TOC
Getting Started
In this series of posts we are explaining how to get started with .NET MAUI and deep dive into the sections that make up a MAUI App while we create a simple demo App.
In our previous post MAUI Deep Dive Pt1 we covered how to install the tooling and create our first app from a template and showed how to run this on Android, iOS and Windows.
We covered HotReload and HotRestart and then we walked through the folders and structure of what makes up a MAUI app.
However if this is all new I suggest you have a read of Part 1 for more info and then come back here to continue the Deep Dive.
Also since the last post in line with the monthly release cadence of the MAUI previews we have moved from Preview 11 to Preview 12 (Early Feb 2022) so if you have downloaded 11 I suggest you update to the latest Visual Studio 22 preview release to get the new bits, it’s the Preview of VS22 you update to get the latest MAUI bits in case your wondering. The team are still aiming for a May 22 GA so I am expecting the next release to be either the last preview or RC1.
Navigation
Before we go too far in building our app we first need to discuss Navigation and how we will be building the navigation stack. As we are going to be building our app primarily for mobile devices we need to think about the interactions the user can make with our app, there is no mouse pointer to use so it’s all touch based.
We have 3 options here we can build and manage the navigation stack ourselves and there are some great docs here to help with this. The 2nd option is to use a 3rd party library which will manage this for you as well as give you many other extras and some of these are Prism and MVVM Light and these are well worth looking into for larger projects.
Lastly there is a great navigation stack system also built into Xamarin.Forms and now .NET MAUI called Shell, and it’s this we will use in our app. The reason I want to show this in use is so that you can see how easy it is to create flyout menus, tab bars etc…
Thinking of your favourite apps on your mobile device and how they all seem to have common forms of navigation, well Shell can help us replicate these and cover navigation for 80+% of the apps we build and for the others we can drop back to one of the other methods mentioned above. Shell also helps with App Structure and Theming as well as helping with Constructor injection and Search Handling so there is a lot to like about it and there is active discussion at present about making Shell the default navigation stack for MAUI apps so may as well start learning it now.
Adding Shell
At present the default template for MAUI is a completely blank app while the team and community decide on the best format for the starting template, so for now we have to manually add it but as you will see it’s a very simple .
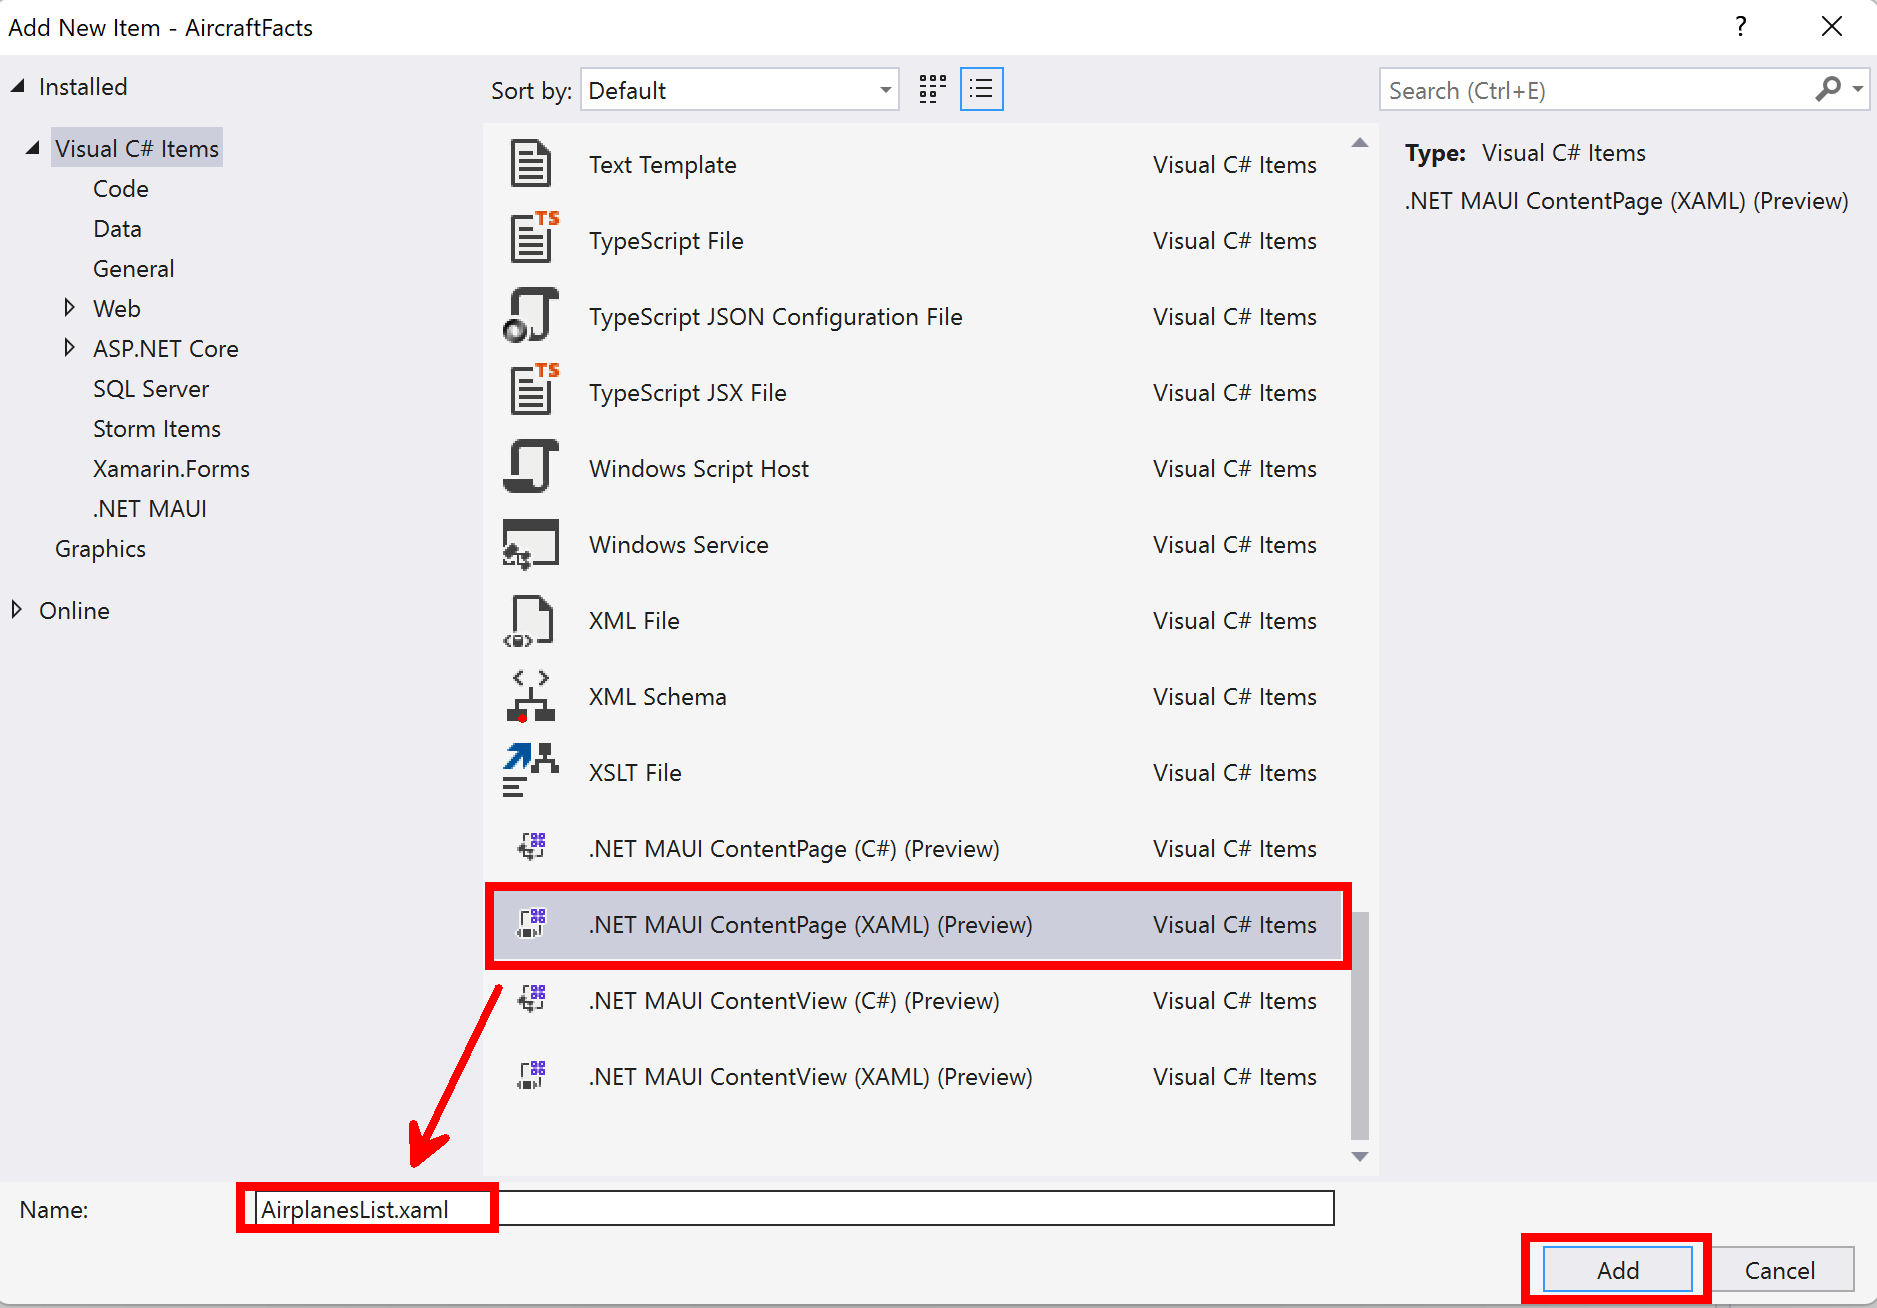
To add Shell to our app we first need to add a new XAML file to our project so right click on the AircraftFacts shared project and select Add->New item.
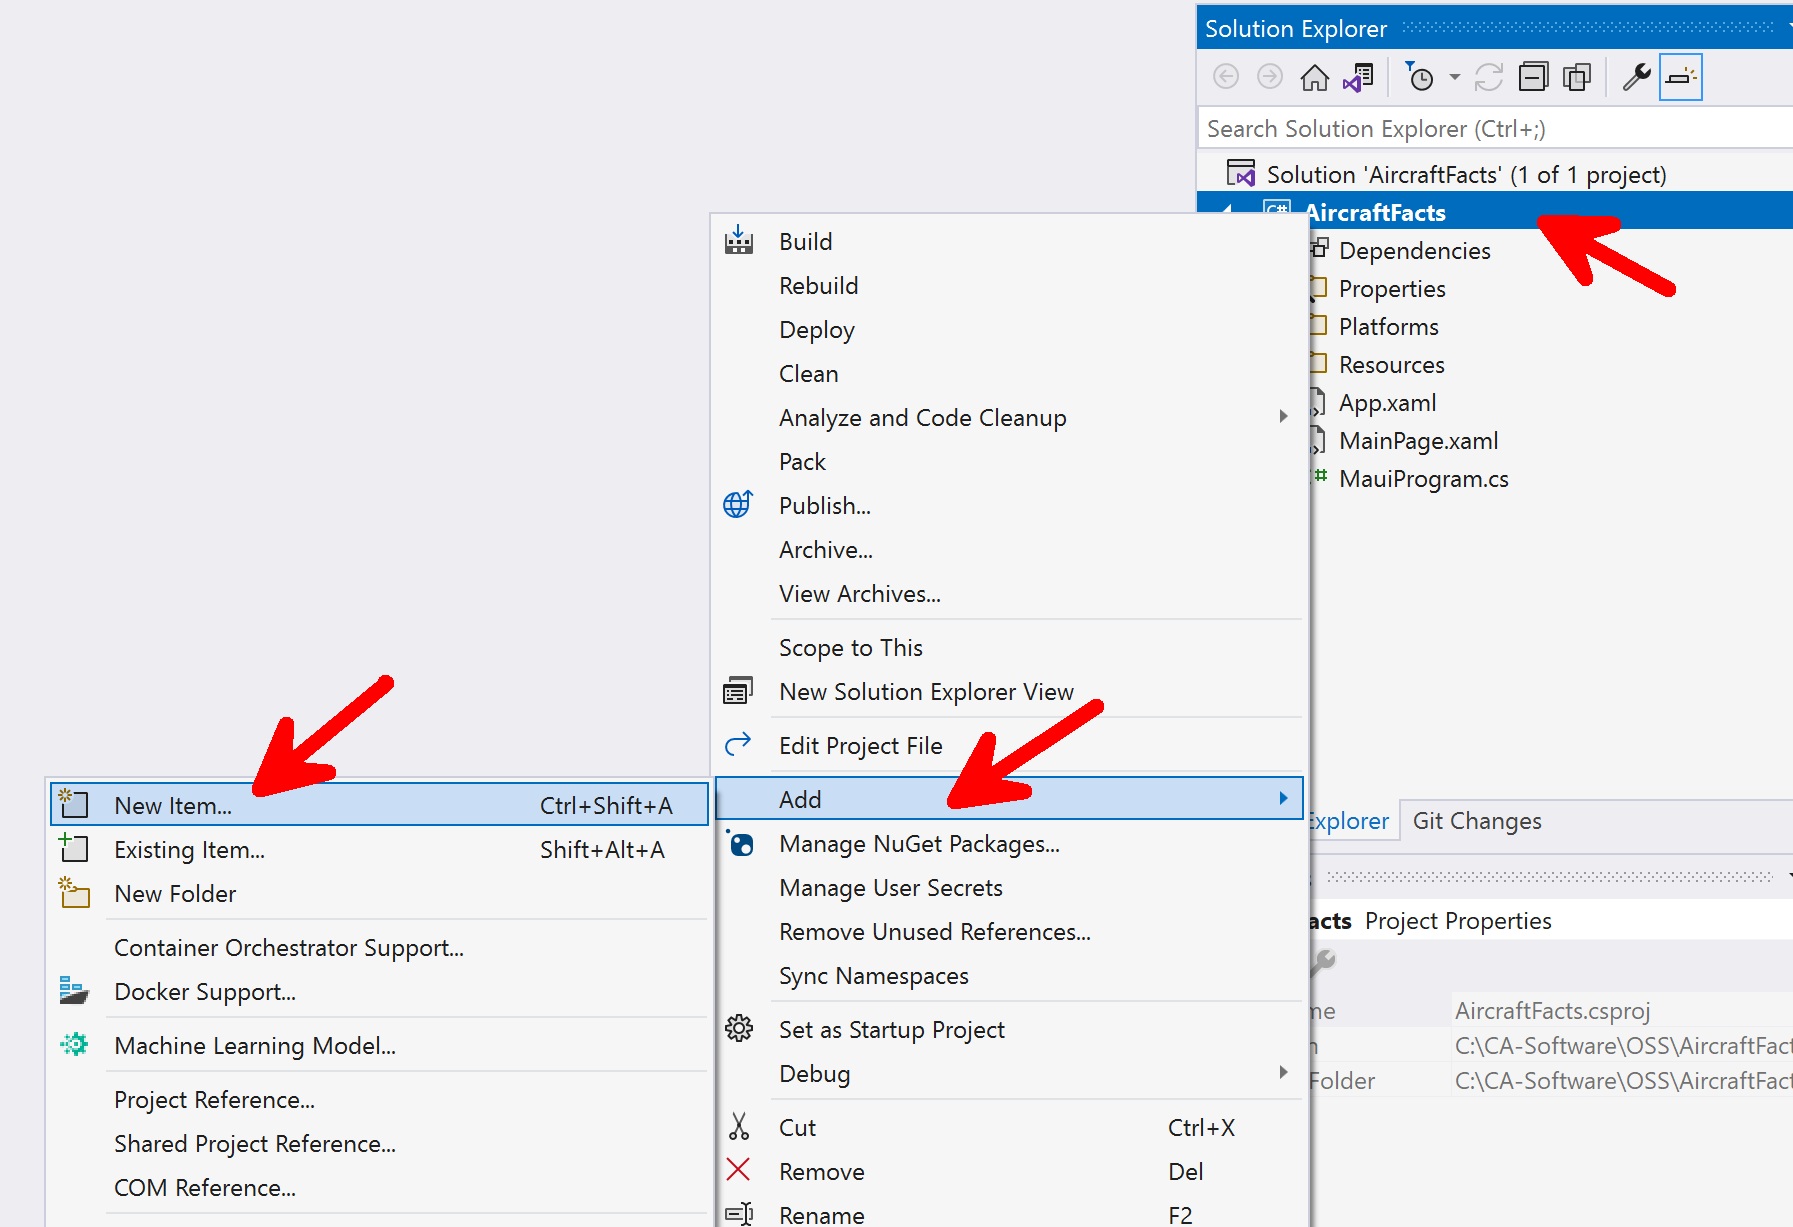
In the template selection list it’s very tempting to select Content page as this is what we want to add, however this will be a Xamarin.Forms content page and not a .NET MAUI content page.
The only different is the schema has changed from
xmlns="http://xamarin.com/schemas/2014/forms"
which you can see comes from xamarin.com to the new MAUI schema which is
xmlns="http://schemas.microsoft.com/dotnet/2021/maui"
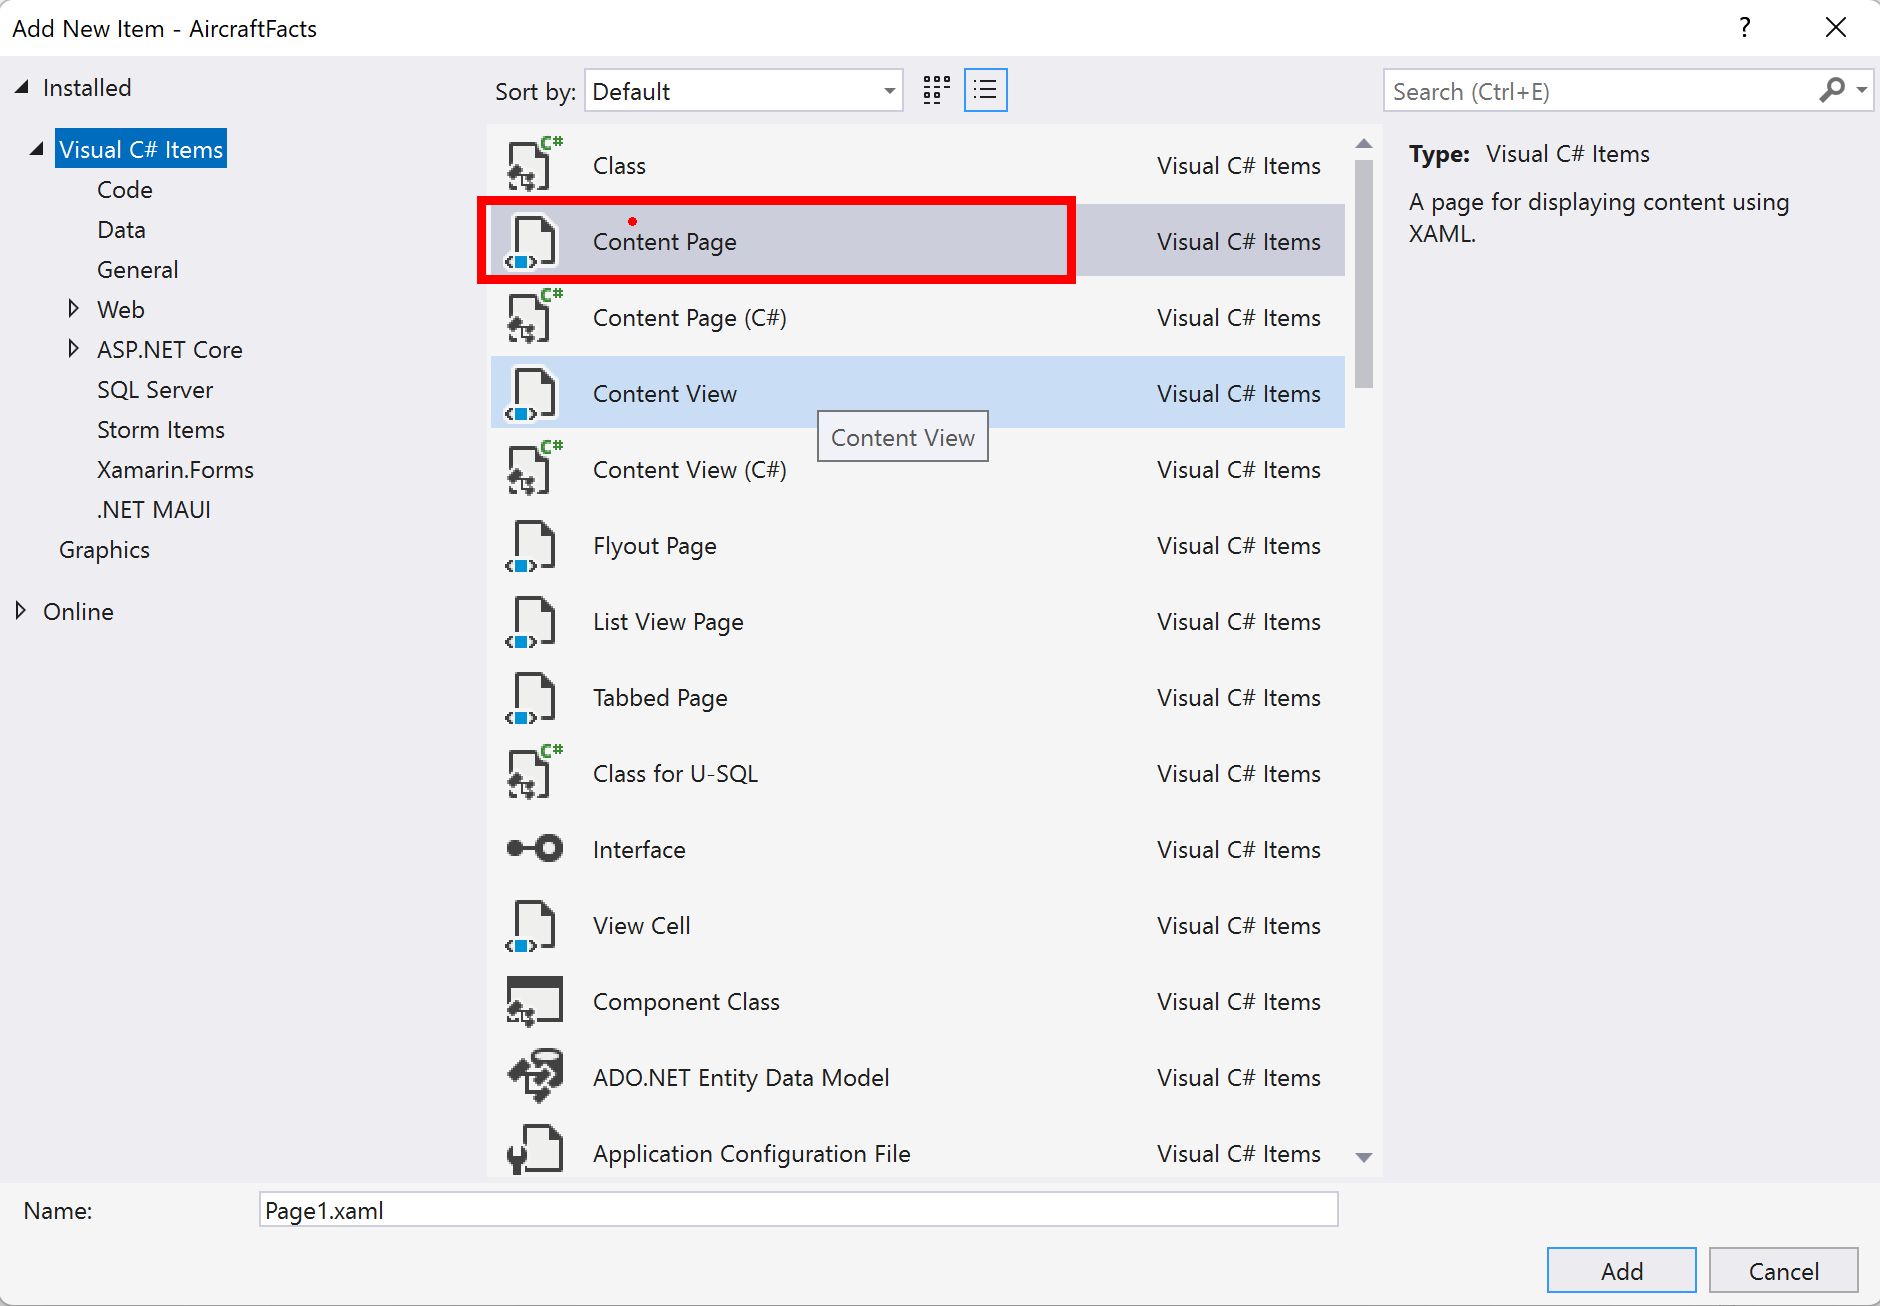
But if we scroll to the bottom (Hopefully when MAUI GA’s it will be at the top!) you will find the MAUI Content Page files to add shown in the blue box, select the .NET MAUI ContentPage (XAML) (Preview) and give it a name which the standard is AppShell.xaml. If you don’t see it in your list then make sure you right clicked on the Shared project and not the Solution (I make this mistake often 😜 )

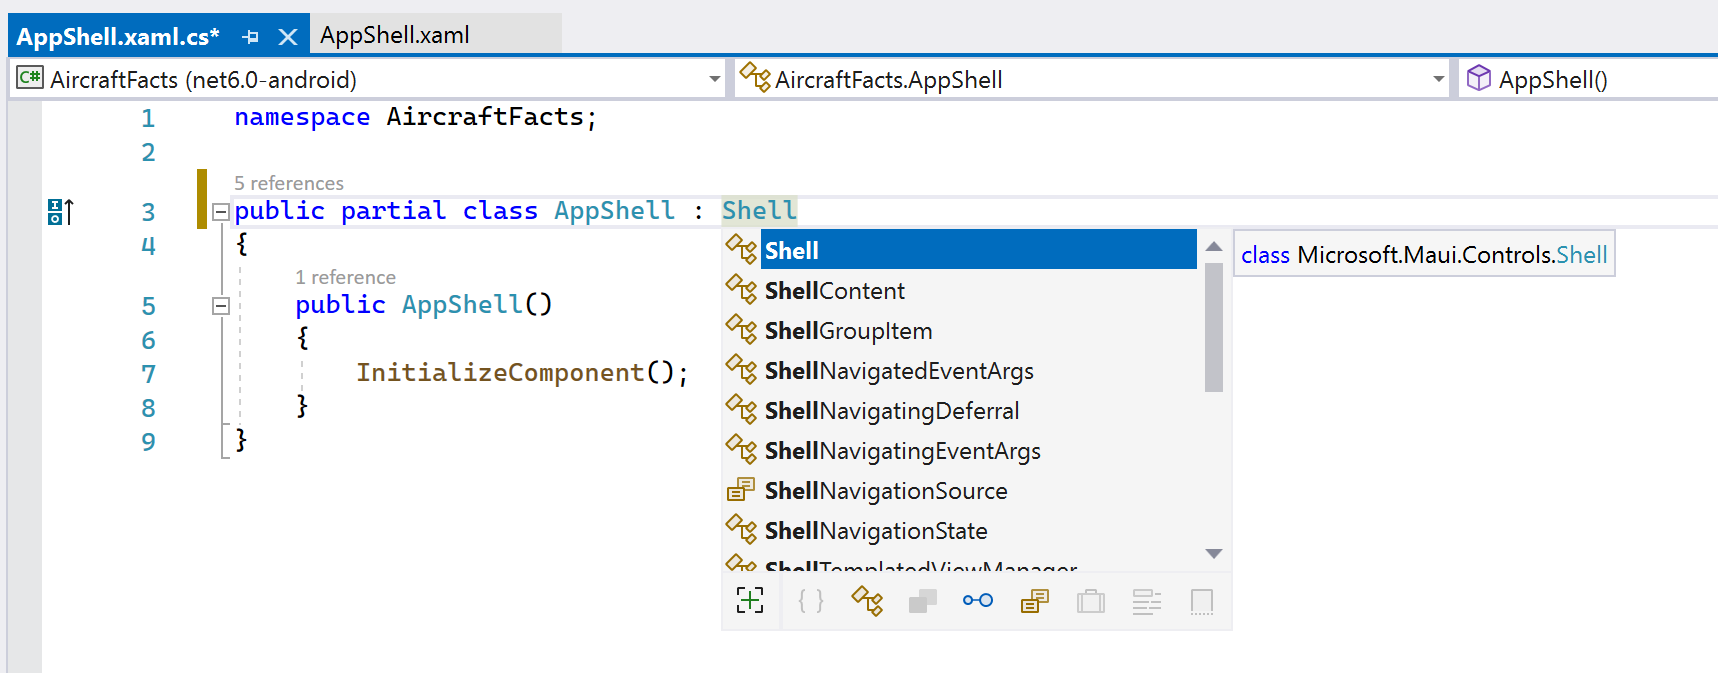
Now we have the file we need to change this templated Content page into a Shell page, so change the root object from ContentPage to Shell and then remove the StackLayout block and while we are there change the Title to Aircraft Facts! so that it looks like this:
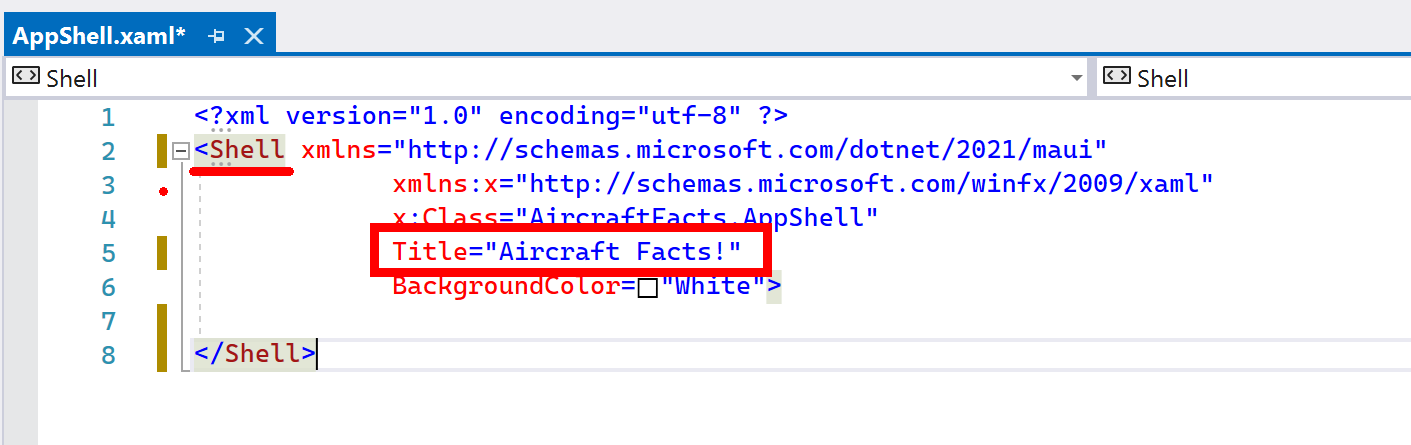
Next we need to go into the code behind file AppShell.xaml.cs and make some changes.
MAUI is using the latest C#10 features of Implicit using’s, so we can see there are no Using Directives in this file. If you have not heard of Implicit Using you can read more about them Here I love Implicit Using’s as they clean up the code files and save the top of all of them having the same 5 or 6 lines of Using statements.
Also notice that the AppShell() has a red squiggly and this is because the page is inheriting from ContentPage and it should be inheriting from Shell as that is what we just set the XAML page to, so a simple change to inherit from Shell fixes this.
Adding our Navigation.
Now we have the Shell file created we need to actually tell the App to use it, rather than just displaying our MainPage as it was before.
First though lets add some structure to our files before it gets messy, on this small app it won’t make a difference but it’s a good practise to get into for those POC’s that turn into large production App’s, now I like to use the MVVM model when building apps so lets add those folders and move our current MainPage into the Views Folder.
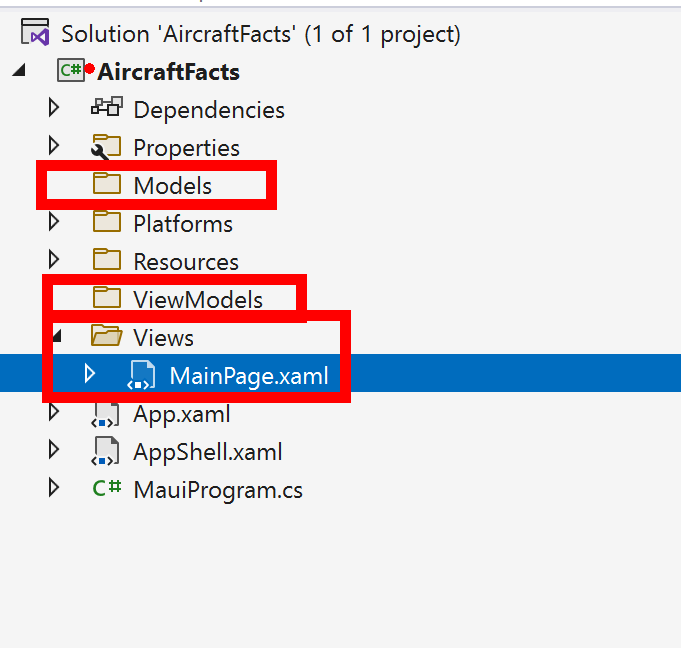
Once you have dragged the MainPage.xaml into the Views folder go into the MainPage.xaml.cs file and edit the Namespace to match it’s new location (This will make sense later!)
namespace AircraftFacts.Views;
Back in our AppShell.Xaml file we can now add our Tabbar and a Tab for the MainPage and also the ShellContent for displaying the page.
<TabBar>
    <Tab Icon="dotnet_bot.png" Title="Main Page">
        <ShellContent ContentTemplate="{DataTemplate local:MainPage}"/>
    </Tab>
</TabBar>
As you can see we have declared a TabBar in our XAML and within this we have added a Tab which has it’s Content, when that Tab is tapped it will navigate to a page containing that content, you will notice that I have given it an Icon of the dotnet_bot which is the same bot image shown on the MainPage as well as a Title that is displayed next to the Icon on the TabBar.
In the ShellContent we declare the ContentTemplate which is our page, for this one I will use the MainPage we already have.
In Shell, the pages are created on Demand which means as they are navigated to, this reduces the App start-up time as not all the pages are loaded into memory as the user may never go to that page it makes sense to do this, so using the DataTemplate mark-up extension we set the ContentTemplate property of each ShellContent object to a ContentPage object.
But what about that local:MainPage part? Well this is the part of the App Navigation were we need to tell Shell how to find the MainPage file, if it was in the root of the project along with the AppShell.Xaml we wouldn’t need it but as we wanted to use the MVVM model we moved the MainPage into the Views folder, this means we need to tell Shell to go look in that folder to find it.
At the top of the AppShell.xaml file where we have our xmlns (xml NameSpace) declarations we want to add our own by adding the following:
xmlns:local="clr-namespace:AircraftFacts.Views"
Title="Aircraft Facts"
Intellisense can help you find the correct namespace but basically we are setting a Namespace of AircraftFact (Our App Name) and the Views folder where our view is living, while there add a Title so that we can name the page we are on which will show at the top.
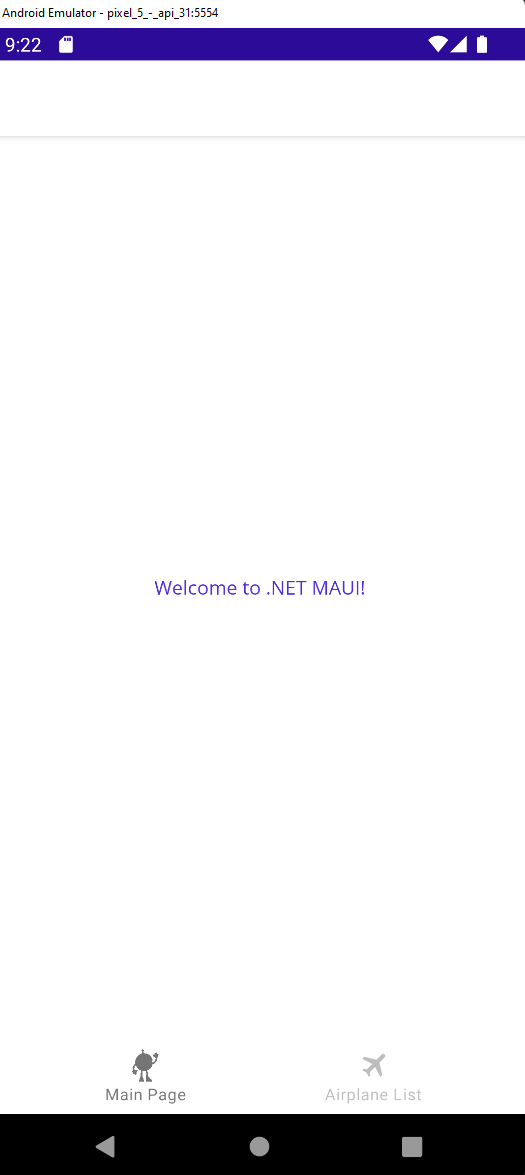
So what does our App look like now? Well if you remember from the 1st blog post we can just select from the Debug/F5 dropdown list the platform we want to use for the Build and Deploy and in my case I am using an Android Pixel 5 emulator.
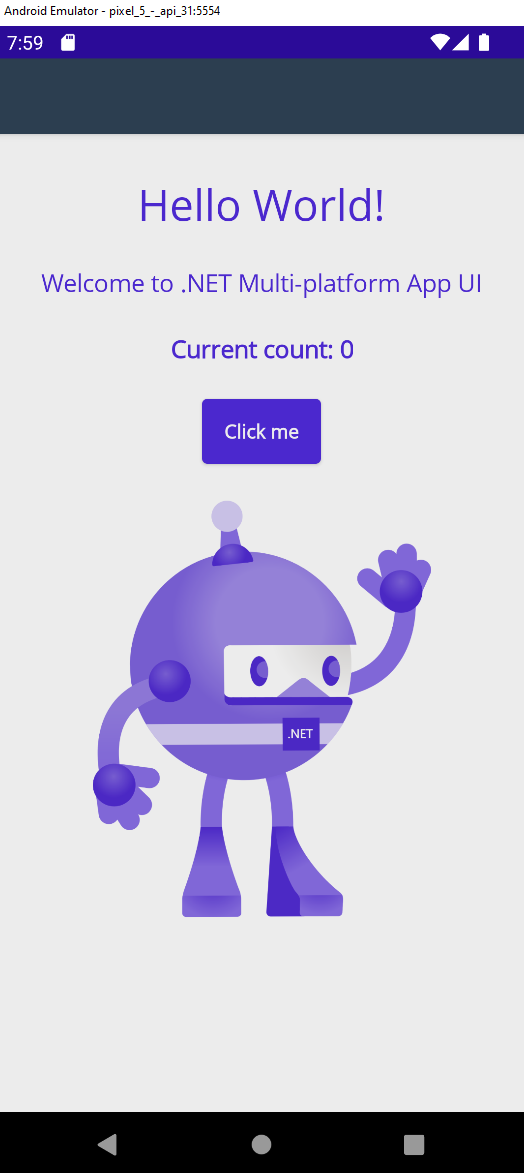
Now that looks great but what happened to our TabBar and Tab? Why do we only have one page and no navigation or icons etc?
Well Shell is clever enough to see that the TabBar only has one tab so won’t display the TabBar for just the one Tab? to show our TabBar we need to add a second Tab.
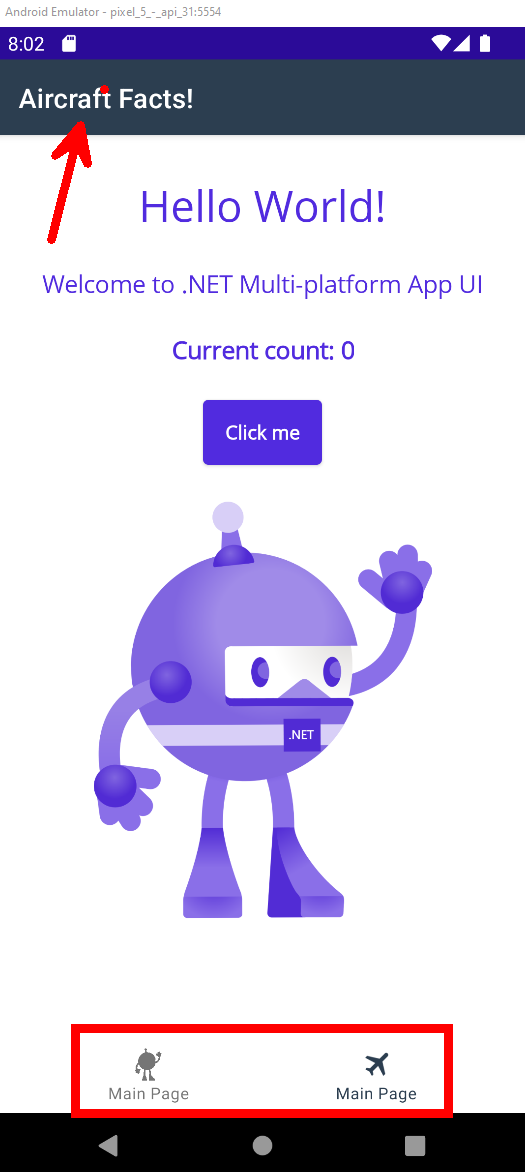
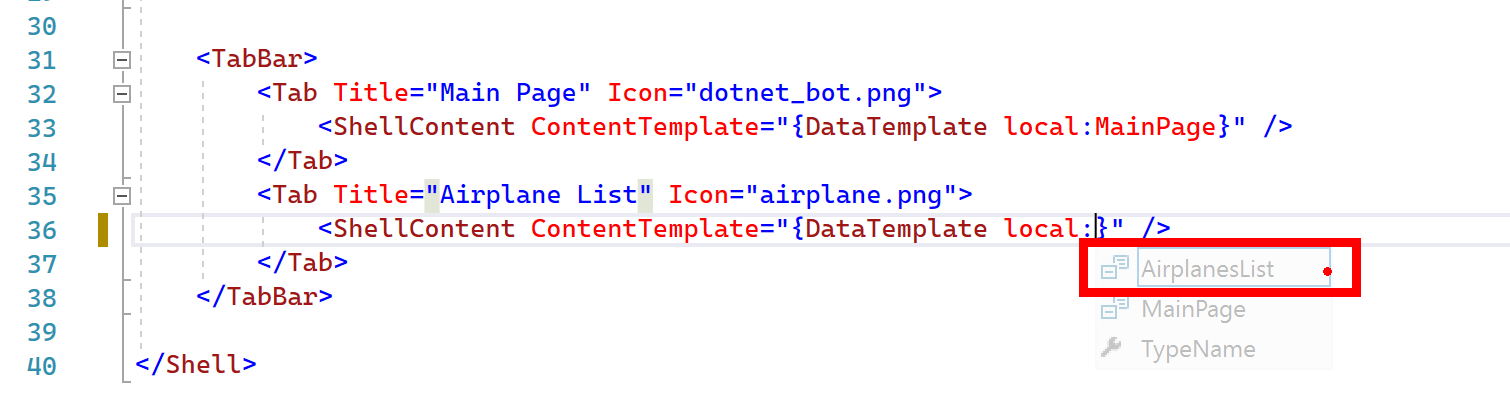
Back in our Shell TabBar add a duplicate Tab for now so making it:
<TabBar>
    <Tab Title="Main Page" Icon="dotnet_bot.png">
        <ShellContent ContentTemplate="{DataTemplate local:MainPage}" />
    </Tab>
    <Tab Icon="airplane.png" Title="Main Page">
        <ShellContent ContentTemplate="{DataTemplate local:MainPage}"/>
    </Tab>
</TabBar>
I have changed the Icon of the 2nd tab to a PNG image of a plane taking off, I got this icon from my favourite Community Icon website https://materialdesignicons.com/ you just need to find the Icon you like and download the SVG file and drop it into your Resources->Images folder. If you remember from the last post we mentioned that these images are taken by MAUI and ResizeatizerNT and converted into the correct size PNG images and hence we ask for the PNG file not the SVG in our code. We will look in the next post in the series how we can do this as part of a Font pack 😉
So what does it look like now?
Adding a 2nd Page
Now we have a TabBar and Navigation sorted lets replace the 2nd page with one we want for our App, I am going to leave the MainPage with the DotNet Bot where it is as I like it.
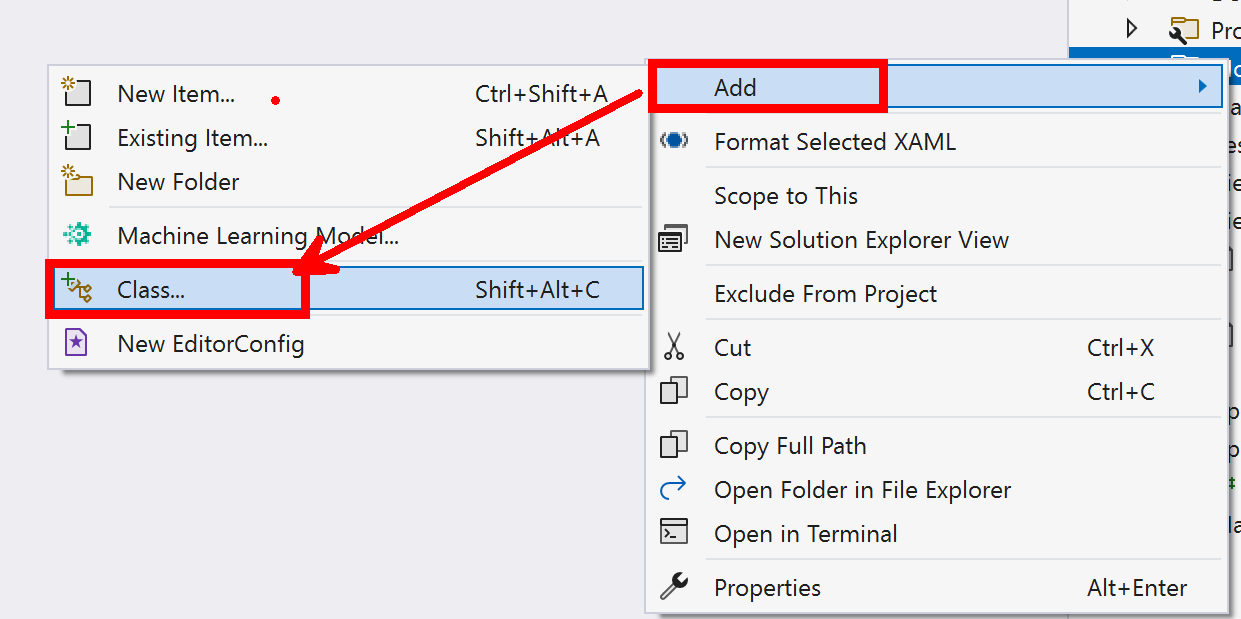
So right-click on the Views folder in the solution explorer and select Add->New to add a MAUI content page like we did before for the AppShell but this time give it a name of AirplanesList.xaml of course if you wanted to write your UI in code you can select the .NET MAUI Content Page (C#) instead, but I prefer my UI layouts in xaml which maybe stems from my years of HTML but you do what you feel best for you and your project.
Now pop into the new files .cs page and change the namespace to add the .Views as it’s in the Views Folder and do the same in the Xaml file for the x:Class
Back in the AppShell.xaml page we can now change the 2nd tab to point to the new AirplaneList page we just added and as we set the namespace correctly as a crosscheck we can see that VS22 intellisense helps us complete the line of code.
Now running the App and navigating to the AirplanesList page we can see the navigation has worked and we are ready to add the amazing new idea we have that will take over the world.
Building a Model.
Obviously this seem like a lot of work to get to this point but if you look at how much you have actually done vs how much reading you will soon realise that it’s a very quick process that once you have done a few times takes seconds to complete.
Now lets add a way to view our Airplanes as that is what we are here for, but first we need to get the data and build a model to display, so lets add a Model to the Models folder and this just needs to be a normal C# class and give it a name of Airplanes.cs
Inside here we want to build our Model and for this I have a handy JSON file I use in my demo’s when giving talks and this is hosted on my personal blog at https://www.cliffordagius.co.uk/data/Airplanes.json if you take a look this is a list of Airplanes with various facts about them. If you open the link in your browser and then select and copy one of the objects in the JSON file.
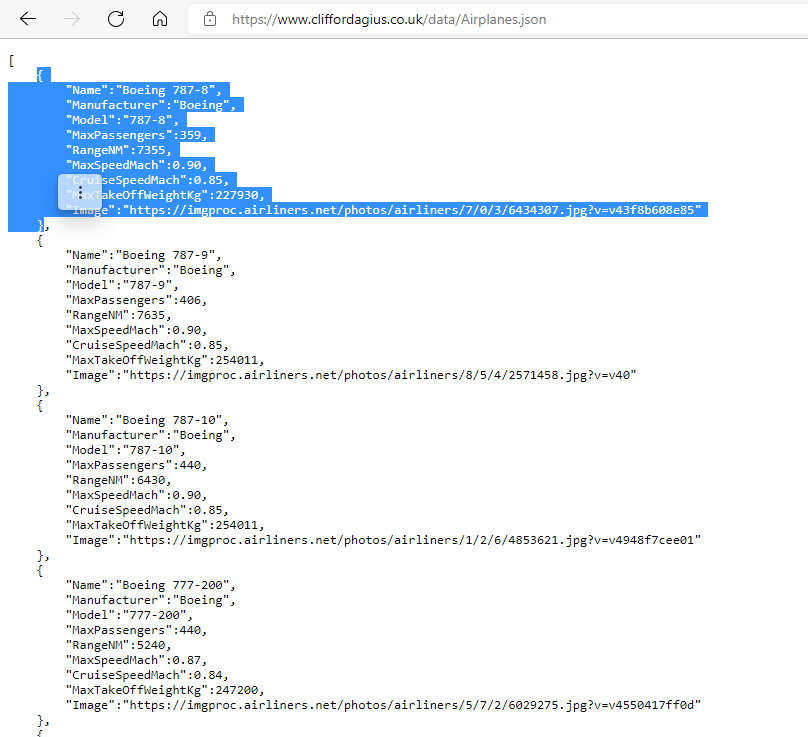
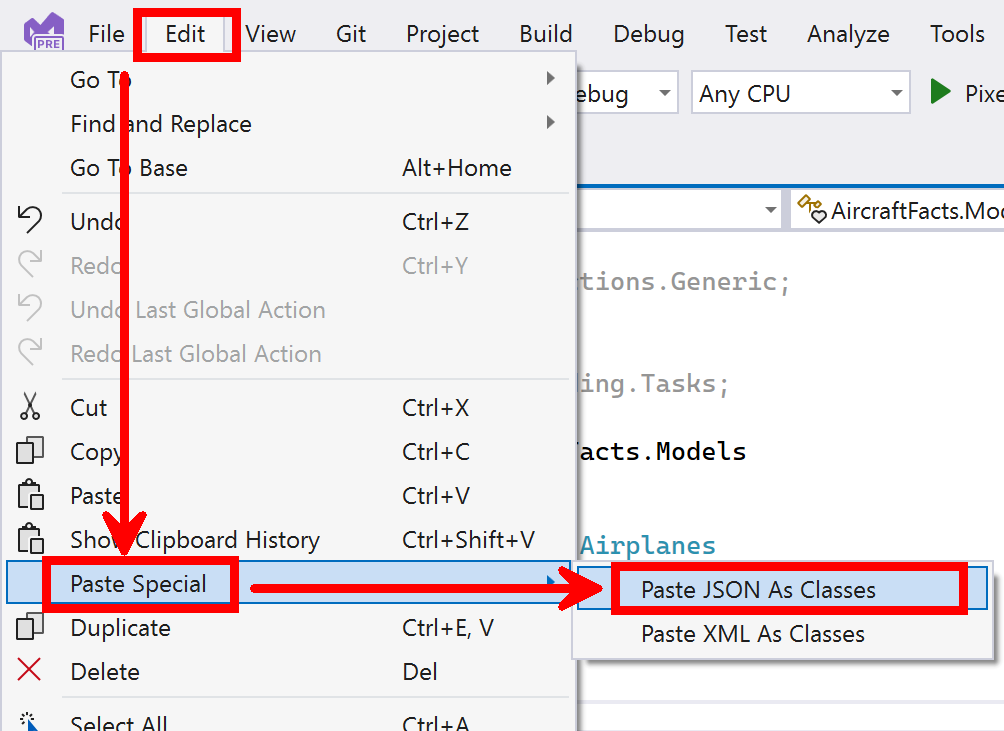
In the Airplanes.cs file we just created delete the existing class and with the power of Visual Studio click Edit->Paste Special->Paste JSON As Classes and as if by magic it will Auto Create the model from the data object you have in your paste bin, now isn’t that cool, no more manually creating Object Models and introducing human errors.
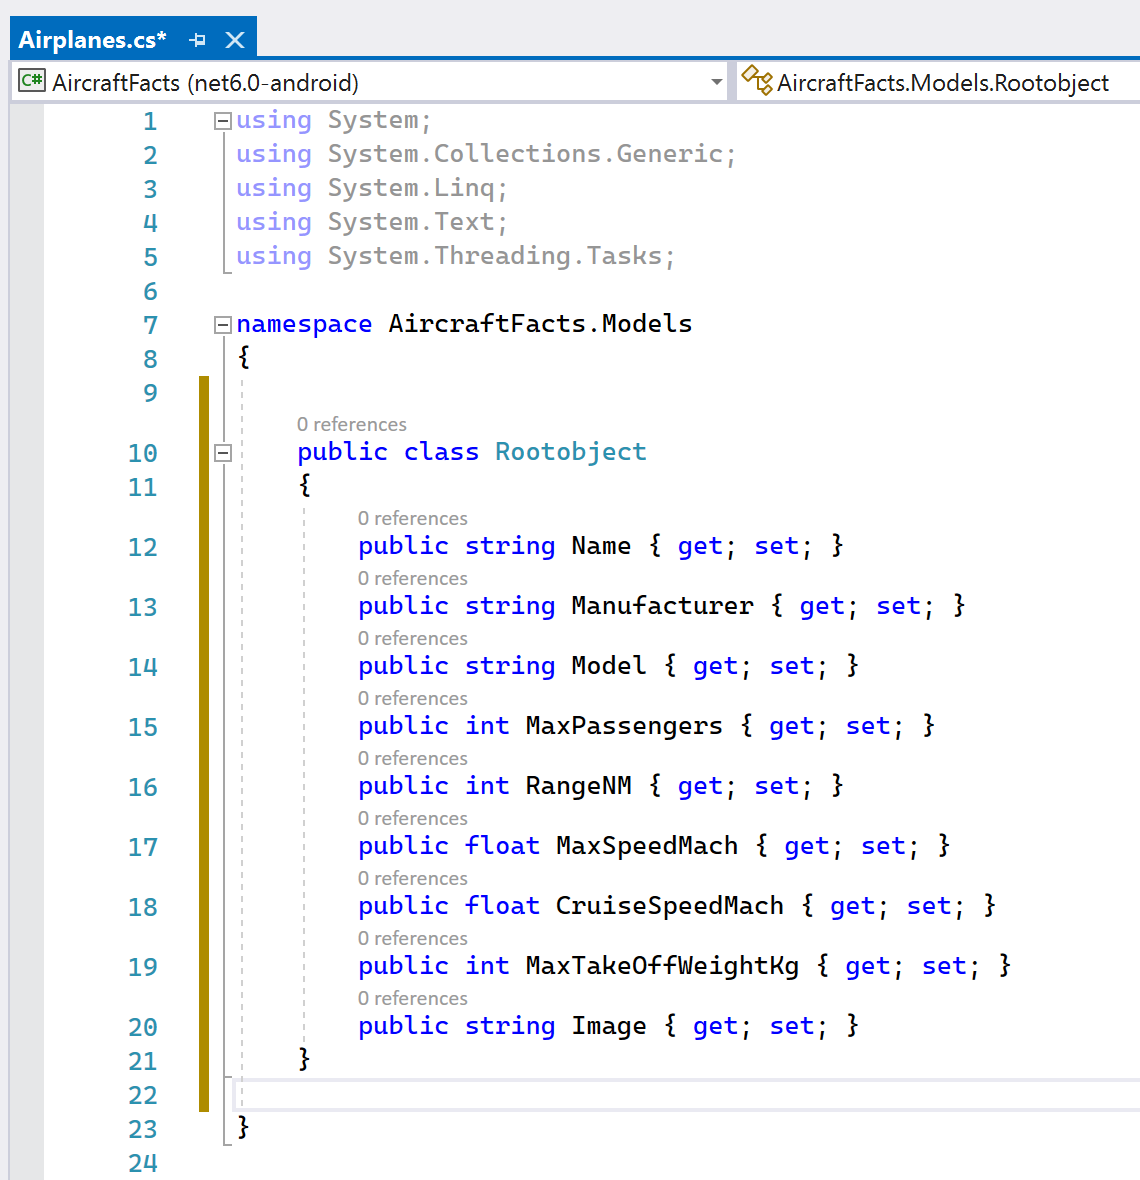
All we need to do now is tidy up the class name from RootObject to something a little more meaningful so lets use Airplane, you will also see that the using statements are all grey as we are in C#10 land so they can be deleted as well and don’t forget to save.
Building a ViewModel
Right click the ViewModels folder in the solution explorer and add a new class giving it a name of AirplanesListViewModel.cs it is common practise to name the ViewModel after the page it will be linked with hence the longer name I have used.
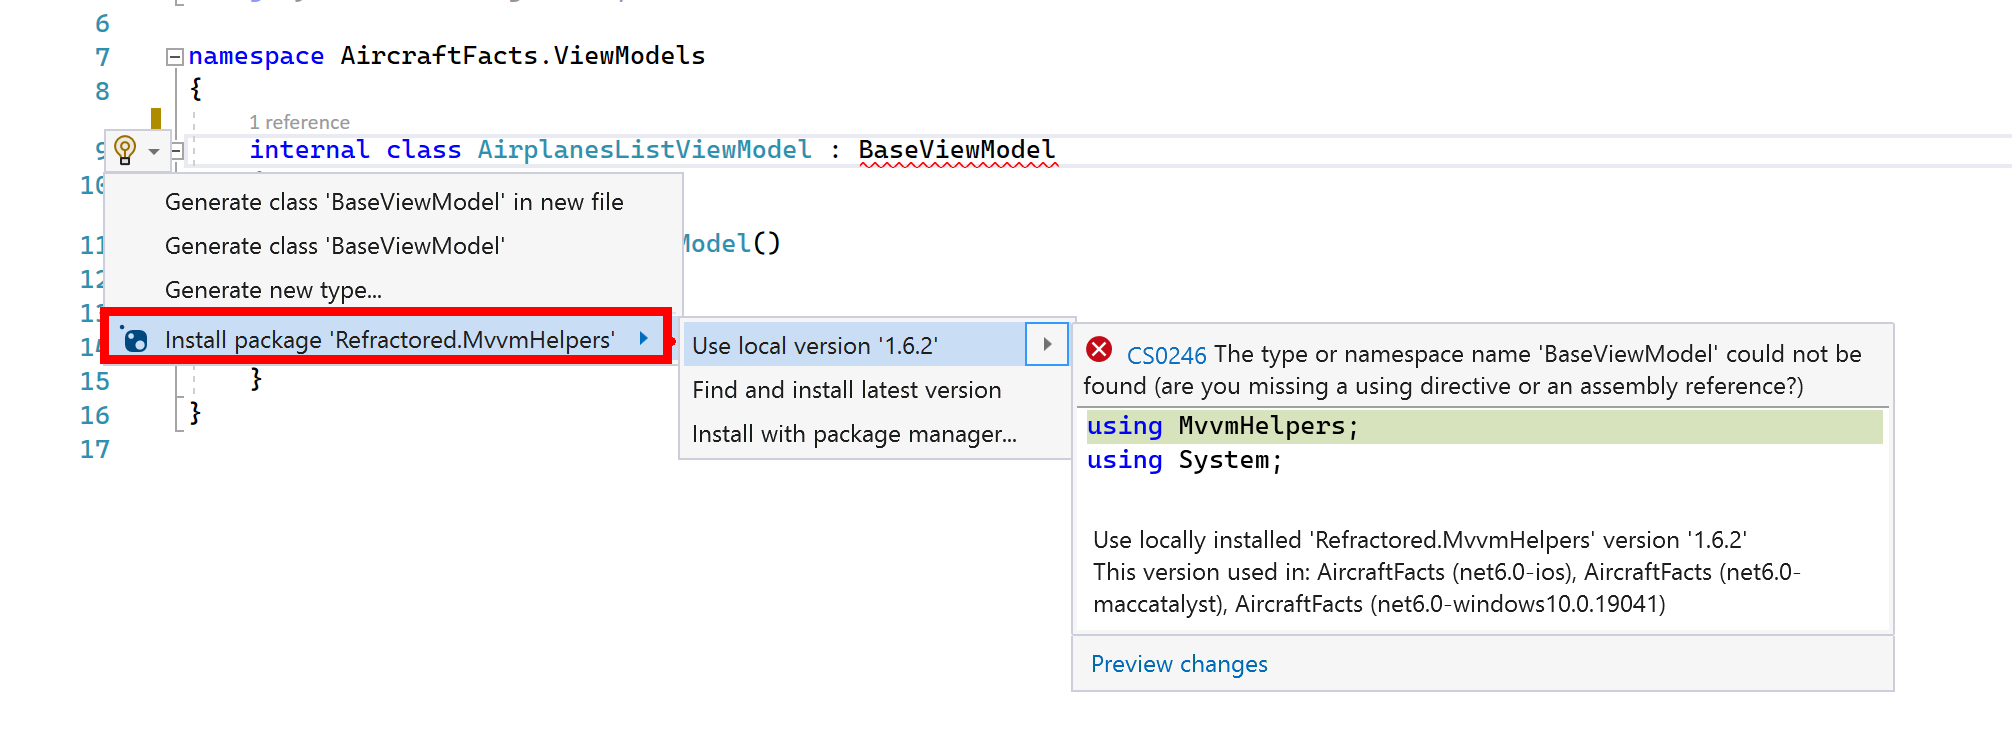
To save us adding INotifyPropertyChanged code all over our ViewModels and property setters etc it common practise to add a BaseViewModel that other ViewModels inherit from and this handles all the boilerplate code for us.
The good news is that James Montemagno one of the PM’s on the Xamarin/MAUI team has done the hard work for us, so if you have the ViewModel inherit from BaseViewModel you will see the red squiggly. With the cursor on this press CTRL + . to open the context menu and at the bottom select Install Package MVVMHelpers.
Now we need to add some code, I’m not going to explain it all as there are comments in the code but reach out on twitter/comments if you need help with understanding this.
using AircraftFacts.Models;
using MvvmHelpers;
using Newtonsoft.Json;
using System.Collections.ObjectModel;
using System.Diagnostics;

namespace AircraftFacts.ViewModels
{
    internal class AirplanesListViewModel : BaseViewModel
    {
        public ObservableCollection<Airplane> Airplanes { get; set; } = new ObservableCollection<Airplane>();
        public Command GetAirplanesCommand { get; set; }

        public AirplanesListViewModel()
        {
            // Set the Page Title...
            Title = "Airplanes";
            // Initialise the command to call the Async Method...
            GetAirplanesCommand = new Command(async () => await GetAirplanesAsync());
        }

        async Task GetAirplanesAsync()
        {
            // Check if Busy and return early...
            if(IsBusy)
                return;

            try
            {
                // Set an IsBusy so that we can display an Activity Indicator while the data loads...
                IsBusy = true;

                // Grab the data from the web with a bog standard HTTPClient call...
                var client = new HttpClient();
                var json = await client.GetStringAsync("https://www.cliffordagius.co.uk/data/Airplanes.json");
                var airplanes = JsonConvert.DeserializeObject<List<Airplane>>(json);

                //  Clear the Collection to make sure we are not adding to a full list...
                Airplanes.Clear();

                //  Add them all to the ObserableCollection.
                foreach (var airplane in airplanes)
                {
                    Airplanes.Add(airplane);
                }
            }
            catch (Exception ex)
            {
                // A Bit of debug info and display an alert for the user...
                Debug.WriteLine($"Unable to get Airplanes data: {ex.Message}");
                await Application.Current.MainPage.DisplayAlert("Error!", ex.Message, "OK");
            }
            finally
            {
                // Set it to false to hide the Activity Indicator...
                IsBusy = false;
            }
        }
    }
}
Building the View
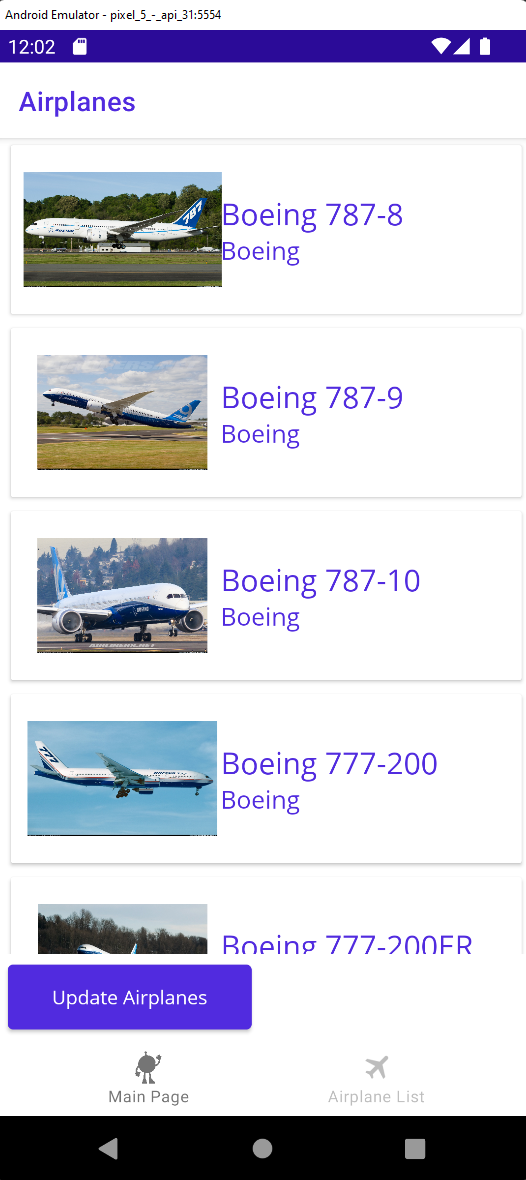
Now we have the Model and ViewModel we need to update the View to use this new data and make our App work, so back in the AirplanesList.xaml let’s build the UI for our App, again I have put comments in the XAML code that I hope explain how it works but the important parts to pull out are:
Line 6 - Adding our ViewModel folder as a namespace.
Line 7 - we are binding the Title Text to the property in our ViewModel
Line 25 - Once inside the DataTemplate of the CollectionView any bindings that you use are then to properties of the current item in that collection, so in our case we are binding the CollectionView ItemSource to the ObservableCollection of Airplanes, and then inside the DataTemplate we can bind to the properties of Name/Manufacturer etc for that item in the collection that is on display.
<?xml version="1.0" encoding="utf-8" ?>
<ContentPage
    x:Class="AircraftFacts.Views.AirplanesList"
    xmlns="http://schemas.microsoft.com/dotnet/2021/maui"
    xmlns:x="http://schemas.microsoft.com/winfx/2009/xaml"
    xmlns:vm="clr-namespace:AircraftFacts.ViewModels"
    Title="{Binding Title}"
    BackgroundColor="White"
    Shell.TitleColor="{StaticResource PrimaryColor}">

    <!--  Add a Binding Context to our ViewModel  -->
    <ContentPage.BindingContext>
        <vm:AirplanesListViewModel />
    </ContentPage.BindingContext>

    <!--  Grid that will layout the page..  -->
    <Grid
        ColumnDefinitions="*,*"
        ColumnSpacing="5"
        RowDefinitions="*,Auto"
        RowSpacing="0">
        <!--  This is the main control that will display the Data...  -->
        <CollectionView
            Grid.ColumnSpan="2"
            ItemsSource="{Binding Airplanes}"
            SelectionMode="Single">
            <CollectionView.ItemTemplate>
                <DataTemplate>
                    <Grid Padding="10,5">
                        <Frame HeightRequest="125" Style="{StaticResource CardView}">
                            <Grid Padding="0" ColumnDefinitions="125,*">
                                <Image Aspect="AspectFill" Source="{Binding Image}" />
                                <StackLayout
                                    Grid.Column="1"
                                    Padding="10"
                                    VerticalOptions="Center">
                                    <Label FontSize="Large" Text="{Binding Name}" />
                                    <Label FontSize="Medium" Text="{Binding Manufacturer}" />
                                </StackLayout>
                            </Grid>
                        </Frame>
                    </Grid>
                </DataTemplate>
            </CollectionView.ItemTemplate>
        </CollectionView>

        <!--  Button that binds to the Command to Get the List of Airplanes...  -->
        <Button
            Grid.Row="1"
            Grid.Column="0"
            Margin="8"
            Command="{Binding GetAirplanesCommand}"
            IsEnabled="{Binding IsNotBusy}"
            Text="Update Airplanes" />

        <!--  This Activity indicator will show center of the screen while the IsBusy flag is set...  -->
        <ActivityIndicator
            Grid.RowSpan="2"
            Grid.ColumnSpan="2"
            HorizontalOptions="FillAndExpand"
            IsRunning="{Binding IsBusy}"
            IsVisible="{Binding IsBusy}"
            VerticalOptions="CenterAndExpand" />
    </Grid>
</ContentPage>
And our App when we Navigate to the Airplane List page and tap the Update Airplanes button will call out to the web collect the data and fill in the page including images that as I am sure you noticed are URI’s to images on one of my favourite sites Airliners.Net now how easy was that and best of all this will run on Android, iOS, Windows and MacOS with no changes.
Conclusion
There is a lot to cover in this deep dive series and this post I hope you have seen how easy it is with .NET MAUI to build out an App, yes it’s a simple App but you can see how it can be built up into a fully featured app.
In the next post we will show some Styling and deeper navigation before we cover some smaller items in the csproj file you might find interesting.
I pushed the code to GitHub and you can find it here https://github.com/CliffAgius/.NET-MAUI—Aircraft-Facts-App
This is the second blog on the deep dive into MAUI and if there is anything specific you want to be covered or you wish to comment then please do reach out on twitter @CliffordAgius or contact the Ballard Chalmers team.
Happy coding.