TOC
Getting Started
In this series of posts we will explain how to get started with DotNET Maui and deep dive into the sections that make up a MAUI App while we create a simple demo App.
In our previous post What is .NET MAUI we covered what MAUI is but a brief recap is that MAUI or ‘Multi-Platform App UI’ to give it’s full name is the evolution of Xamarin Forms. It is now (Or will be when it GA’s in Q2 2022) be baked into DotNET and will be the way we as developers build Mobile cross-platform applications going forward when using DotNET and C#/F#.
However for more info read the blog linked above and then come back here to start the Deep Dive.
Installing the Tooling.
Before we start diving into the code we need to install some tools so that we can build our demo App and at the time of writing (December 2021) MAUI is at Preview 11 which means it couldn’t simpler to install as gone are the days of using PowerShell scripts to get the latest bits.
You will need Visual Studio 22 17.1 Preview 1 or later and don’t worry the FREE community edition is more than enough.
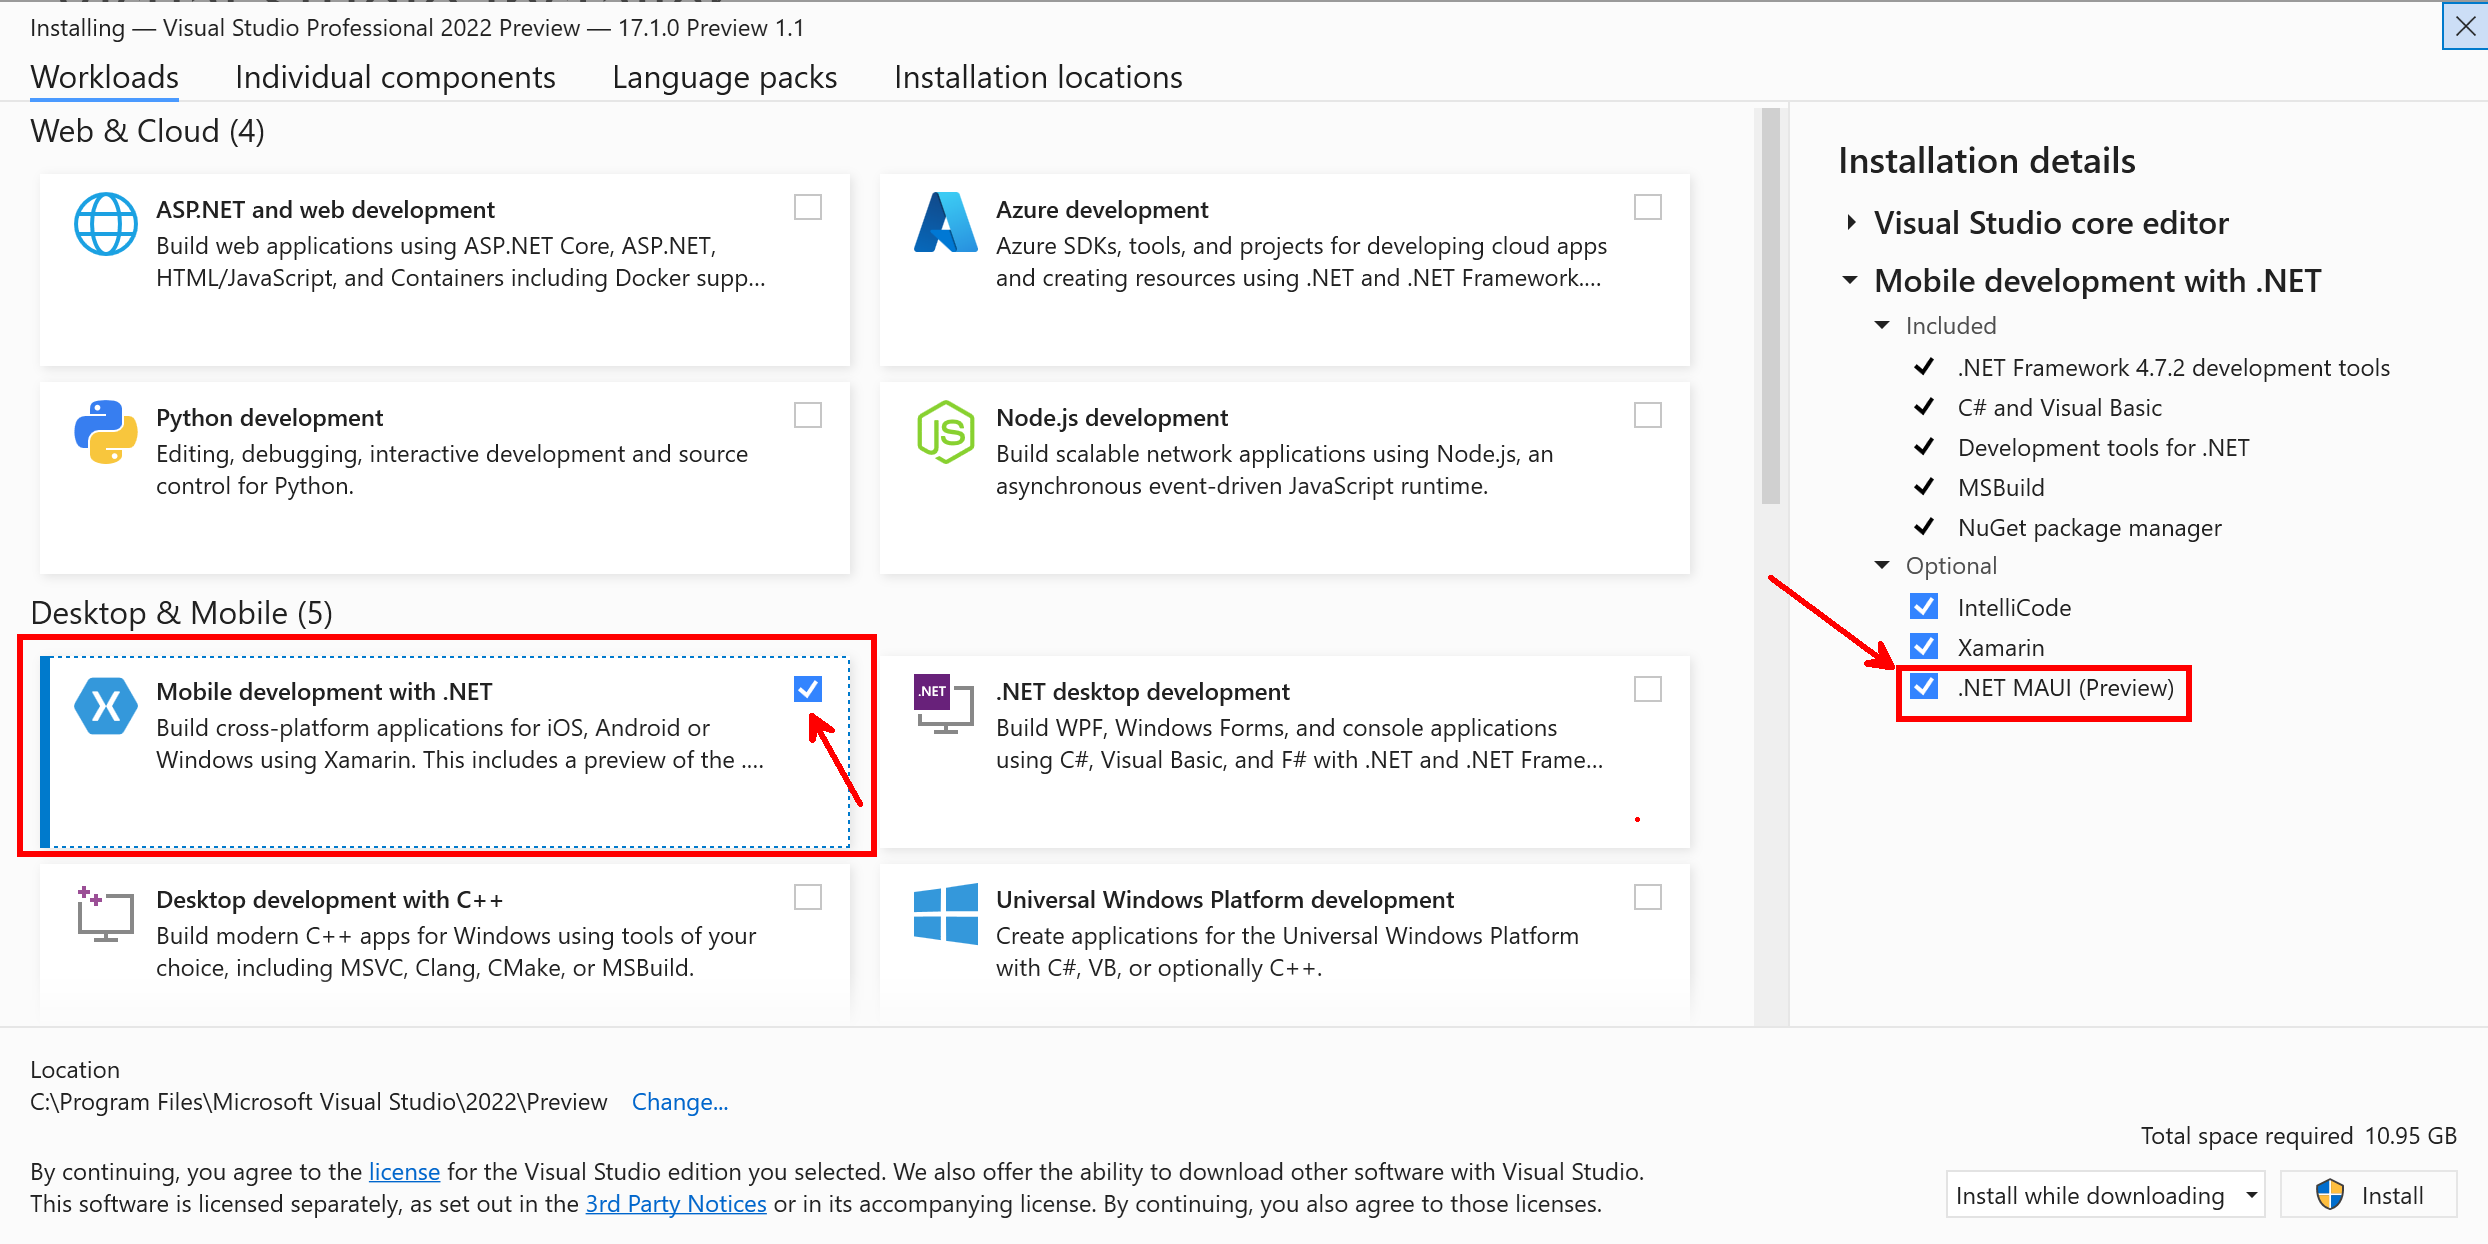
Once it’s installed you will be presented with the workload selector where you can pick which workloads you want to install and for us to be able to develop for MAUI we need to select the ‘Mobile Development with .NET’ and on the right panel ensure that ‘.NET MAUI (preview)’ is selected.
While that downloads and installs go grab a coffee and that biscuit you promised yourself you wouldn’t eat, don’t worry we won’t judge you and will wait for you to return… (It’s a large download and takes a good 10-15 minutes…)
What will we build?
Now we have the tooling installed lets discuss what we will be building as all good projects start with a little planning before diving into the code.
As someone who is keen about Aviation and likes to know the facts and figures of the various aircraft seen at an airport I though we could build an app that allows you to select an aircraft from a List. Once selected it opens a page to show some images and the facts about that aircraft and then we can note where we have seen the aircraft as all good geeks like to collect data.
This will be a very simple app but the idea here is not to create a fully featured app but to show how easy it is to start on the journey of becoming a Mobile developer. We will build this app so that it runs on Android, iOS and Windows desktop just to show that the same code base can be used on Mobile and desktop platforms and I’ll be using a Windows 11 laptop with an Android Emulator and iPhone physical device and nothing else so no need for a Mac just my laptop and my mobile phone and free tooling.
Let’s start the project.
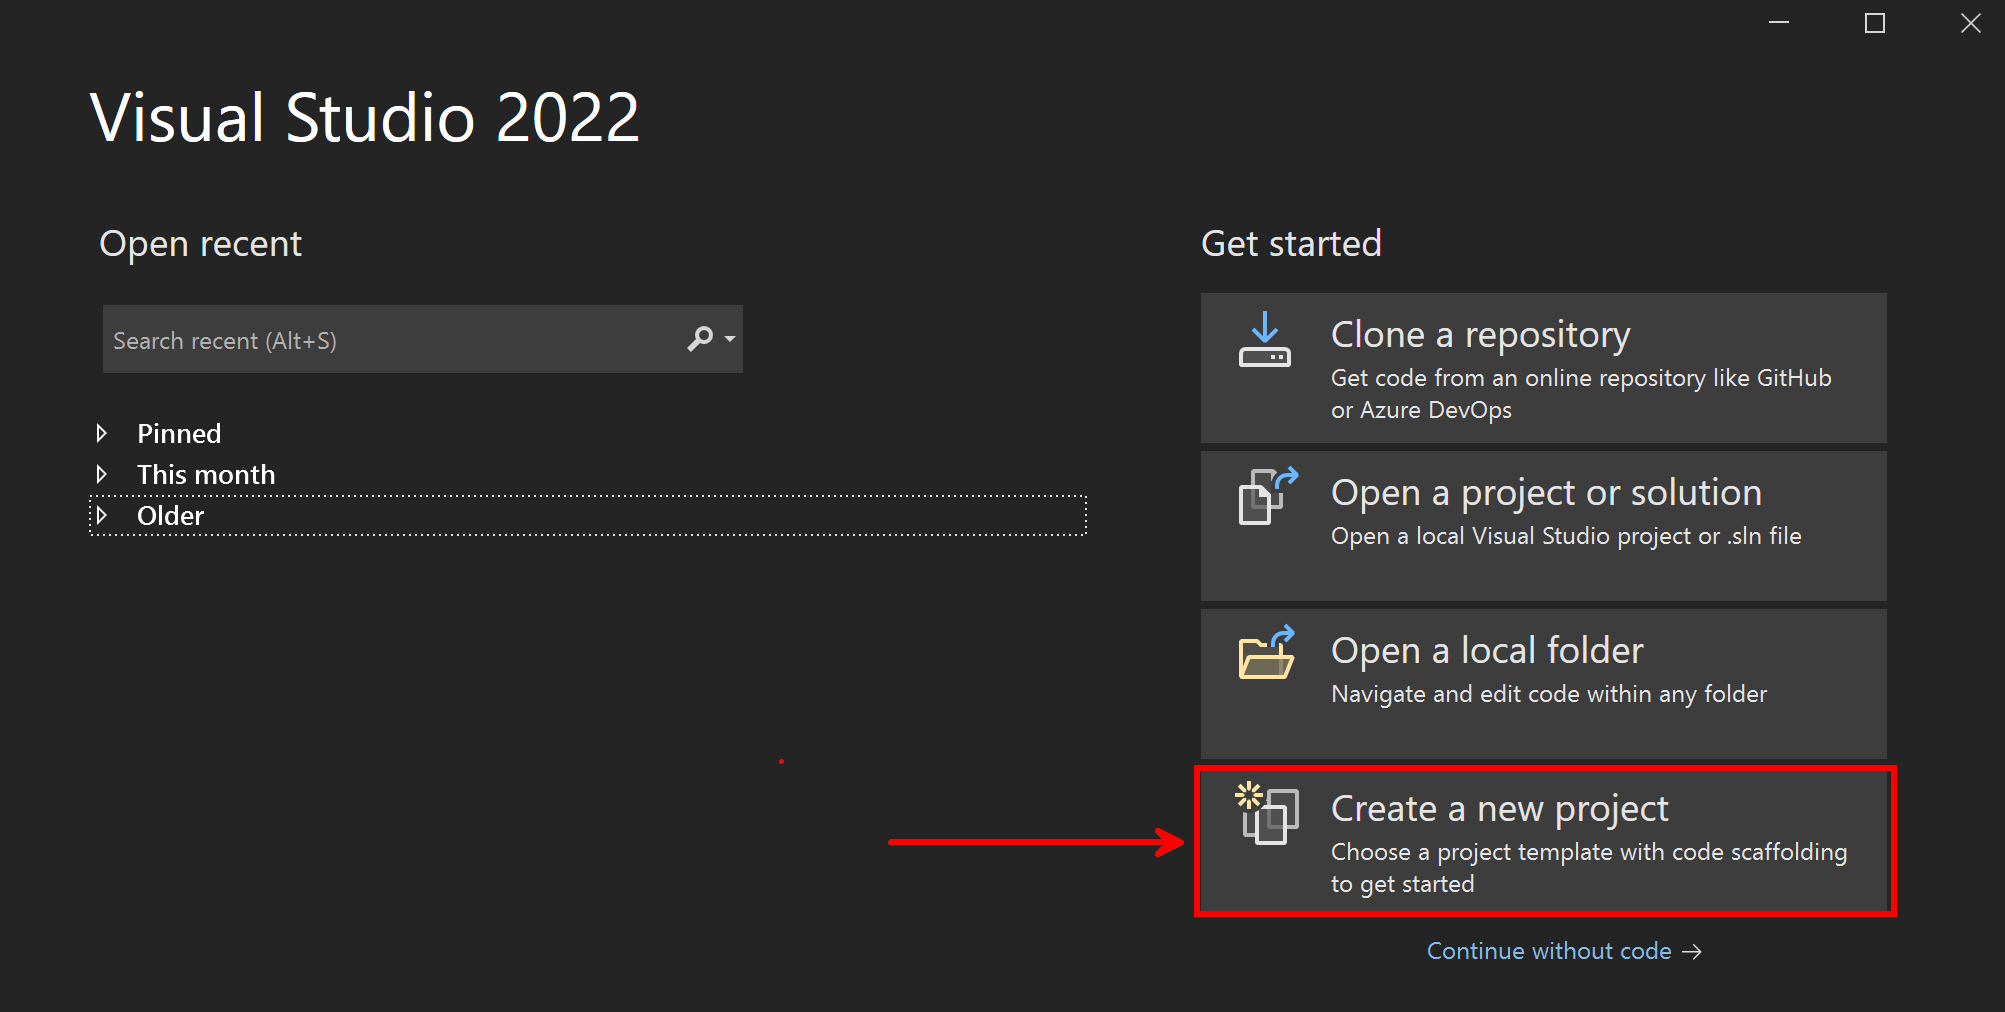
Open up the newly installed Visual Studio preview edition and select ‘Create a new Project’
In the search box at the top type ‘MAUI’ and you will be shown the MAUI Templates, for us we need to select the ‘.NET MAUI App (Preview)’ and click next.

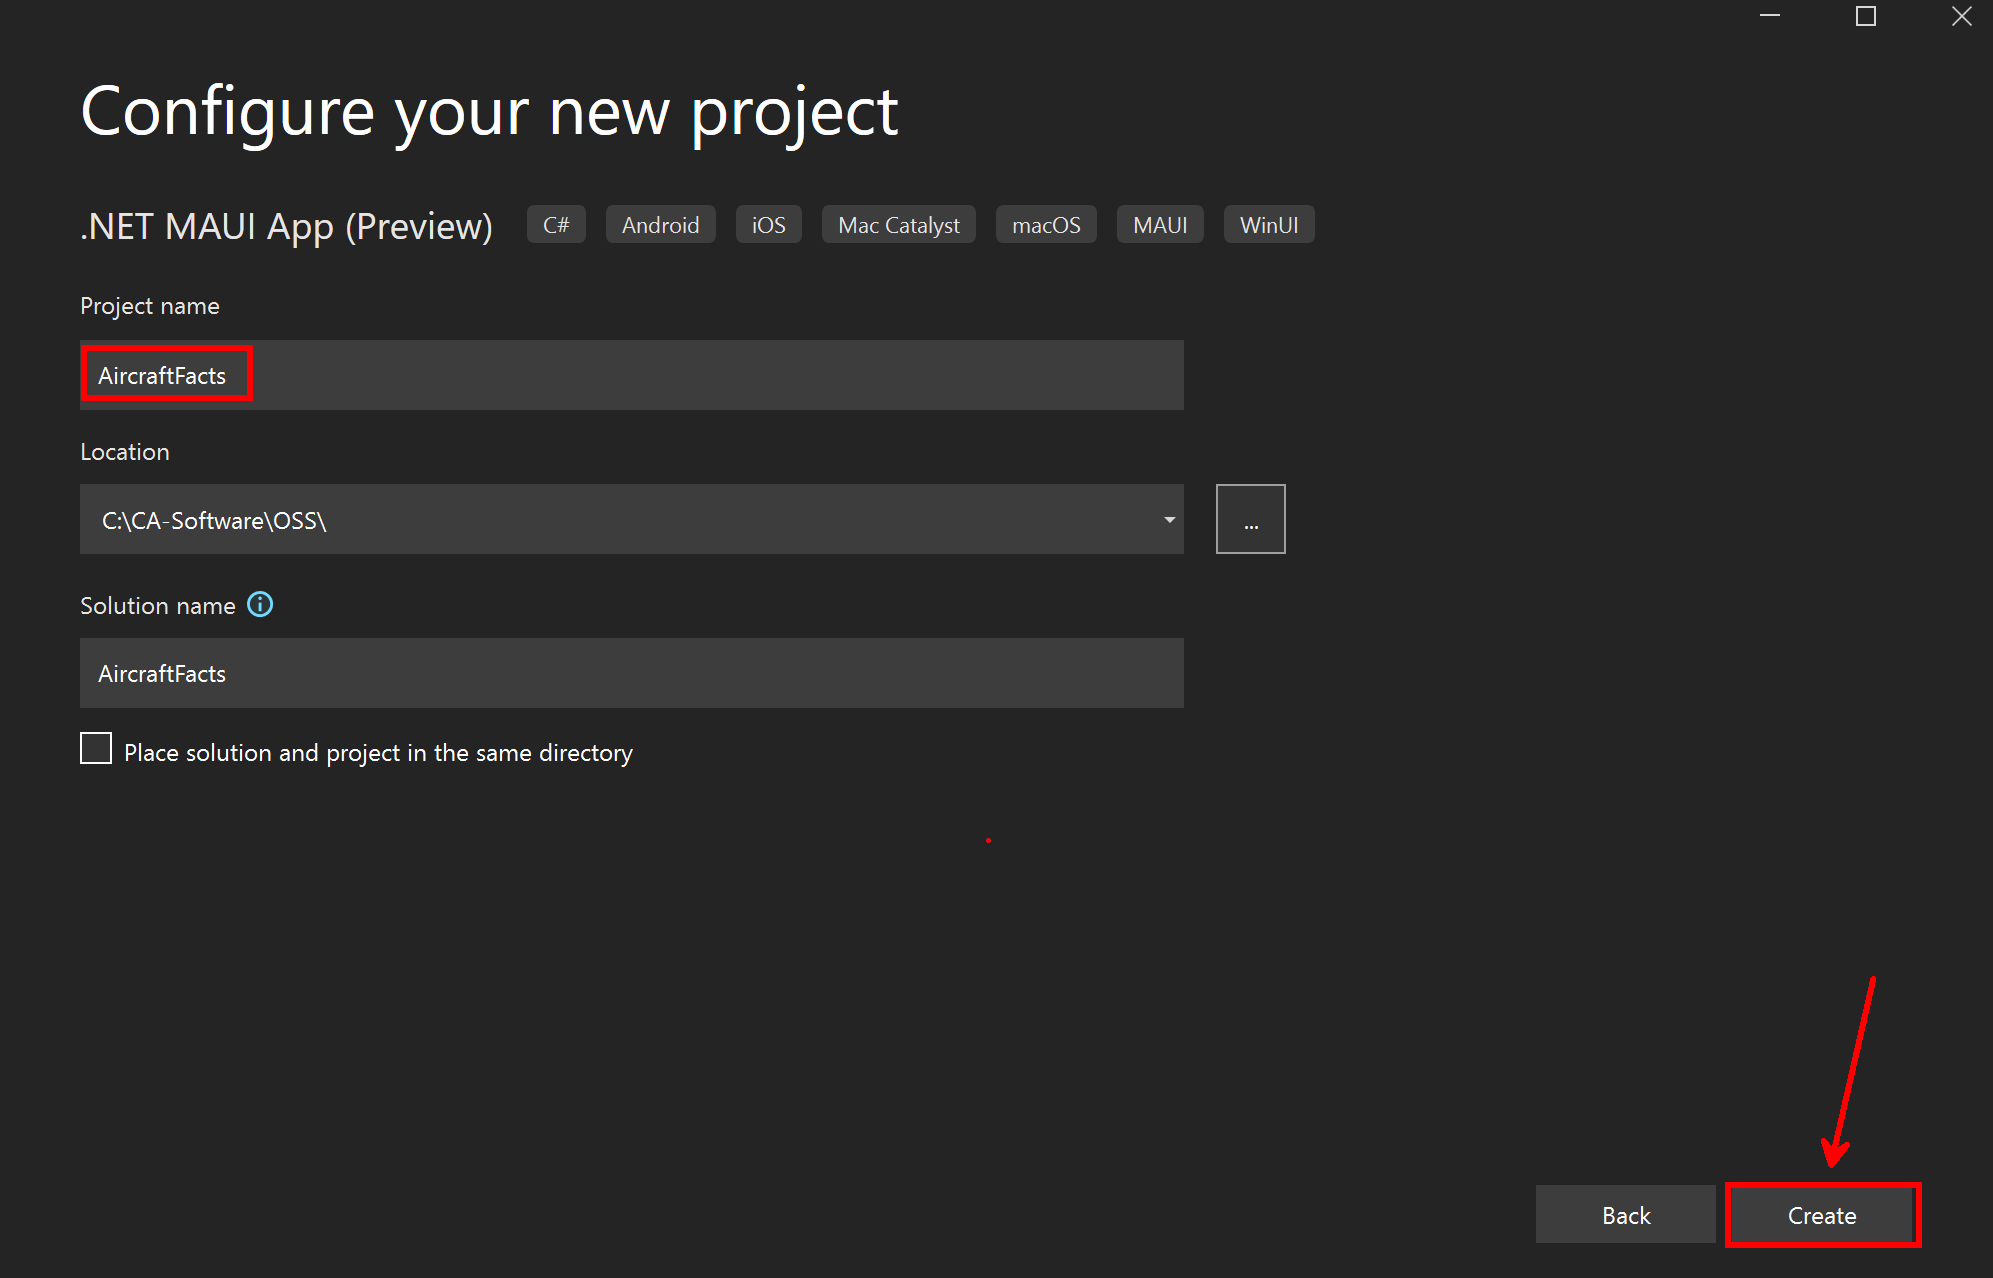
Now the hardest part of the whole process in creating a new App and that is what to name it! after all naming is hard. But to keep this simple lets name our App ‘AircraftFacts’ and pick a location to save the project.
Once Visual Studio has finished creating the template you will be presented with the MainPage.xaml page by default and in the background it will be updating all the NuGet packages.
Running for the First Time.
Now we have a default Hello World app created I always like to make sure that it will build and run before making any changes so that I know all the bits and packages are in the right place and that any changes made are done from a known working point.
So how do we run a MAUI app within VS22, well we can just do what we always do and hit F5 that will work but lets look a little deeper at the change in this function for a MAUI app.
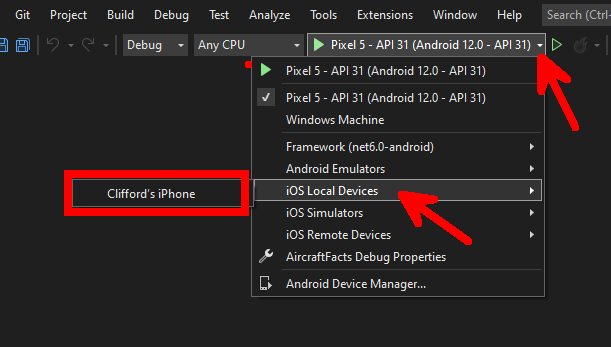
If you click the little down arrow just to the left of the Start Without Debugging green arrow (the one not filled!) you will see a list of possible targets for your MAUI app. In my case here as I already have some Android Emulators installed it’s automatically picked the last one I used.
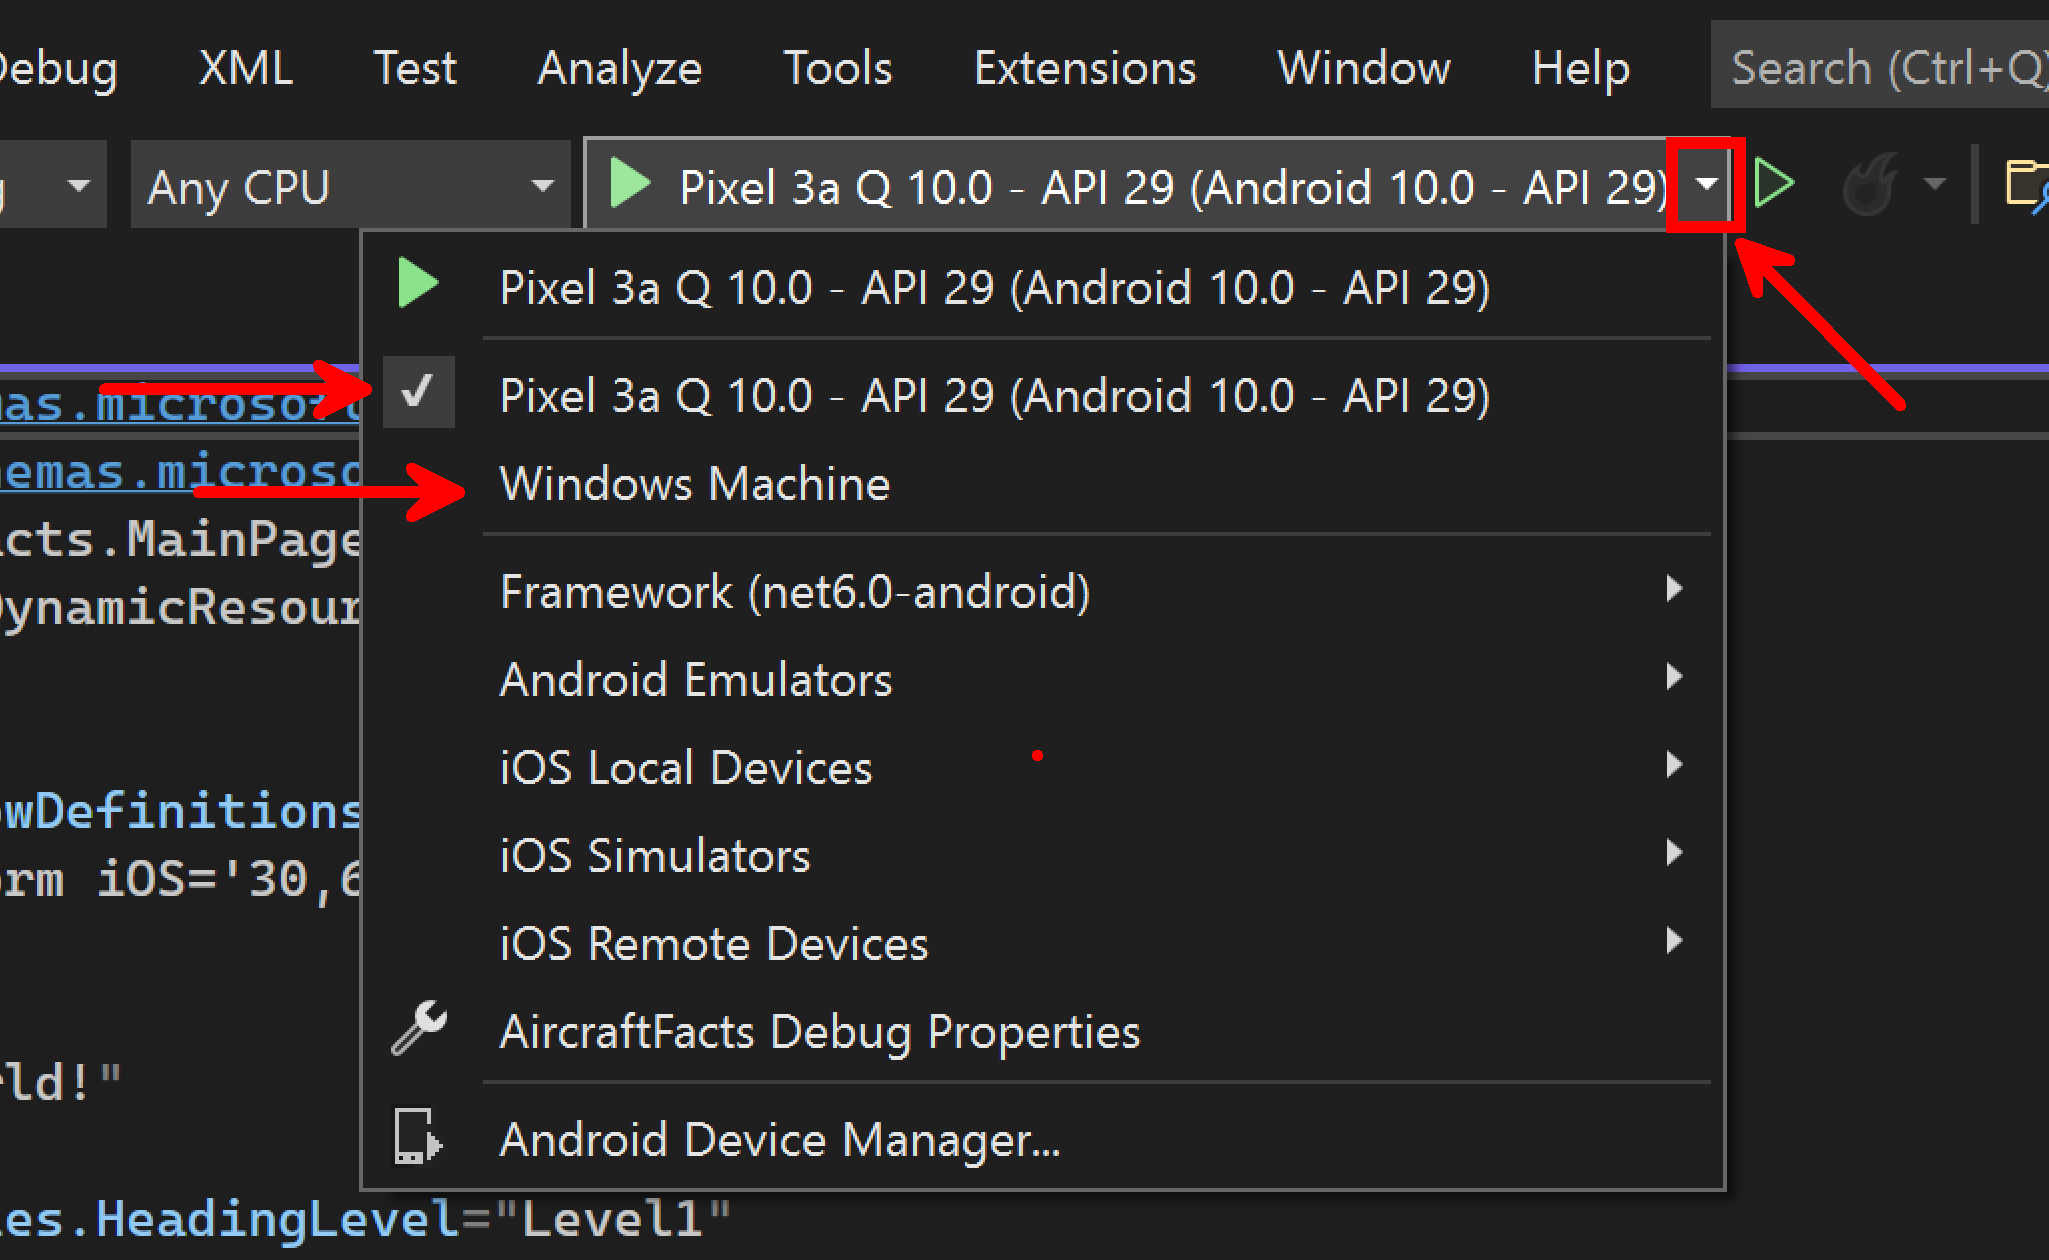
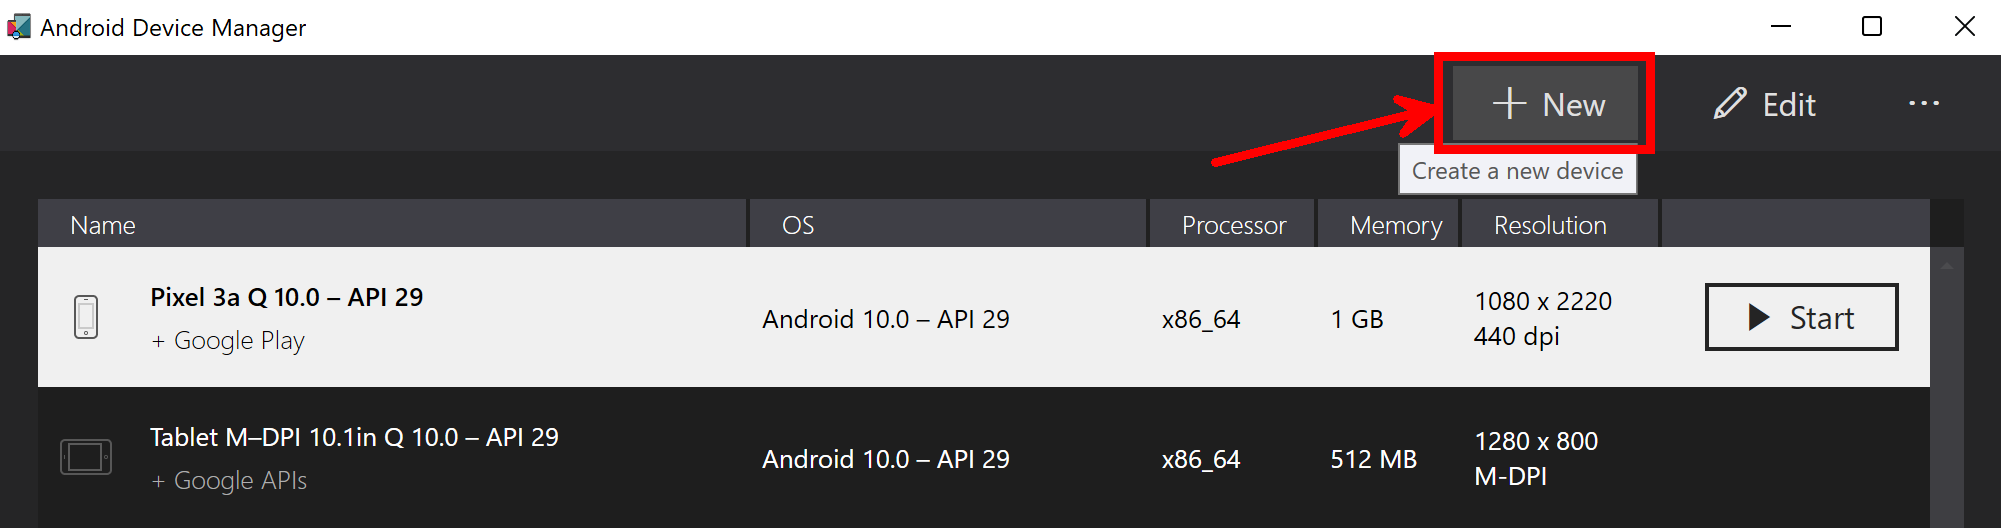
You can see that we can select Android Emulators, Windows Machine (as I am on Windows!) and also iOS. At the bottom of that list is the Android Device Manager if you are new to this and don’t have any Emulators installed selecting this will open the device manager where you can create a new Emulated Device.
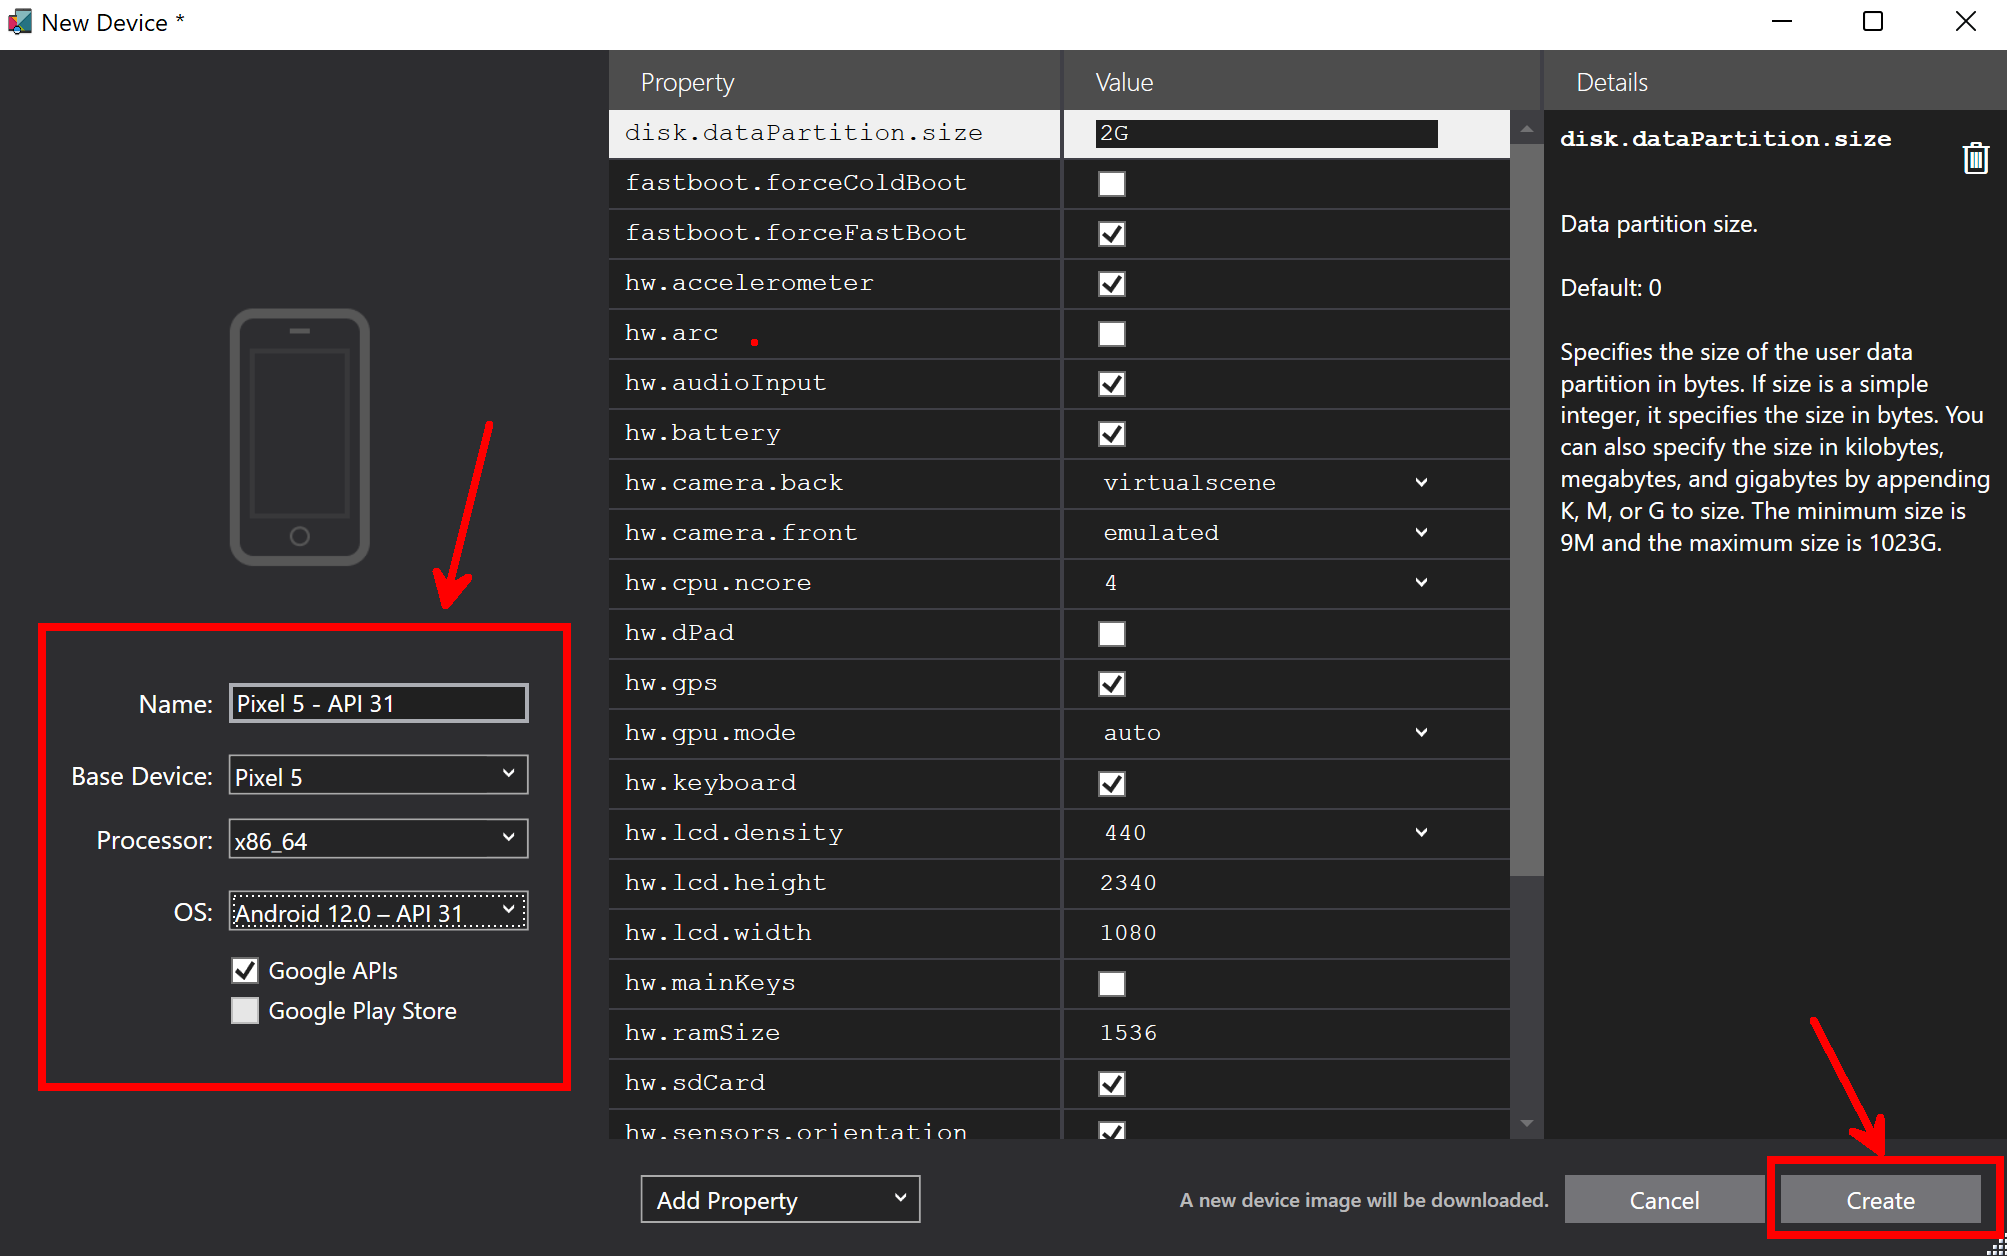
Here I am creating a new Emulated Device for a Pixel 5 Phone running the latest API31 or Android 12.0. You will have to accept the Android Licence and then it will download and install the bits for that device on your machine.
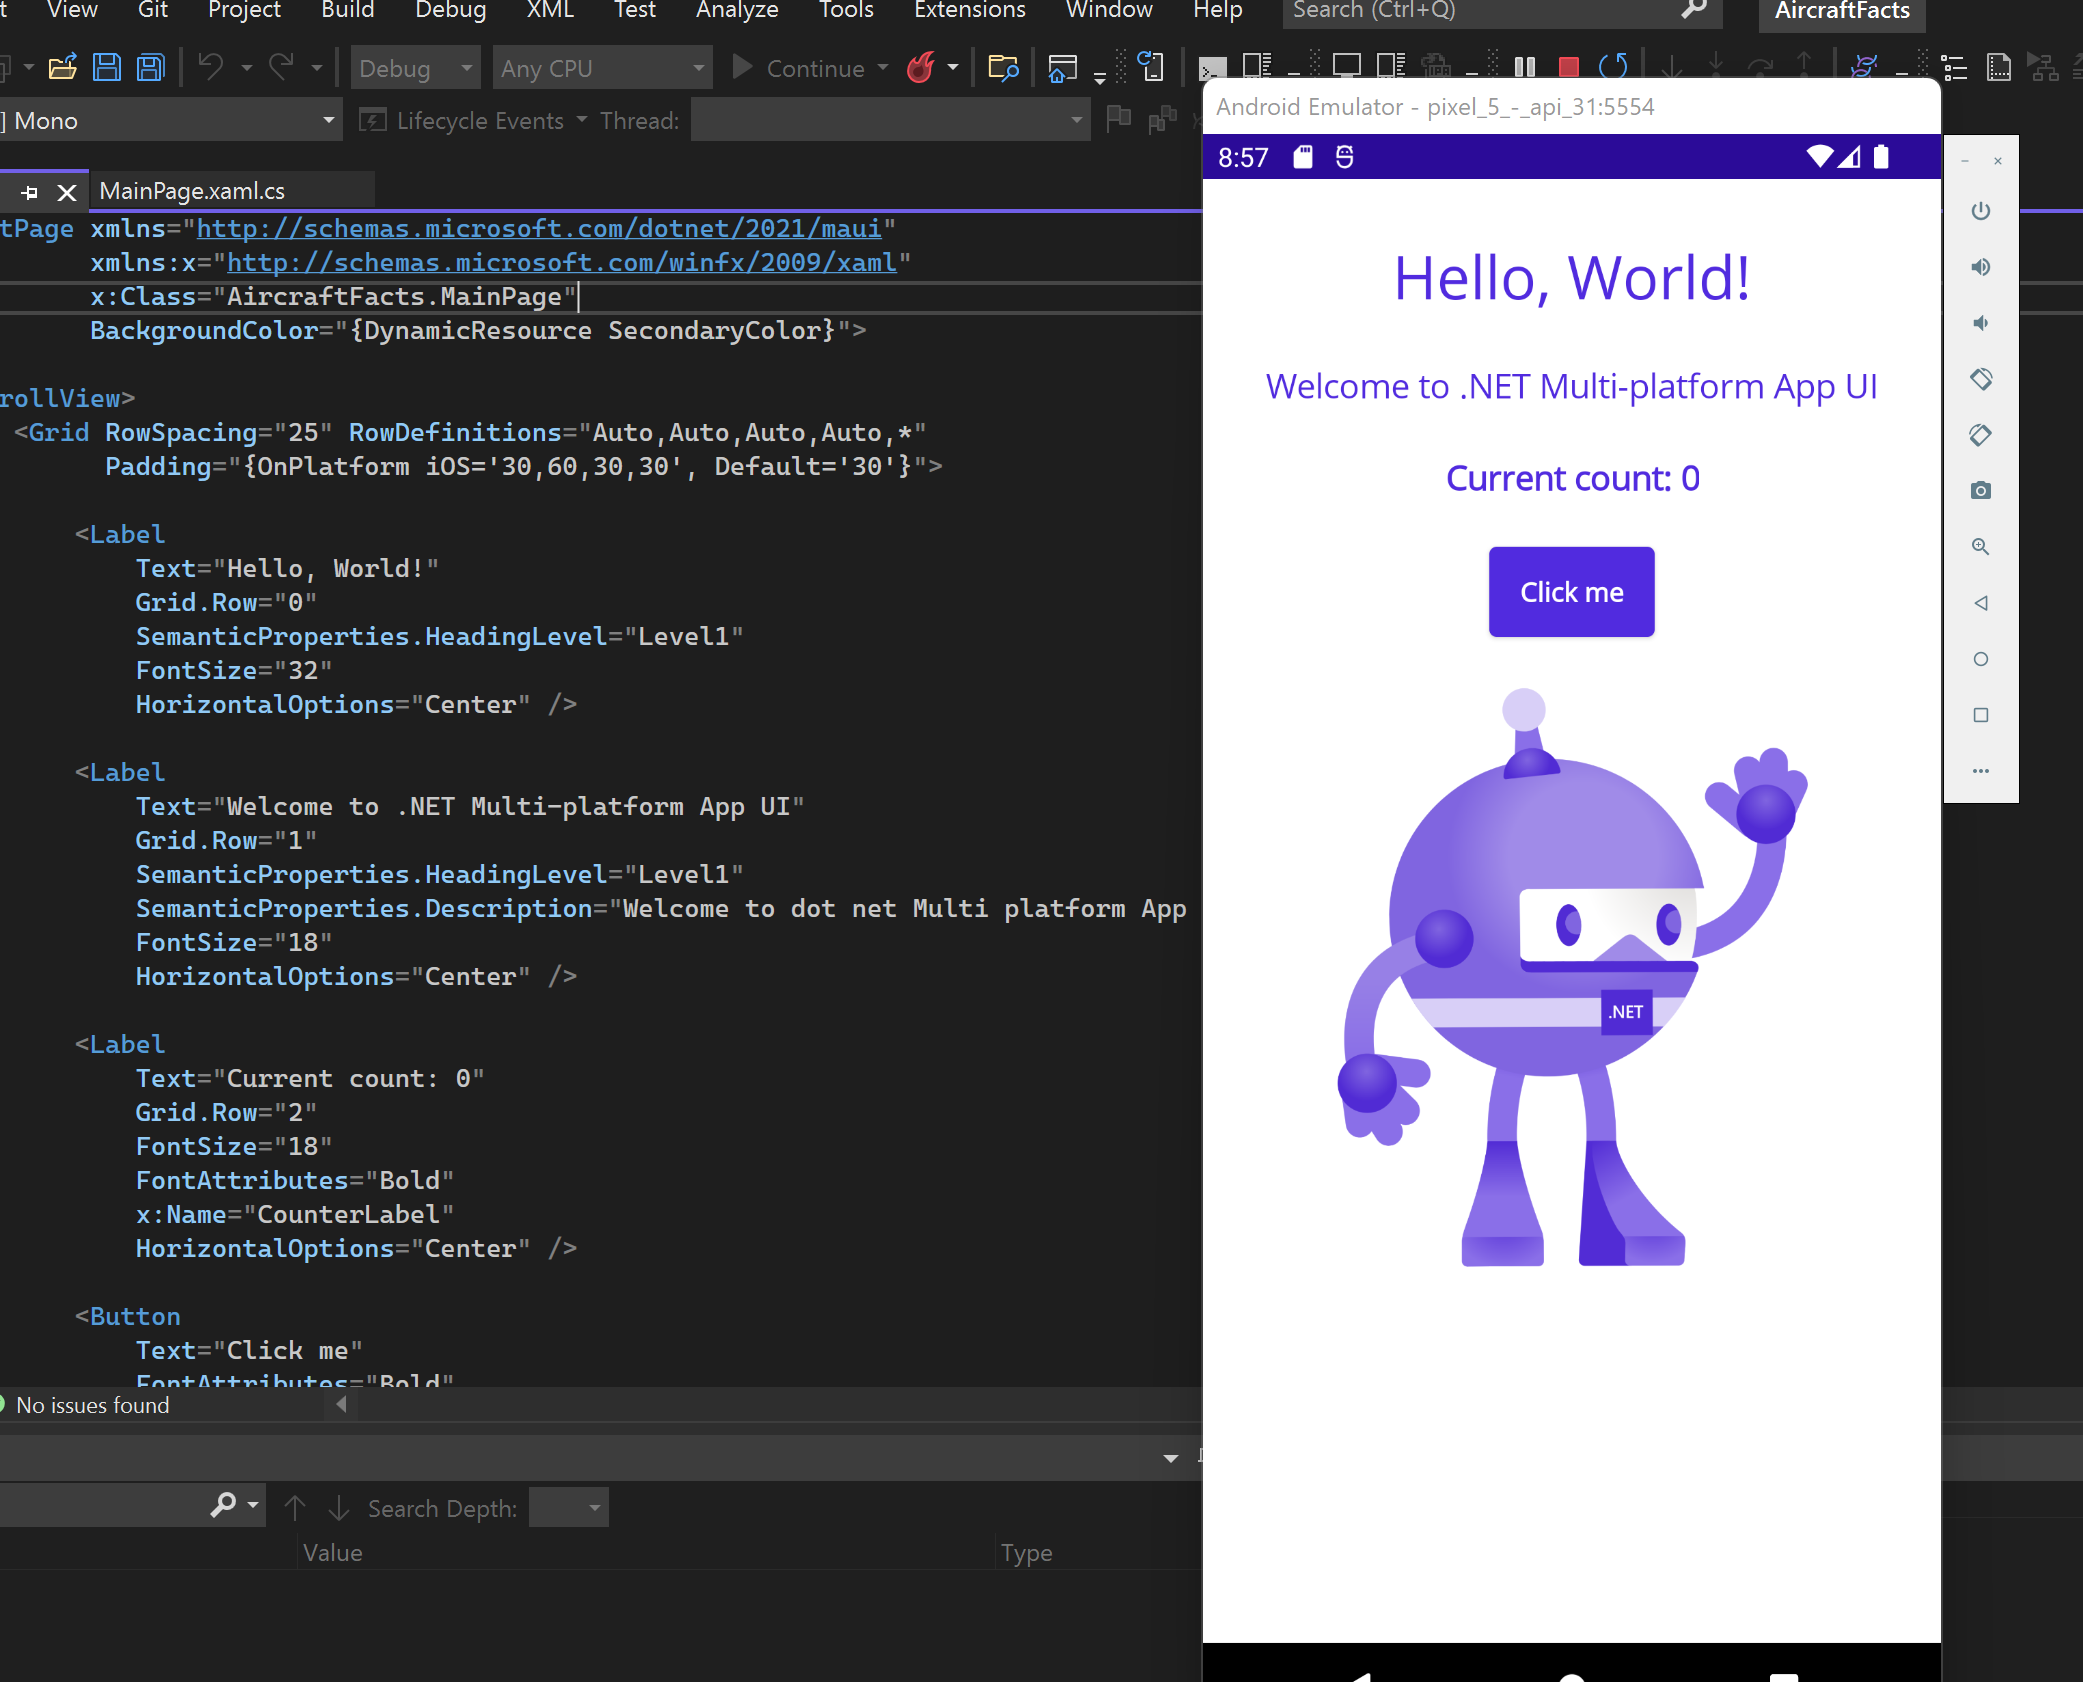
Now we have a new Device we can select it from the F5 dropdown and deploy to the Android Emulator to test that the App will build and run. The first time a new Emulator image is used it takes a minute or two for it to boot up but after that first run it’s much quick as a snapshot is used rather than fresh boots each time.
If you have a physical Android device you can also use that by plugging it into your Laptop and you just need to enable the Developer Mode on your device and you can read how to do this on the Xamarin Docs page.
The advantage of doing this is that the App will be on your phone so has the full advantage of the phone and it’s sensors plus you can use your killer app while out and about and show off to friends and family, but more importantly Emulators use a lot of system resources so could slow your machine down.
Check Windows
Now we have it running in the Android emulator lets change the Build Target to Windows Machine and check we can build for windows. Again it’s good to do this now as any missing SDK files and NuGets will be installed the first run and you know it once worked so any errors are now down to changes. Being on a windows machine this is super quick and no other set-up or hardware is required, however if you are reading this and using a Mac or Linux machine you obviously can’t do this step.
How about iOS?
So the last build target we will use is iOS for the iPhone/iPad and I know what your thinking we need a Mac to build and deploy to an Apple device right?
No actually we don’t, we can use the power of Hot Restart so that we can connect the iPhone directly to our Windows machine with a standard USB iPhone cable. We can then Build and Deploy as well as use all the tools like Hot Reload (More on that in a bit!) to work on our App.
Hot Restart needs a little set-up and rather than repeat the process here, take a look at the Docs.Microsft.com Page where it will explain that you need iTunes installed. Before you scream iTunes I don’t want that on my windows machine trust me this will make your dev life a lot easier and I have it installed and just make sure that it doesn’t start with Windows thus I control when to open it to stop it sucking resources.
Once you have the bits Set-up for Hot Restart, plug in your iPhone and from the top menu you should now see your phone appear so that you can select it and run the App.
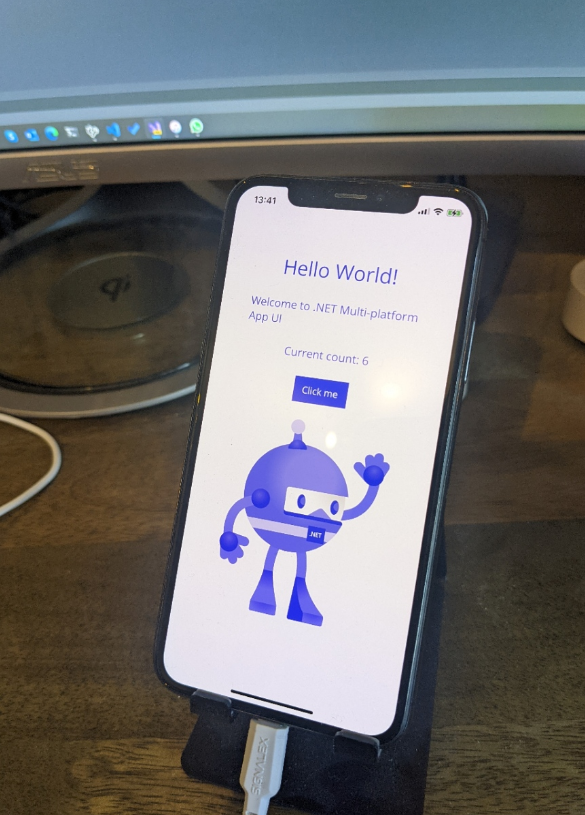
When you do the Build and Deploy make sure you do it in Debug mode otherwise it will fail to deploy, this means you can’t use the CTRL+F5 Start Without Debugging. However once it has been built on your windows machine and using the iTunes you installed magic happens and the app will deploy to your physical iPhone and run. The great thing as well is that you can then disconnect the device from your computer and while out on your daily life continue to use the app without a MAC in sight…
Hot Reload
I mentioned above about Hot Restart and I wanted to cover this separately as it’s very useful when working on your App’s and it isn’t restricted to MAUI it works for any of the .NET workloads.
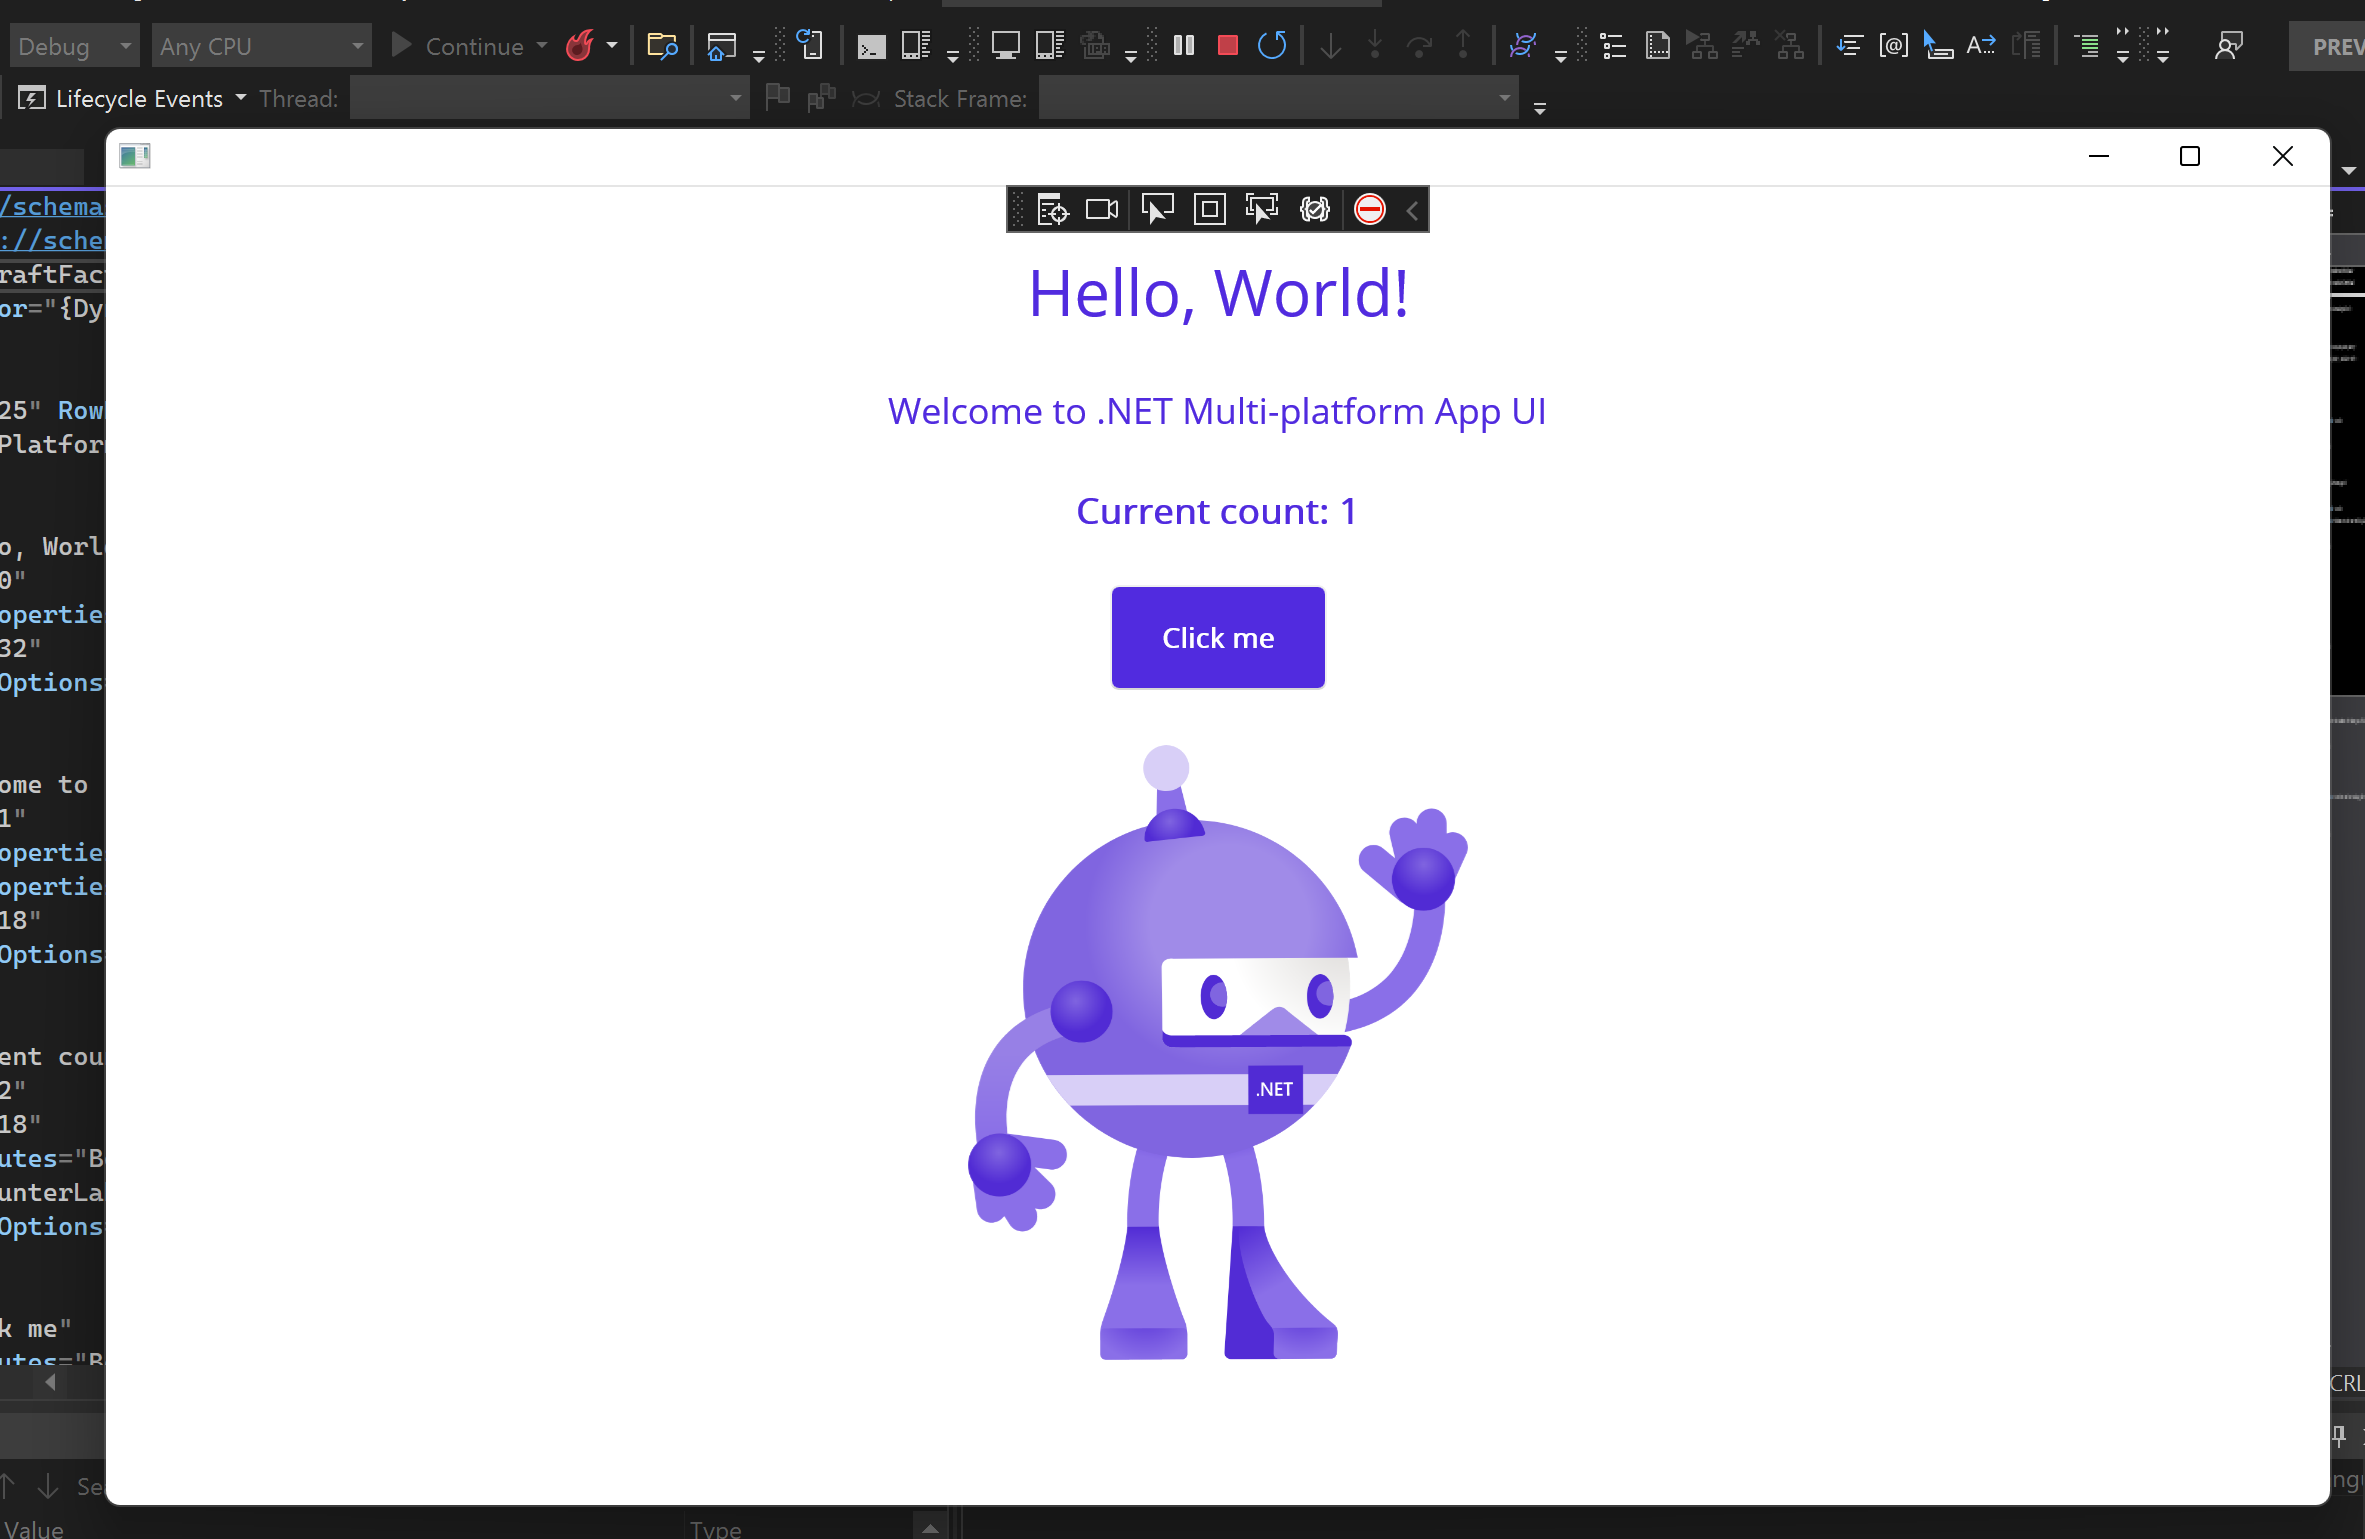
If you start the App in any of the targets we have checked, so for me I am going to pick Android just because it’s easier to grab screen shots for this blog.
Once it’s running notice just to the right of the F5 Continue at the top of VS22 there is now a little Red Flame. This is the button you can push to reload changes you have made to the XAML and in an ever growing list of places even your C# code, think Edit and Continue on steroids.
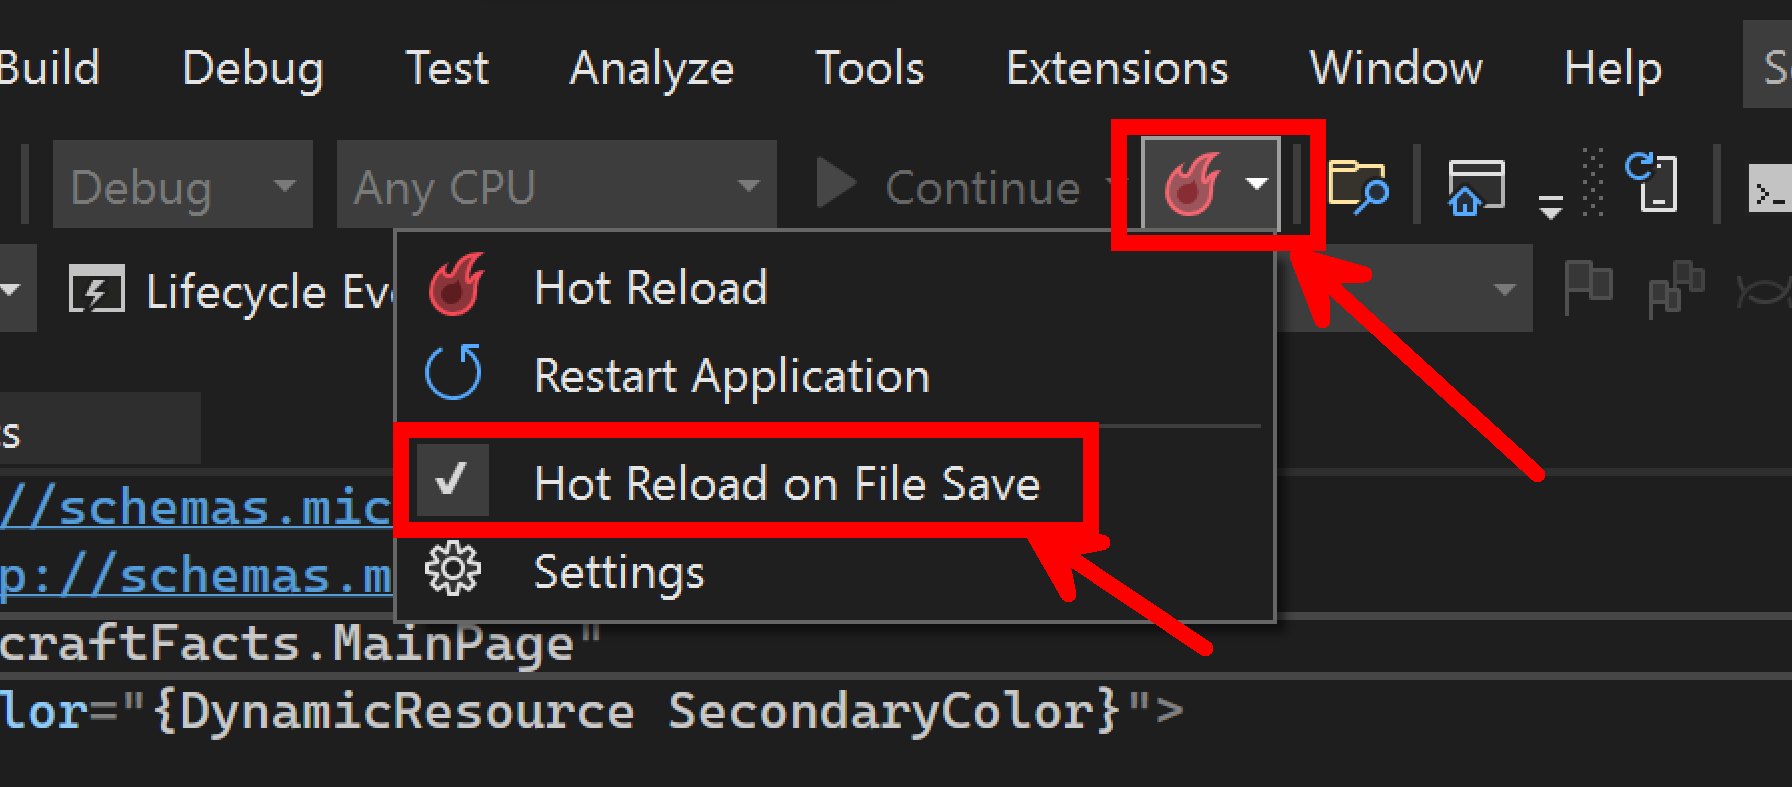
I like to click the dropdown arrow and select Hot Reload on File Save this means that I can make changes to say my View Model and with muscle memory CTRL + S to save and the changes are reloaded to the build target and I can see them instantly, with no stopping of the running project to make the changes and then waiting for it to build and re-deploy just to fix a typo in your code. Once you have played with Hot Reload you will not want to go back, if you need to make a change that Hot Reload can’t handle it will pop up with a Dialog to say that it has to restart the App, but if it can then all the Position in the App and the State are retained so if your 4 pages deep in your App debugging something this saves so much time.
You can read more about this on the Docs website at Docs.Microsoft.Com
MAUI App Structure
Now that we know the Template App builds and runs on the 3 platforms we wish to target and we have discussed using Hot Reload lets look at the structure of the Single Project that makes up our MAUI app.
Looking at the Solution Explorer unlike a Xamarin App (Don’t worry if you have never use Xamarin it means less for you to unlearn!!) this App is just one project.
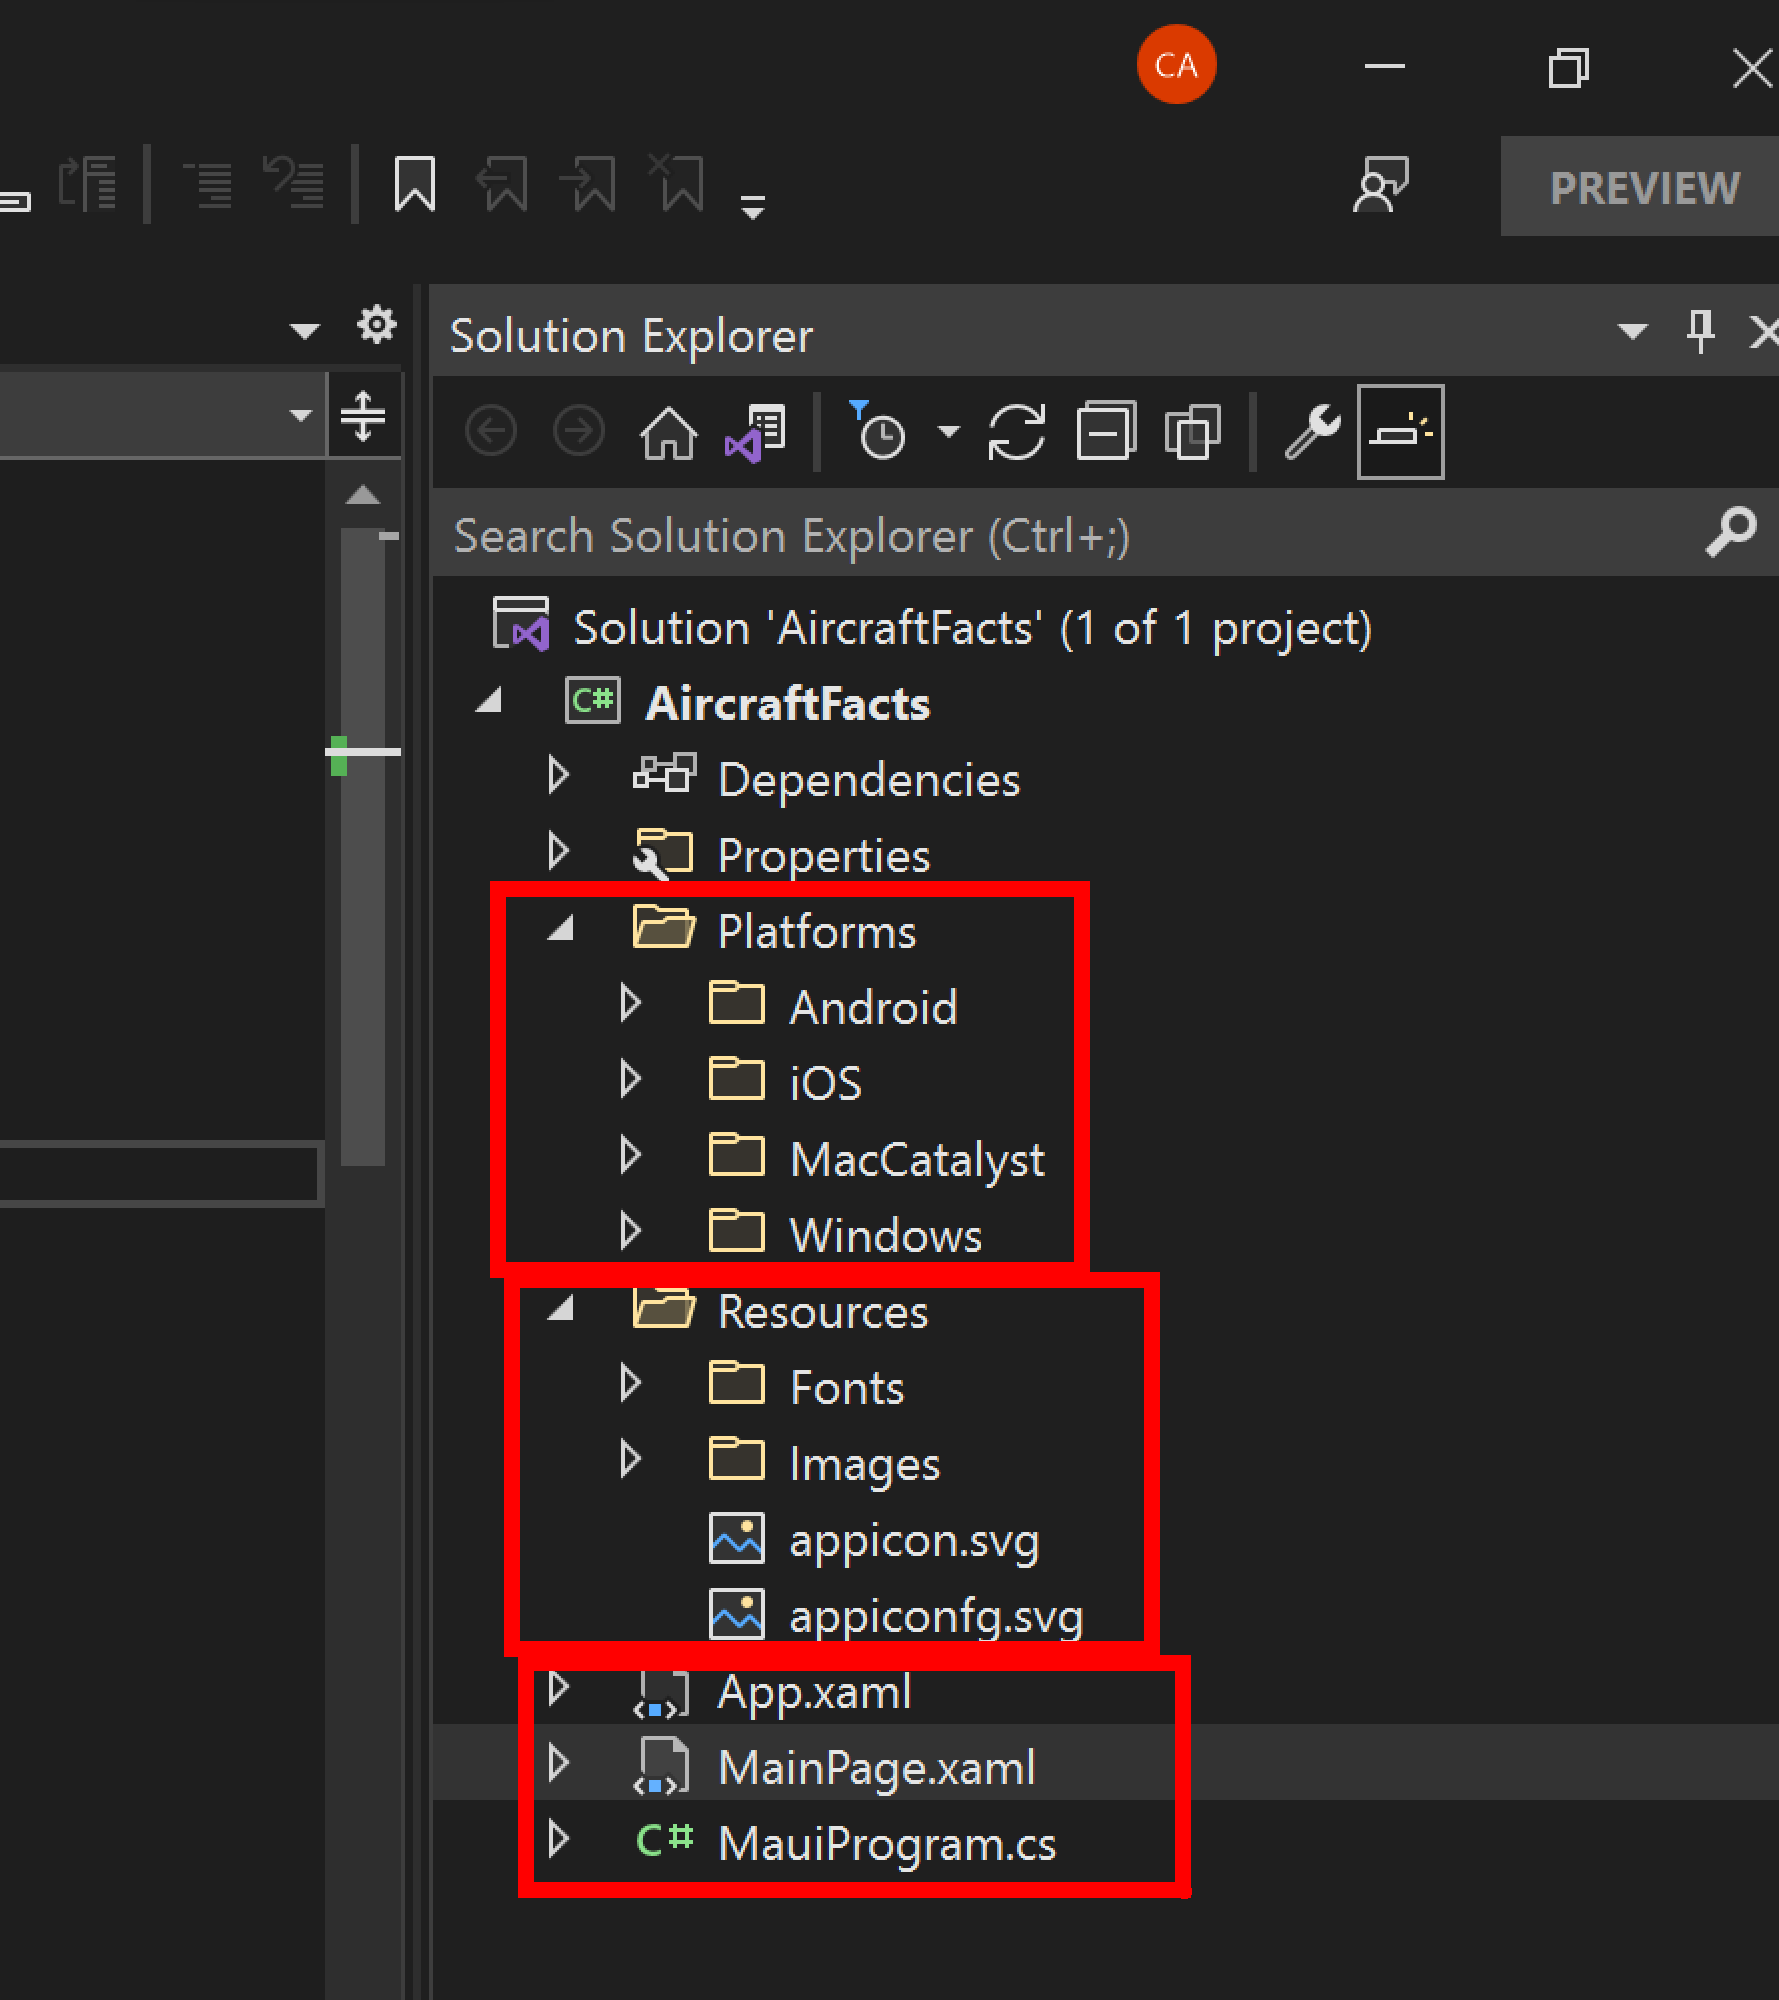
Looking at the red Boxes we can see we have a Platforms folder a Resources folder and then some XAML files at the bottom.
Lets dive deeper into these folders.
Platforms Folder
In here is a separate folder for each of our target platforms so we can see that we have one for Android, iOS, MacCatalyst and finally windows.
Note: MacCatalyst is used to create a Mac Desktop version of our app and for this you WILL need a physical Mac for obvious reasons. You can read more on MacCatalyst at https://developer.apple.com/documentation/uikit/mac_catalyst if you don't have a Mac you can use a service like MacInCloud - https://www.macincloud.com/
We can add other Platforms into this folder for building against and there are community efforts for GTK/Linux and the Samsung Team are working on the Tizen platform so you can write Apps that run on your Fridge or TV.
If we take a look inside these folders we will see that there is our platform specific code files and resources. I have highlighted the file in each folder that is the entry point of the App on that platform.
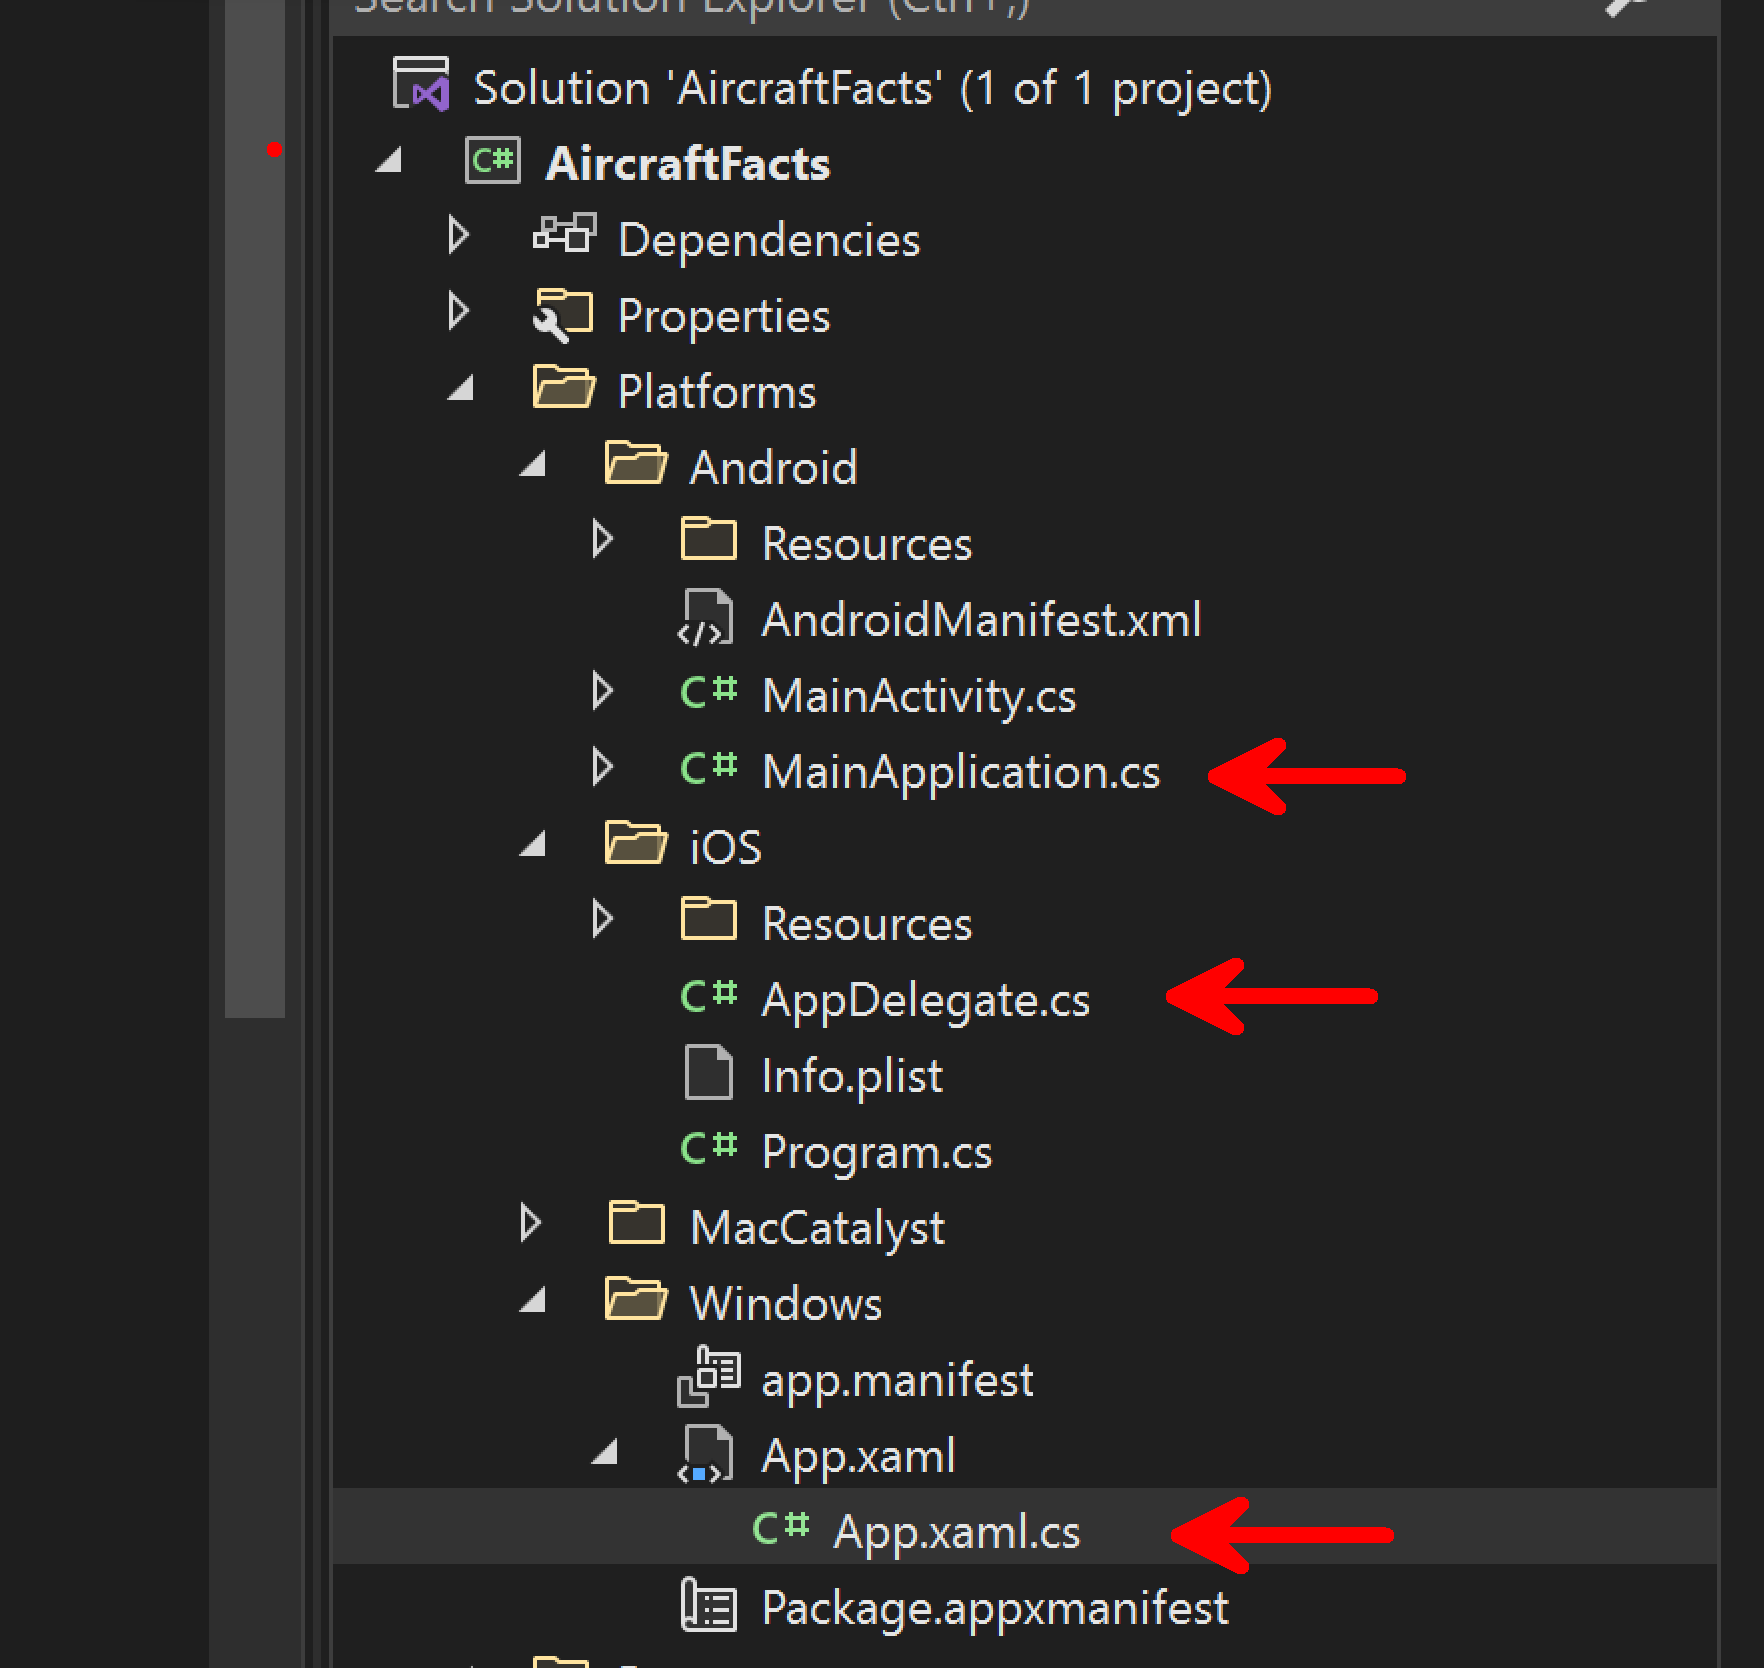
In each of these files there is an instance of the MAUI Application created and this is where the App we create is called from the Platform specific code, so your Android device starts the App and this code creates an instance of the Shared MAUI App is the easy way to think about this.
As an example looking that the iOS AppDelegate.cs file we can see the code is very simple and the other platforms are equally just that same line of code.
[Register("AppDelegate")]
public class AppDelegate : MauiUIApplicationDelegate
{
	protected override MauiApp CreateMauiApp() => MauiProgram.CreateMauiApp();
}
Resources Folder
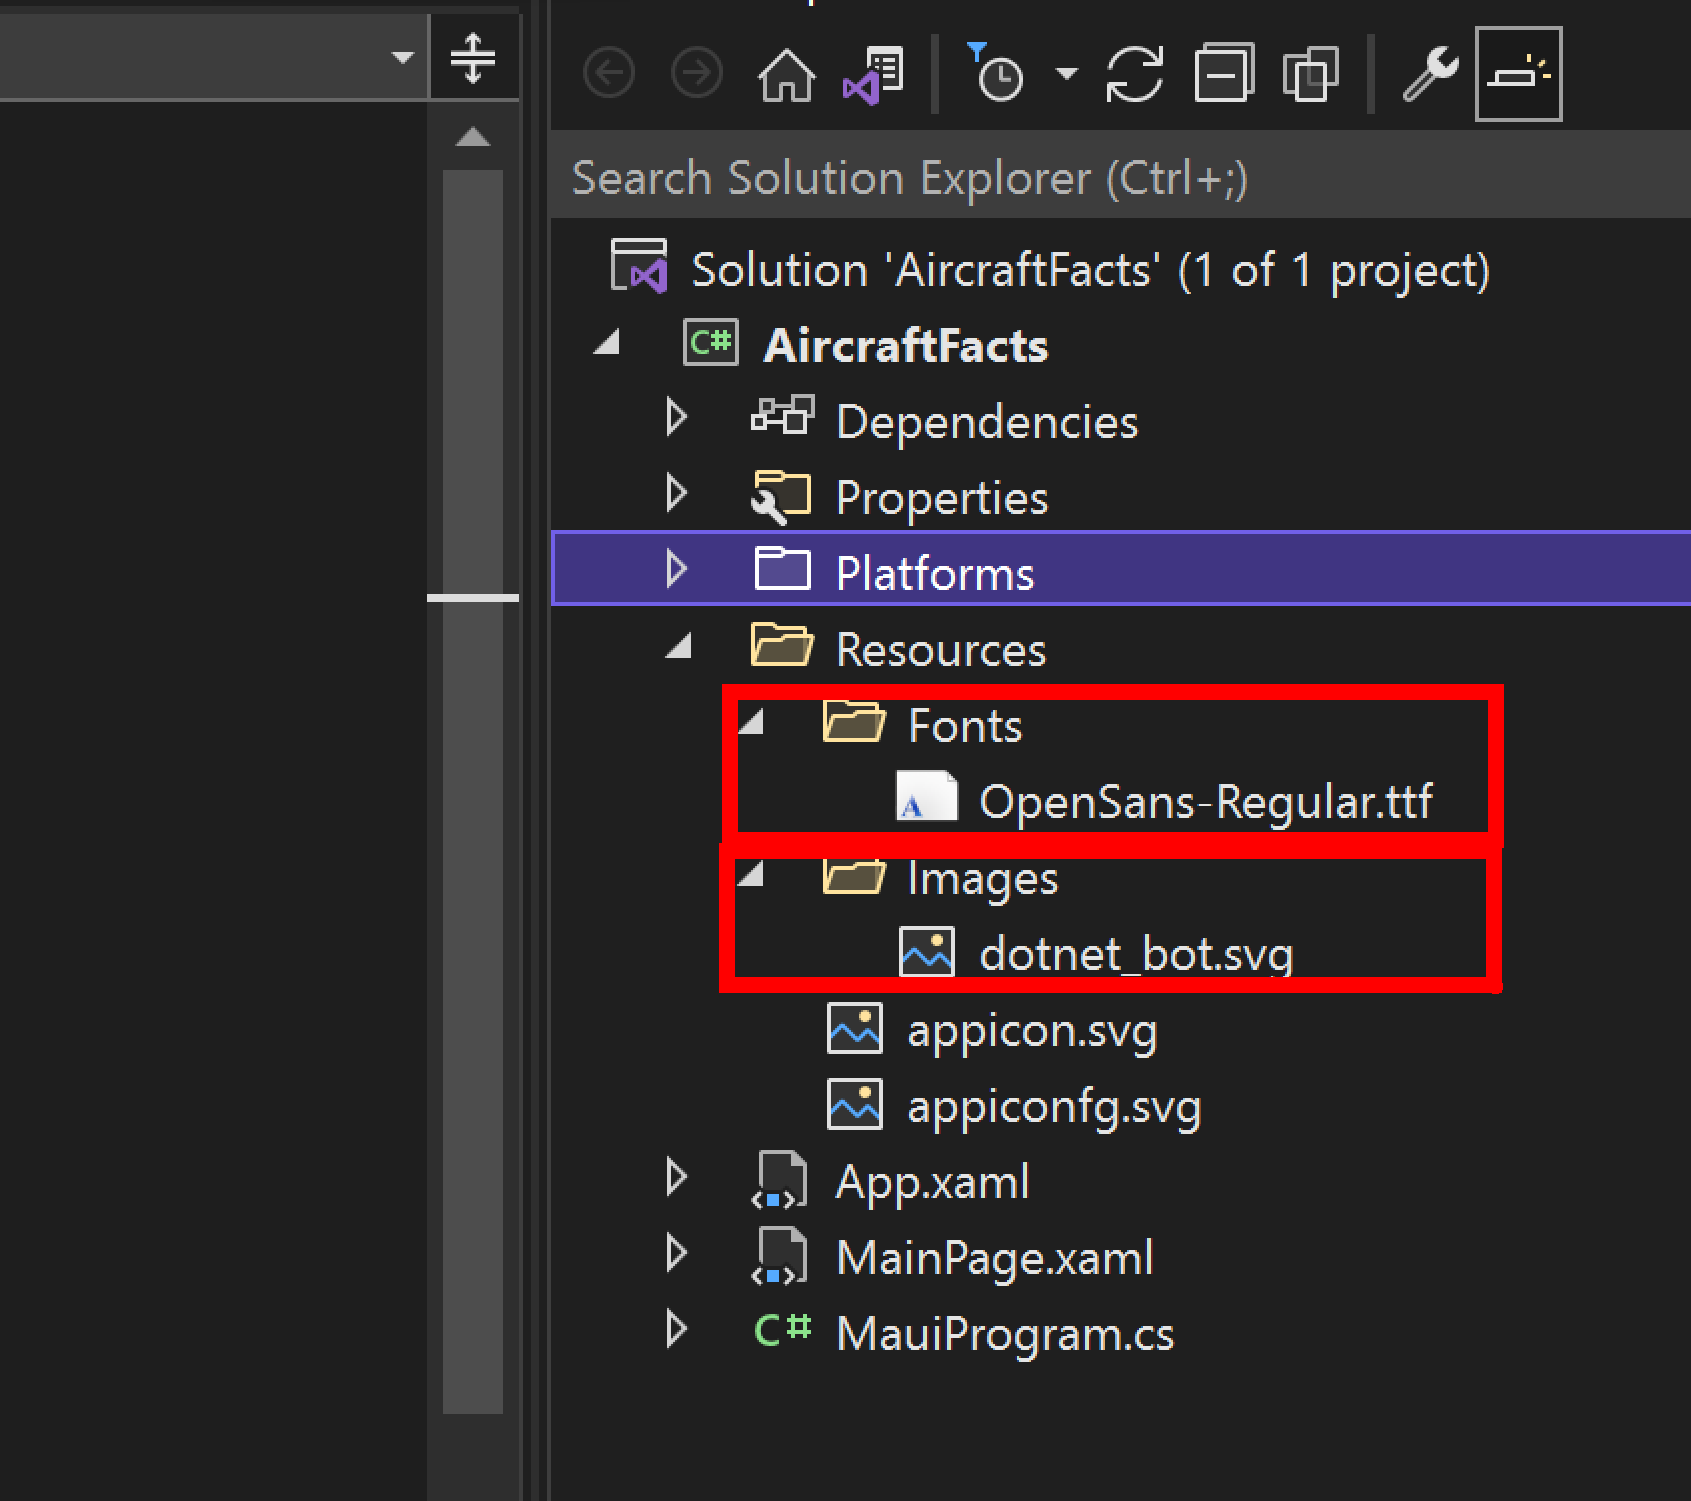
Next folder in our project is the Resources folder and this is where we will place all the common project resources like Images and Fonts. Yes we could place them in the resources folder of each of the individual projects but then we would need to create the many versions of each image for each platform and required sizes etc etc. This was a massive time sink for Xamarin Development as for each platform you would need several formats of the same image in varying sizes and resolutions and name and place them in the correct folders it was a huge pain point until recently.
The new way of achieving this using MAUI is to place a common image into the Images folder and any special App specific fonts we require into the Fonts folder. You can see that there are already some sample images and fonts placed by the template.
It could not be simpler really, we will cover how to include these items in the project build later but for now just know that this is where we place this content.
There may be occasions where we do need to place an image into a platform specific resources folder but that is beyond the scope of this blog but we can cover in later blogs if you wish to know.
NOTE: For images under the hood the MAUI build pipeline uses a tool called ResizetizerNT which is open source and you can find the repo at https://github.com/redth/ResizetizerNT this was developed mainly by members of the Xamarin/MAUI team and is integrated into the Build system so you don't need to worry about it too much. All you need to know is that it can cope with SVG, PNG and Bitmaps.
MauiProgram.cs and HostBuilder
Outside of the folders we have just covered there are 3 other files
- App.xaml
- MainPage.xaml
- MauiProgram.cs
Lets start with the last one first which is MauiProgram.cs, this is the entry to our Application so sort of the Main() of a Console App if you will.
Looking inside this file we will see that it’s very short:
public static class MauiProgram
{
	public static MauiApp CreateMauiApp()
	{
		var builder = MauiApp.CreateBuilder();
		builder
			.UseMauiApp<App>()
			.ConfigureFonts(fonts =>
			{
				fonts.AddFont("OpenSans-Regular.ttf", "OpenSansRegular");
			});

		return builder.Build();
	}
}
HostBuilder Pattern
Now you may recognise this from other DotNET project types as being the HostBuilder pattern which is great as you probably know already how it works and that is why it was picked to aid developers in the transition to MAUI.
If you remember from above that inside the Platform specific entry points there was a call to CreateMauiApp well this is where that call will come to. In here we first add the App code with the .UserMauiApp<App>() with App in the angle brackets being the name used in App.xaml.cs which is a partial class and we will cover this a little more later.
public partial class App : Application
{
	public App()	<-- App Name... -->
	{
		InitializeComponent();

		MainPage = new MainPage();
	}
}
Adding Custom Fonts
Now we have the app created in the HostBuilder we can see that the next Configuration setting is a call to .ConfigureFonts() in here you can add the fonts which you placed in the Resources/Fonts folder we covered earlier.
You can see here a call to AddFont
fonts.AddFont("OpenSans-Regular.ttf", "OpenSansRegular")
We have the filename with the extention of the file, as named in the Fonts folder and then the second parameter is an alias that we can have to make it easier to use later. This means rather than having to type the full name without the extention when we are using the FontFamily to set the font in our code, so we could shorten this to say OpenSansReg after all it’s less typing.
Custom Handers or Renderers
Inside this Host Builder we can also register any custom controls we may have so for example we may create our own version of the Entry control that does something special and is used all over our App. We will cover how to do this in a later blog but to add this to the project we would configure the handler in the Host Builder.
.ConfigureMauiHandlers(handlers =>
{
handlers.AddHandler(typeof(MyEntry), typeof(MyEntryHandler));
});
If however we have found a cool Renderer on the web from one of the many out there for Xamarin.Forms we can still use them as the team have added a Shim for these to still work. To add this into the Host builder we would have a configuration setting and you need to give it the control that backs your renderer, again this will be covered more in a later blog post.
#if __ANDROID__
.ConfigureMauiHandlers(handlers =>
{
	handlers.AddCompatibilityRenderer(typeof(Microsoft.Maui.Controls.BoxView),
	typeof(Microsoft.Maui.Controls.Compatibility.Platform.Android.BoxRenderer));
});
#elif __IOS__
.ConfigureMauiHandlers(handlers =>
{
	handlers.AddCompatibilityRenderer(typeof(Microsoft.Maui.Controls.BoxView),
	typeof(Microsoft.Maui.Controls.Compatibility.Platform.iOS.BoxRenderer));
});
#endif
App.xaml and App Resources
As we see above in the Host Builder we create an Instance of our App which is inside the App.xaml.cs that in turn creates the first page of our App called MainPage.
But what is the Xaml file doing now we know what the Code Behind is doing, well this is where the Apps resource dictionary is typically held. It’s important not to confuse this with the Resources folder we have already talked about.
The resource dictionary is the central place we can set things like Colours, Fonts, Padding etc. If your a Web developer transitioning or taking a look think of this as your CSS, in fact with Xamarin.Forms you could write and use a CSS page but that has not YET! made it over to MAUI.
<ResourceDictionary>
    <Color x:Key="PrimaryColor">#512bdf</Color>
    <Color x:Key="SecondaryColor">White</Color
    <Style TargetType="Label">
        <Setter Property="TextColor" Value="{DynamicResource PrimaryColor}" />
        <Setter Property="FontFamily" Value="OpenSansRegular" />
    </Style
    <Style TargetType="Button">
        <Setter Property="TextColor" Value="{DynamicResource SecondaryColor}" />
        <Setter Property="FontFamily" Value="OpenSansRegular" />
        <Setter Property="BackgroundColor" Value="{DynamicResource PrimaryColor}" />
        <Setter Property="Padding" Value="14,10" />
    </Style>
</ResourceDictionary>
The larger the project the larger this file becomes so you can also break this down into smaller chunks having multiple XAML files with resources per section of the App just like you would with a CSS file in the web world. I have recently started to put these Resource Dictionary files in the Resources folder rather than clutter the root of the project and it feels to me at least the natural place for them.
You can read more about breaking that out here at Docs.Microsoft
MainPage.xaml and finally our App
Up until now we have been looking at the way the app is pulled together the way it’s built and the various resources but have yet to cover the actual App. All the parts covered so far are pretty much the same in every MAUI App but now we want to write our killer mobile App that is going to take over the world and make us millionaires… Hey we can dream.
This is where the MainPage.xaml page comes in, this is the start of OUR App and our layout and control. It’s from this page onwards we make the App our own and where we will spend some time in future posts making the AircraftFacts App come to life.
Conclusion
If you have made it this far well done there is a lot to cover in this deep dive series and this first post I wanted to cover the way the App is pulled together and the resources used.
In the next post we will start to build out the AircraftFacts App with a design and some data, then show how we can build the Navigation system before moving onto Testing locally and on devices.
I will be pushing the code to a public GitHub repo but as this 1st post is just the standard File->New Project I will leave you to set-up your tooling and explore yourself.
This is the first of many blog posts on the deep dive into MAUI and if there is anything specific you want to be covered or you wish to comment then please do reach out on twitter @CliffordAgius
Happy coding.