TOC
TLDR!
This may look like a really long post but honestly it takes less than 10 minutes and its mostly pictures.
Don’t commit your SECRETS to Source Control.
We have all done it at least once (Don’t lie!), you start a project and you need that secret key or connection string to the backend, so you put it in the code just to test and then forget and commit to source control, now the secret is out. Hopefully it’s just a private/internal repo and not a popular Open-Source project, but I am going to show you how quick and easy it is to set-up a Xamarin/MAUI App connecting thru a WebAPI to CosmosDB with no secrets or connection strings anywhere.
This is part 1 of setting up the project and in part 2 I will show you how to secure the connection so only your App and users can access the data from the WebAPI and not just anyone with a browser/web connection.
KeyVault
To make this magic happen we are going to utilise Azure KeyVault which as its name suggests is a secure vault that can hold your secrets likes Keys, Connection strings and any other App secrets you want to secure even Certificates. KeyVault is very simple to set-up and is super cheap to use with me hosting this demo one in UK South it’s going to cost per 10,000 transactions £0.023 / €0.023 / $0.023 (Notice Azure billing just change the currency symbol for the pricing here!). A transaction for KeyVault is any interaction with the Vault so any CRUD operation etc but you can read more Here as well as confirm the pricing for your region
Lets start with KeyVault
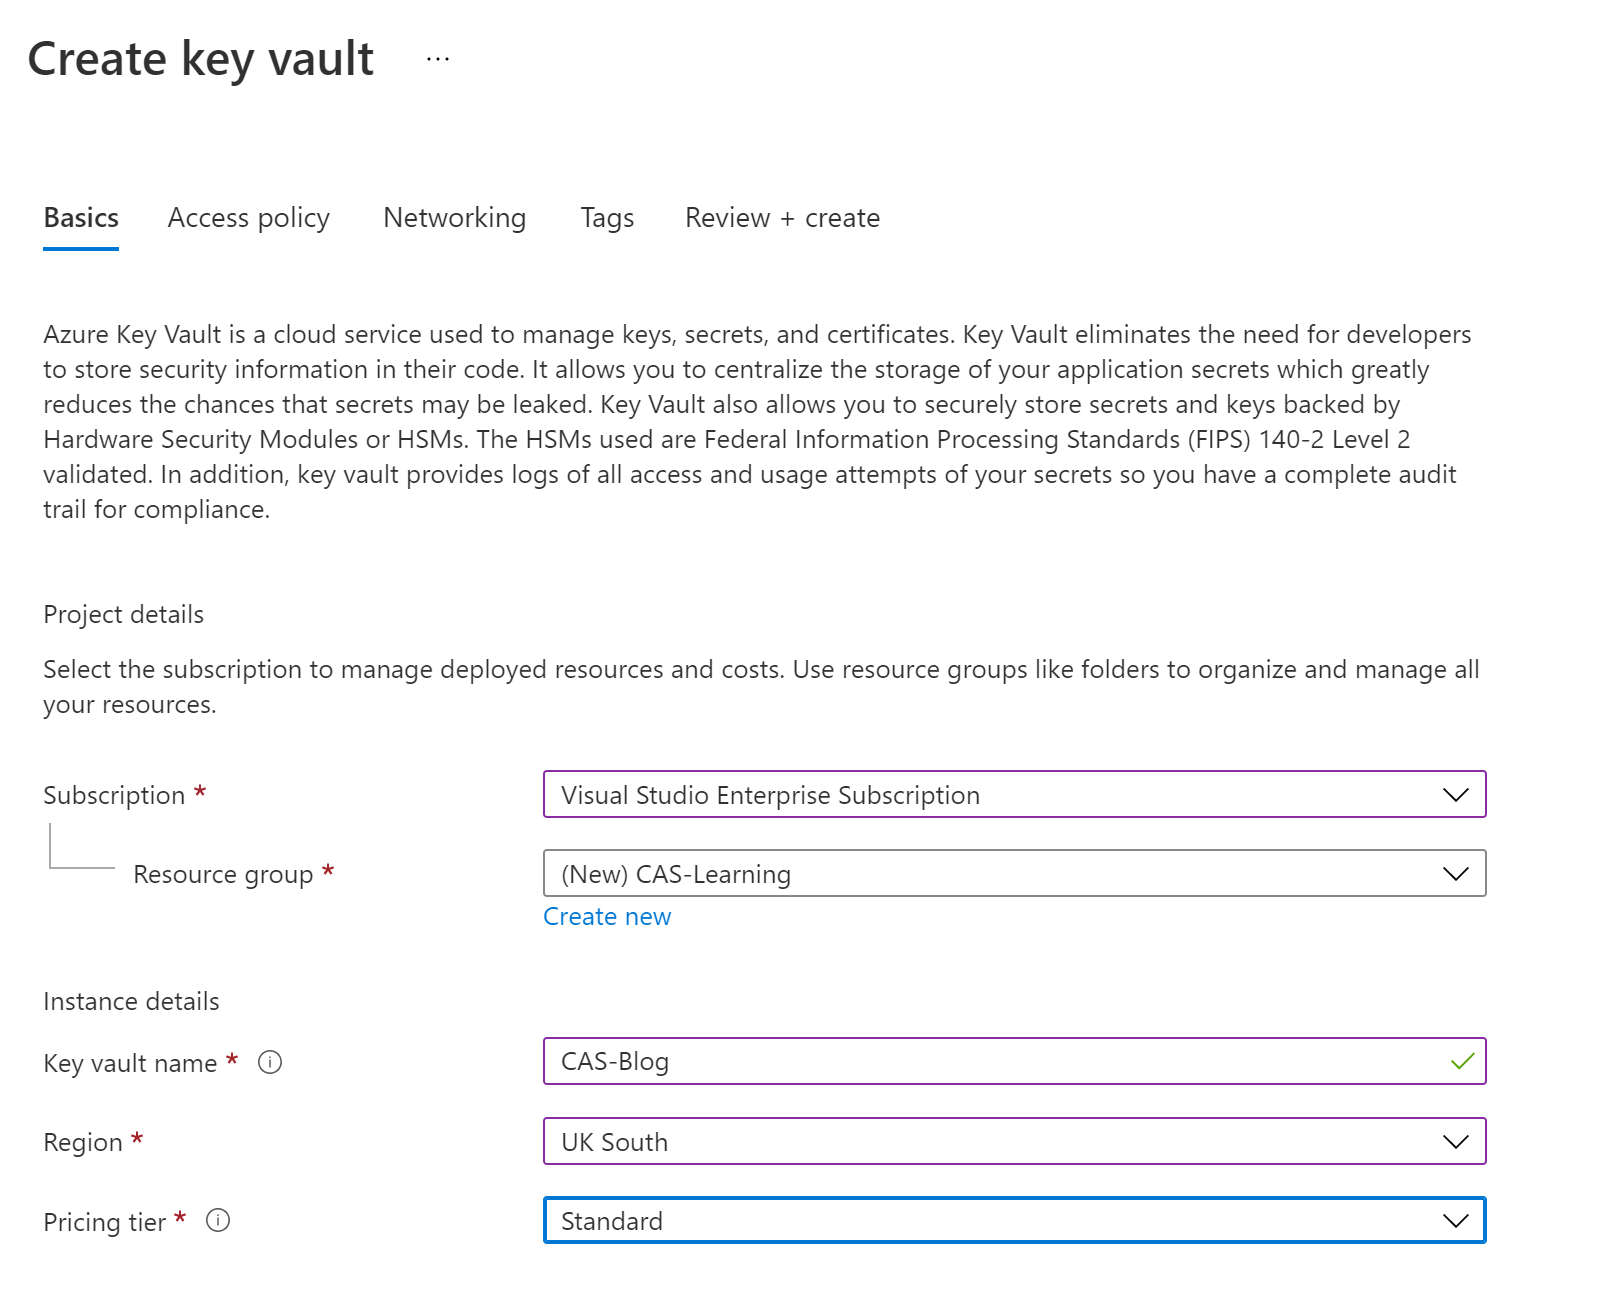
So lets get cracking then, open the Azure Portal and in the search bar at the top type ‘KeyVault’ to find the service. Fill in the first page with your Subscription, Resource etc and hit create, there are other pages like Access Policy, Networking and Tags but the first page is all you need for now.
Once this is created we need to create the CosmosDB so we can get the secrets we want to store like the connections string, I’m using CosmosDB here as I really like it as a datastore for my mobile apps but obviously you can substitute for SQL, DataLakes etc what ever you like.
Create CosmosDB
Before we create the CosmosDB resource I just like to say that I was a SQL fan and the full on relational database, but since trying CosmosDB I am a convert it can store data in a JSON blob but you can query it just like you can the SQL DB but you can on the fly change the data stored so no need to worry about adding that extra column to a table just add it to the JSON and your done. Also CosmosDB is super cheap and for the first 400Request Units (No me Neither!) it’s FREE but you can check the pricing model and details at azure.microsoft.com/pricing/details/cosmos-db
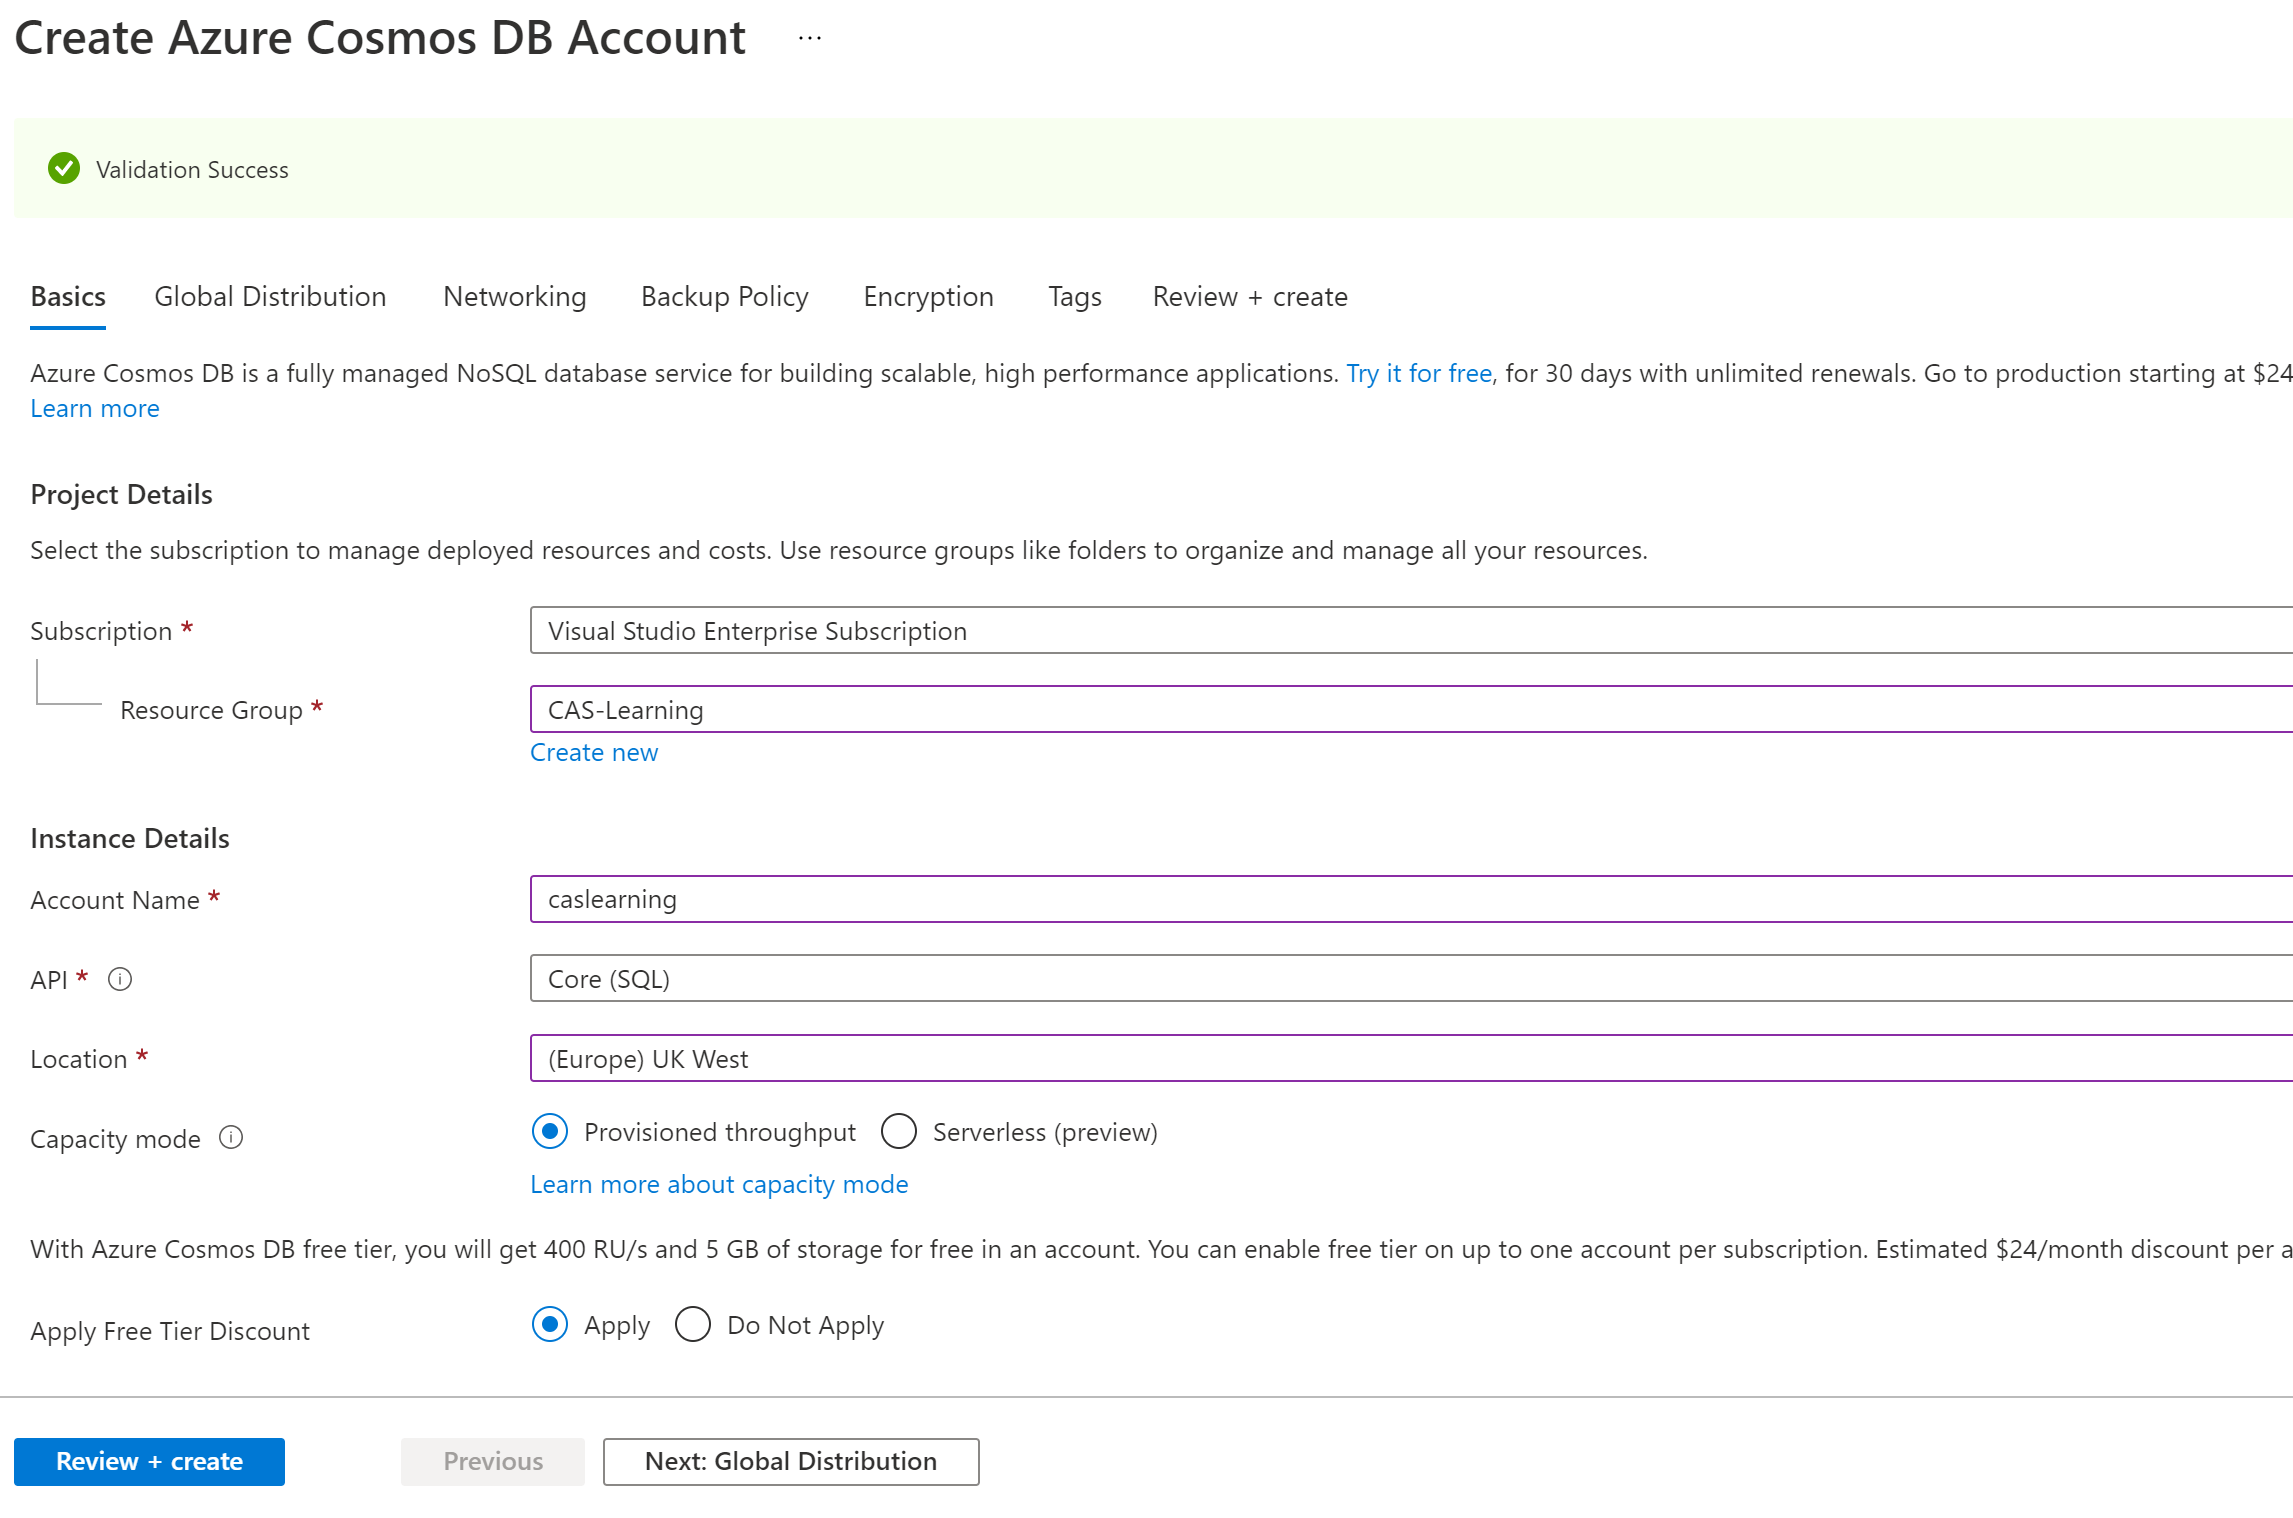
Again back to the top search bar and type ‘CosmosDB’ and select, fill in the first page and again this is all you need really. Account name is just a unique name for your CosmosDB Account and the API is the type of query language you want to use like SQL, Mongo etc you can read more about CosmosDB at docs.microsoft.com/rest/api/cosmos-db
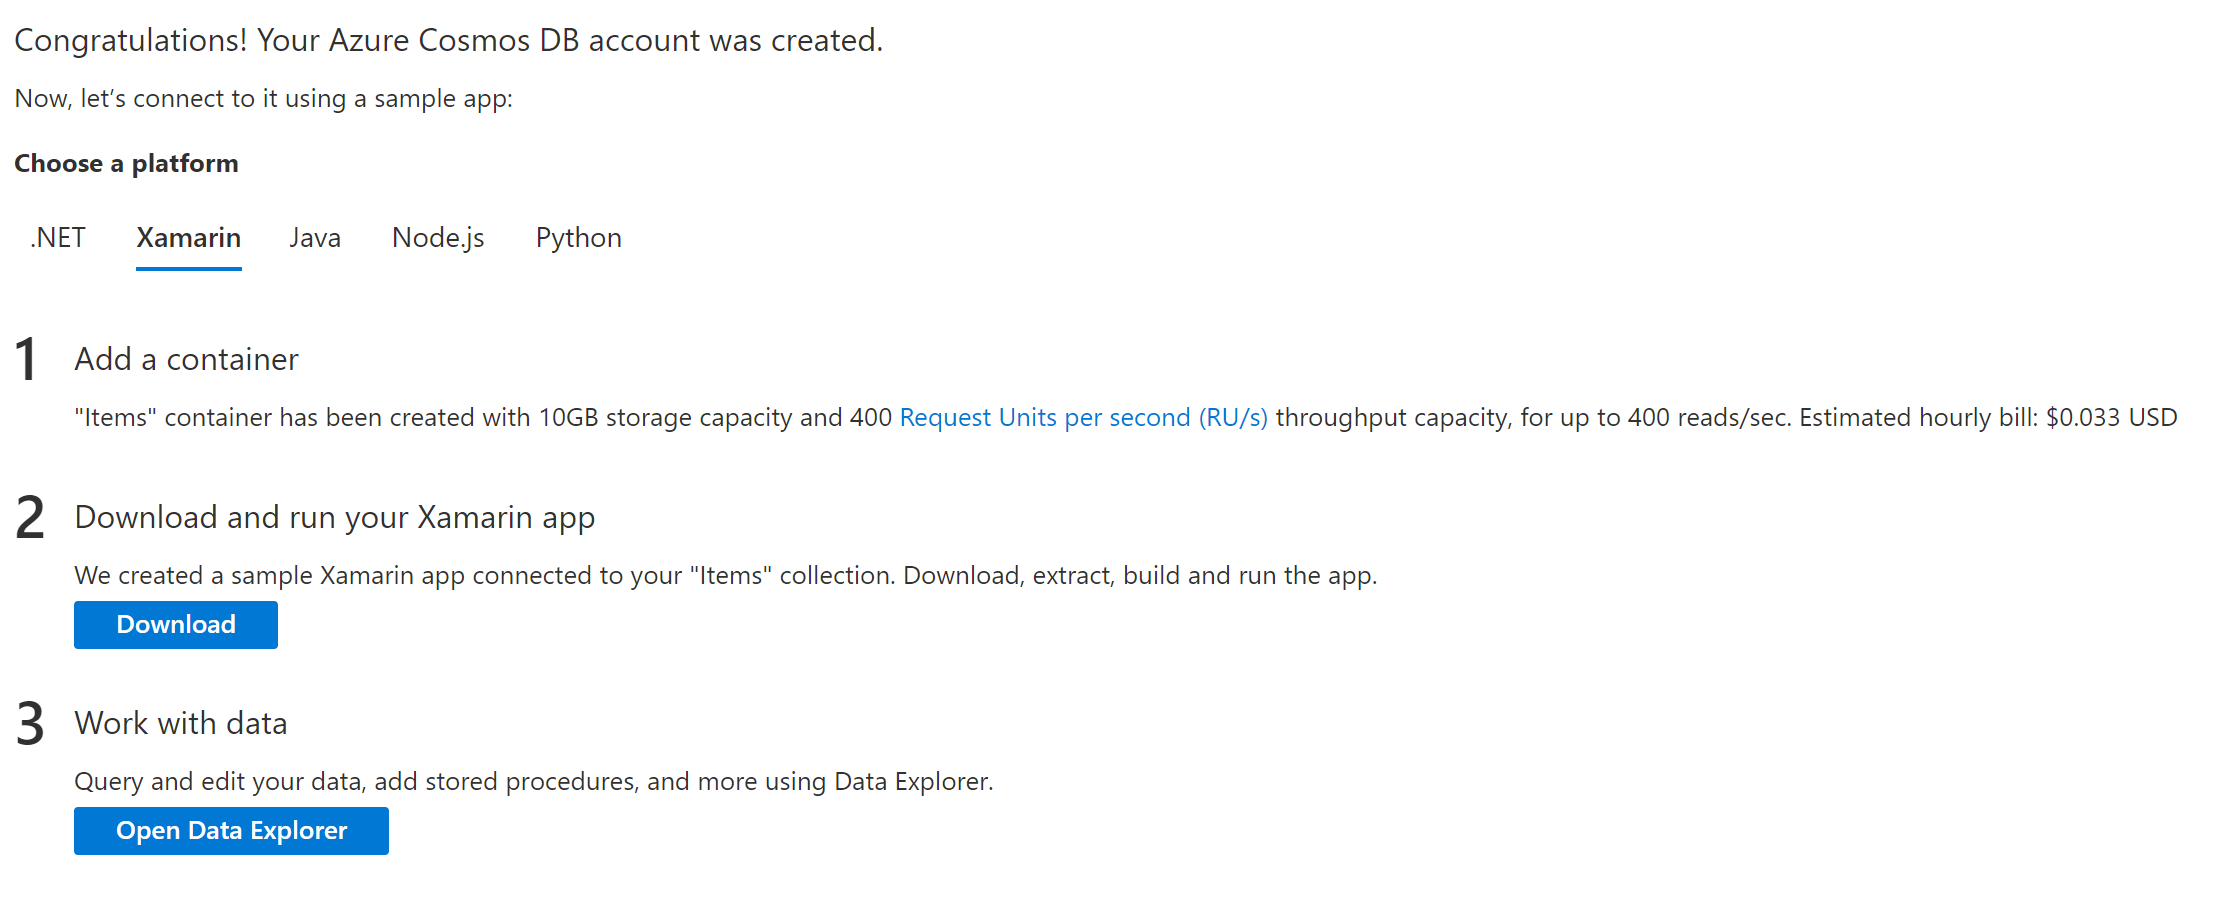
Now that we have created our CosmosDB resource go in and you should see the QuickStart page if not select it on the left and click Xamarin (Might have updated to MAUI by now!) and this will finish the account creation and will even offer a templated app to download if you wish.
Lets get that Secret
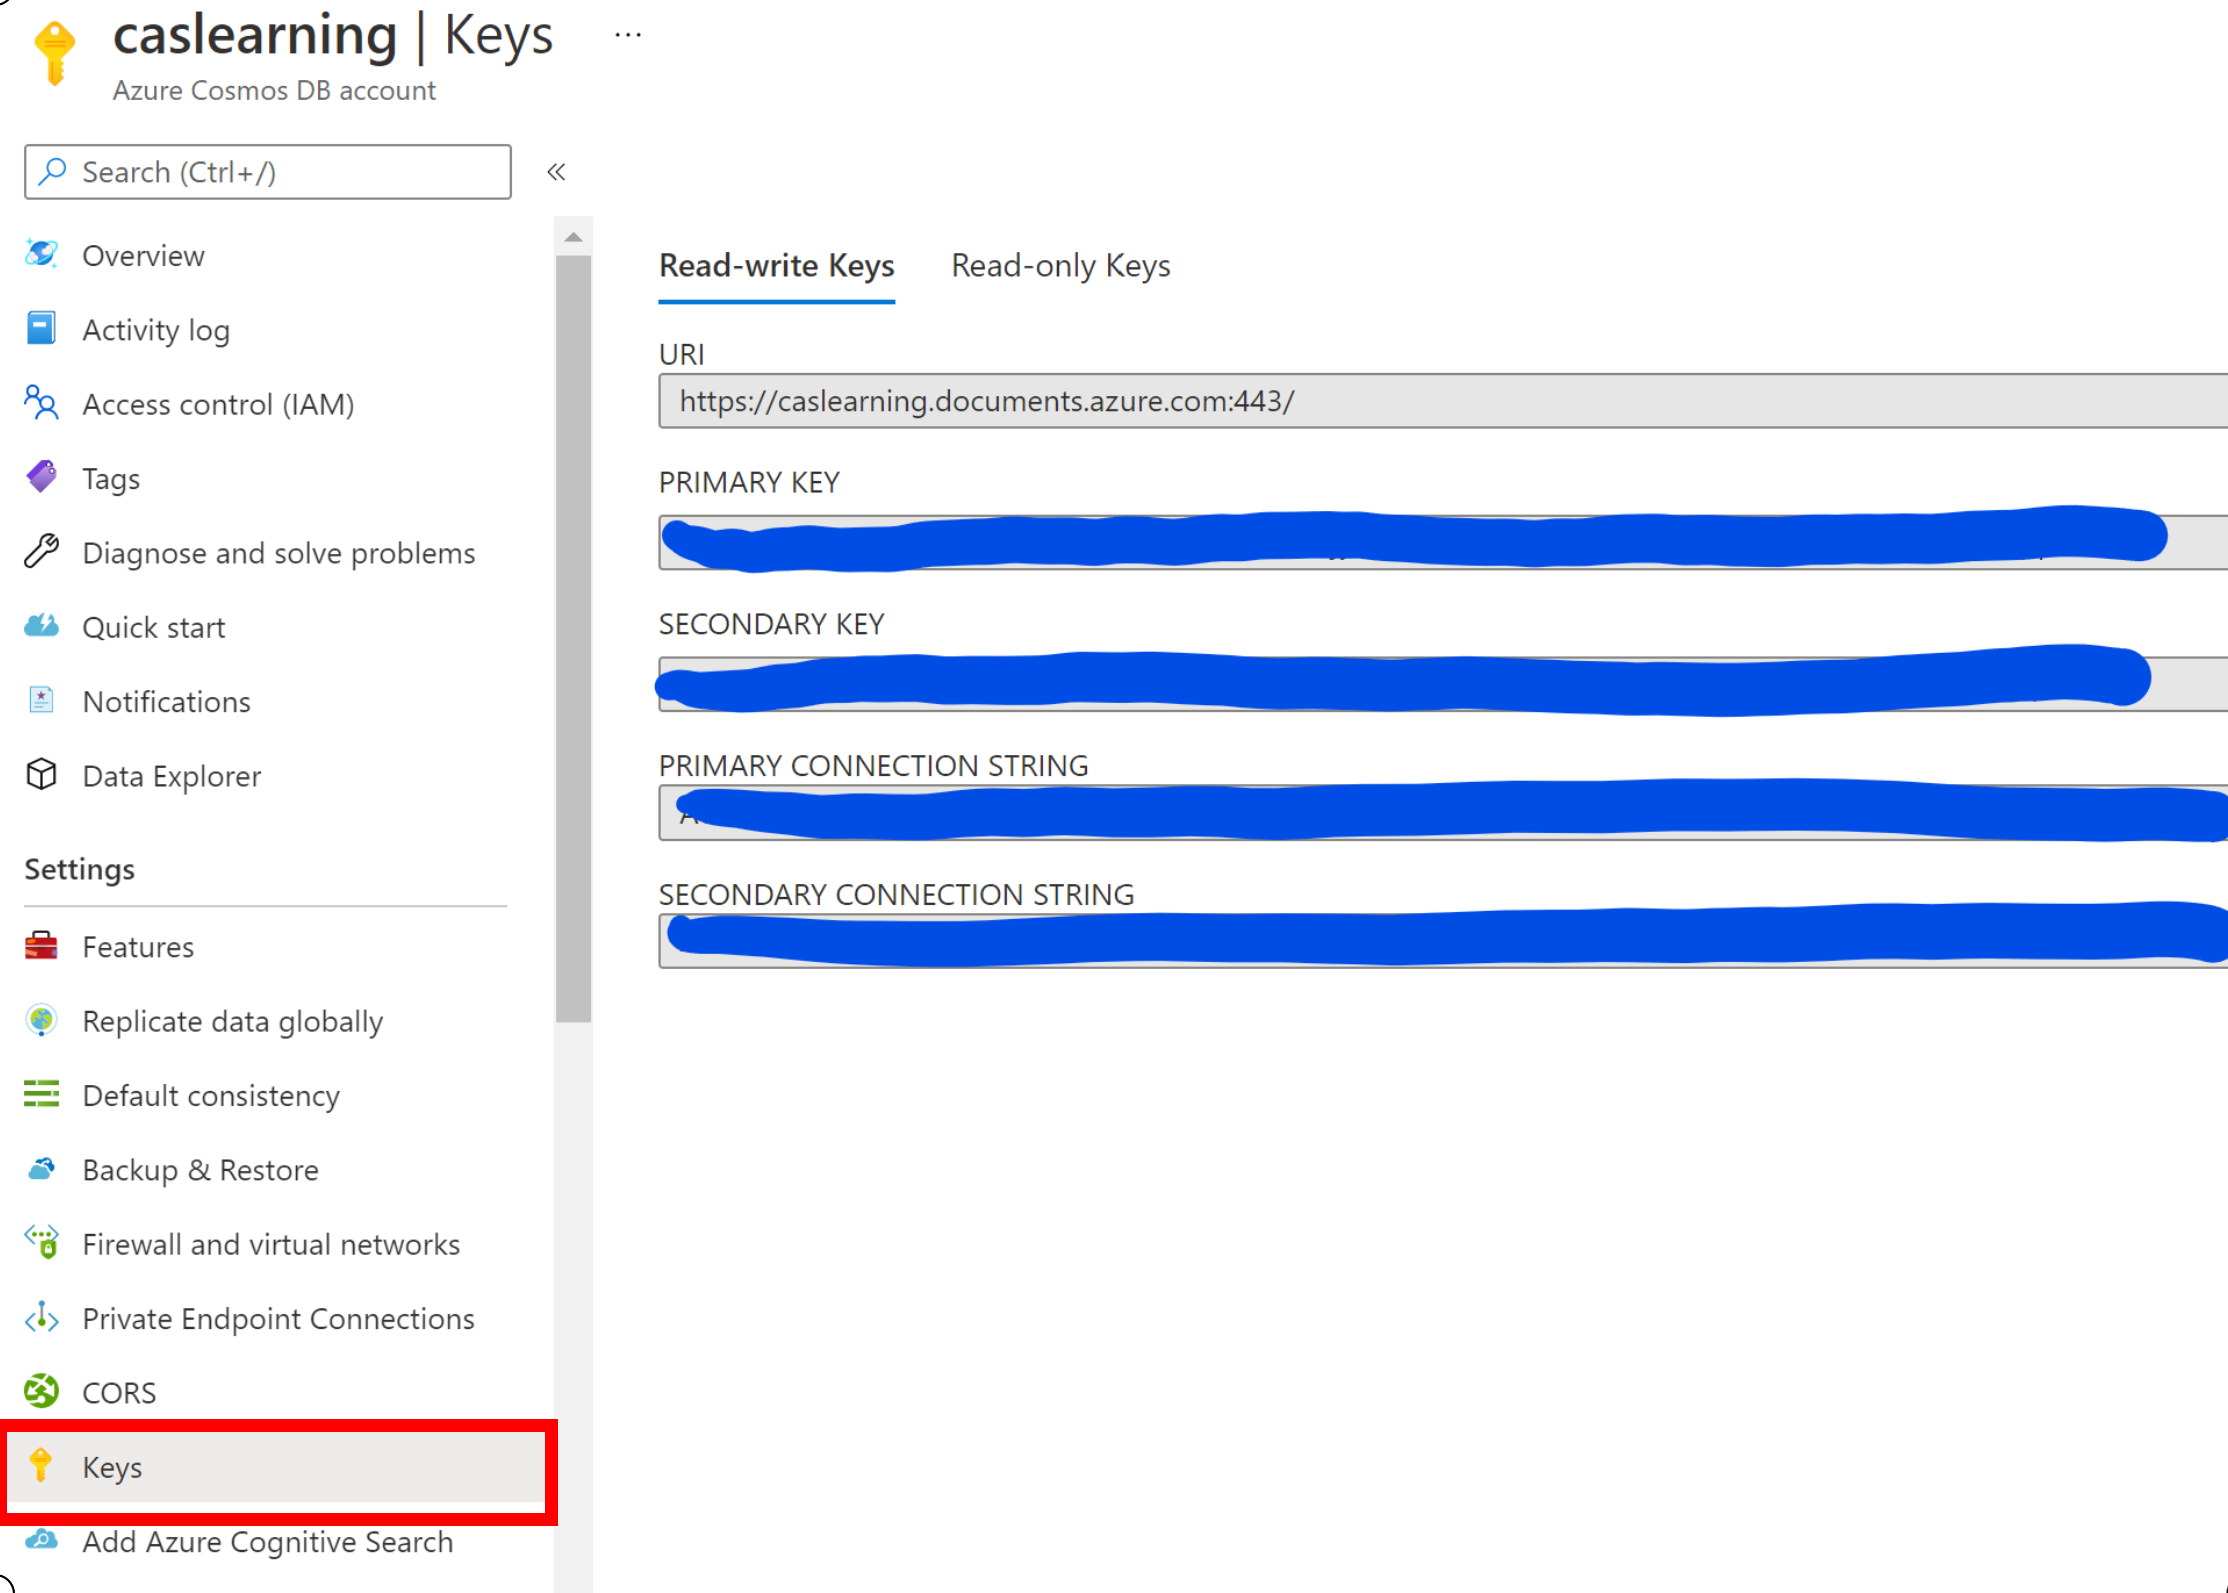
Now we have our data store when we connect we will do so using a Connection String and this is the secret we don’t want to end up in Source Control or leaked/lost/destroyed etc. SO lets grab that and put it into our new KeyVault.
Select Keys in the left menu under settings and copy the Primary Key.
Adding the Secret to KeyVault
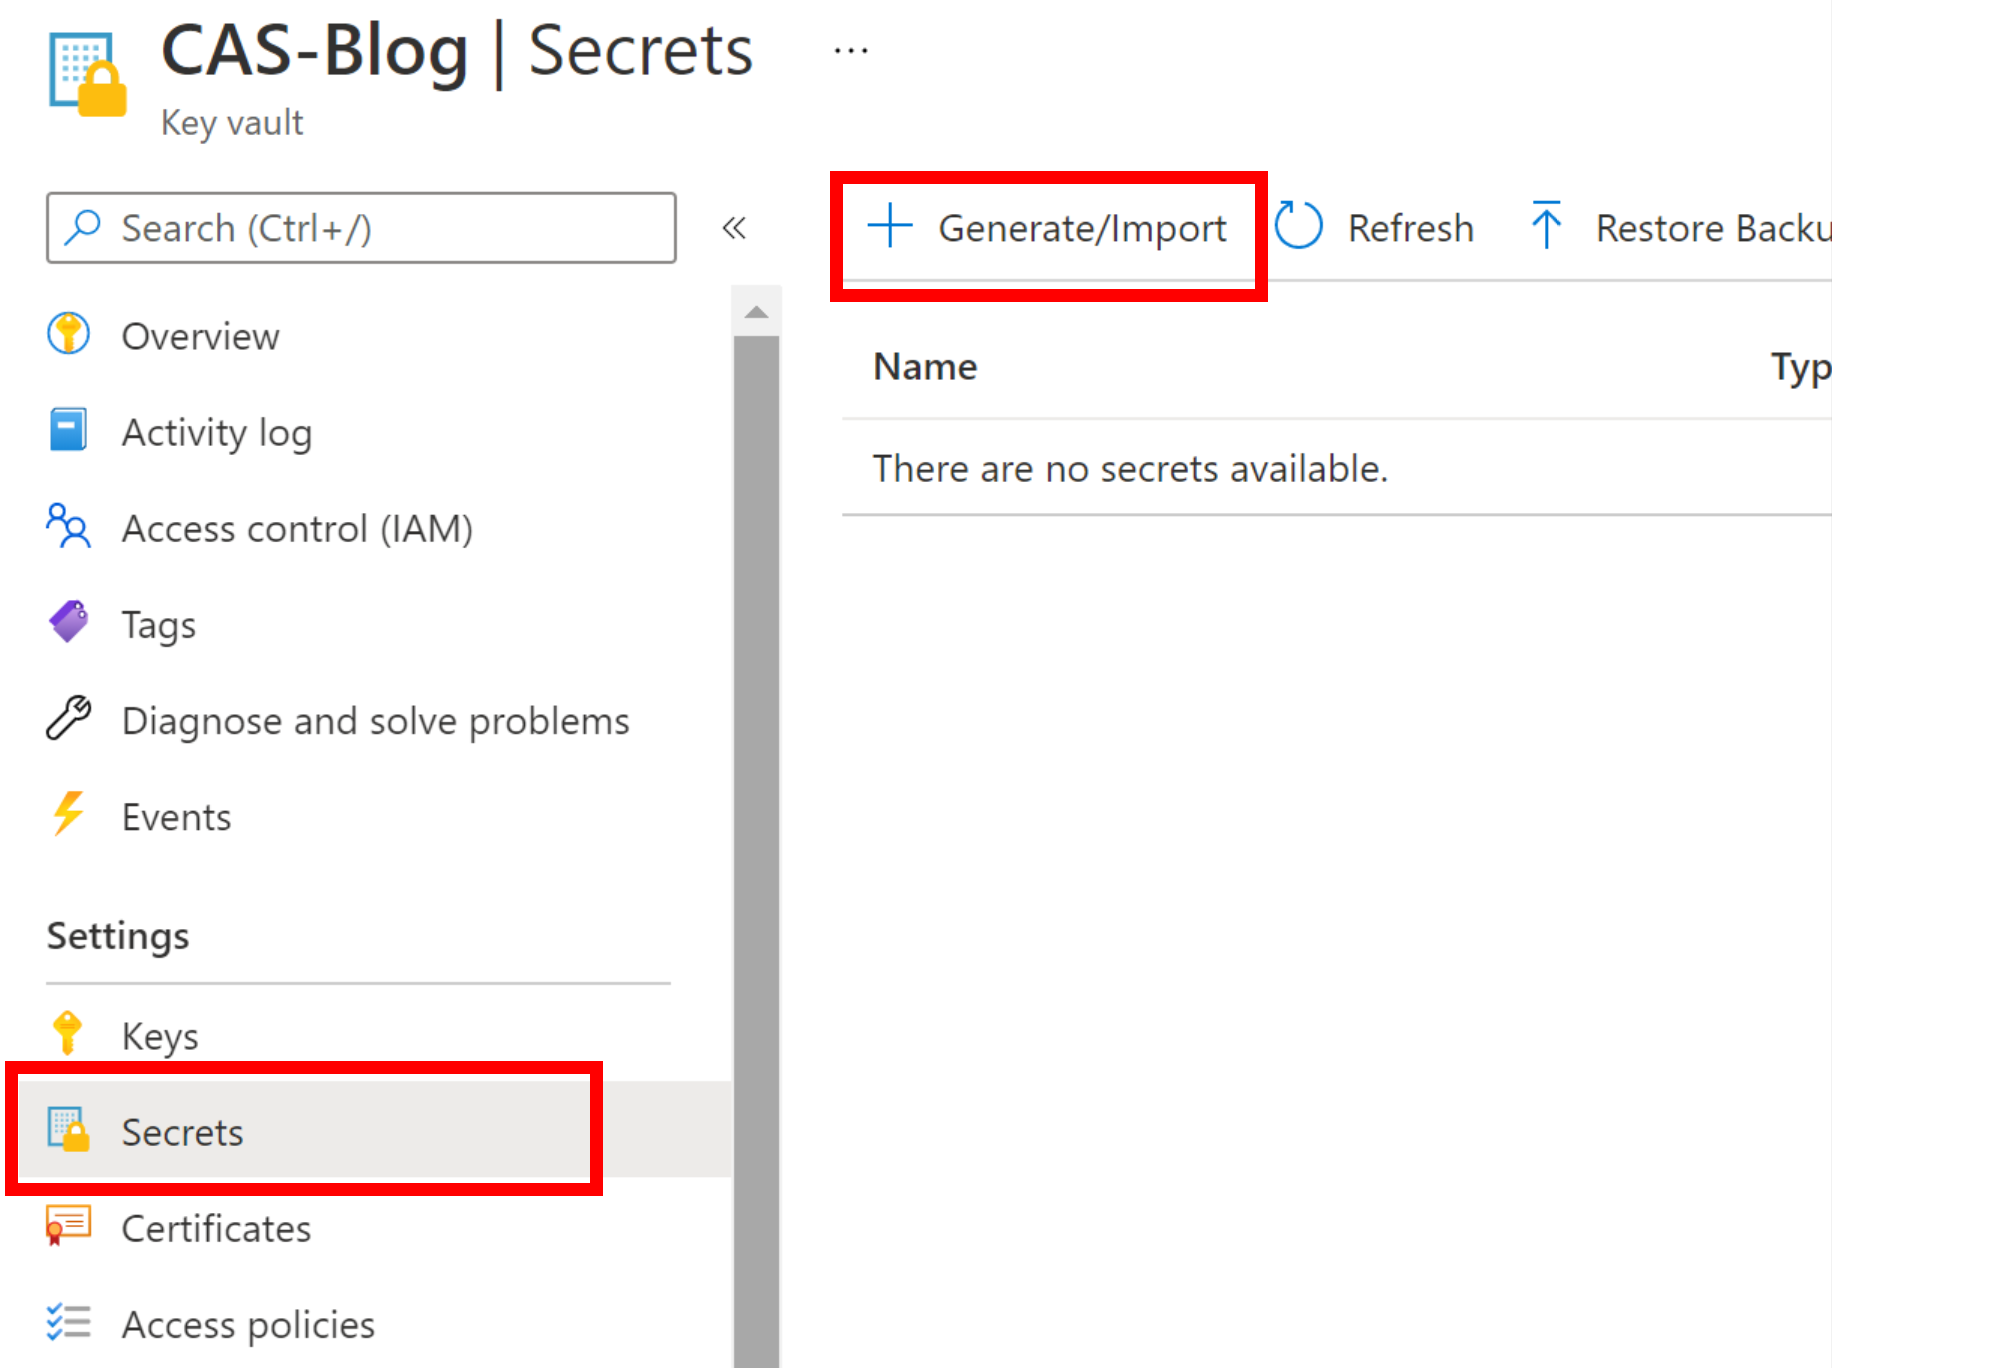
Now we have the secret lets add it to KeyVault.
Select Secrets under Settings and Generate/Import.
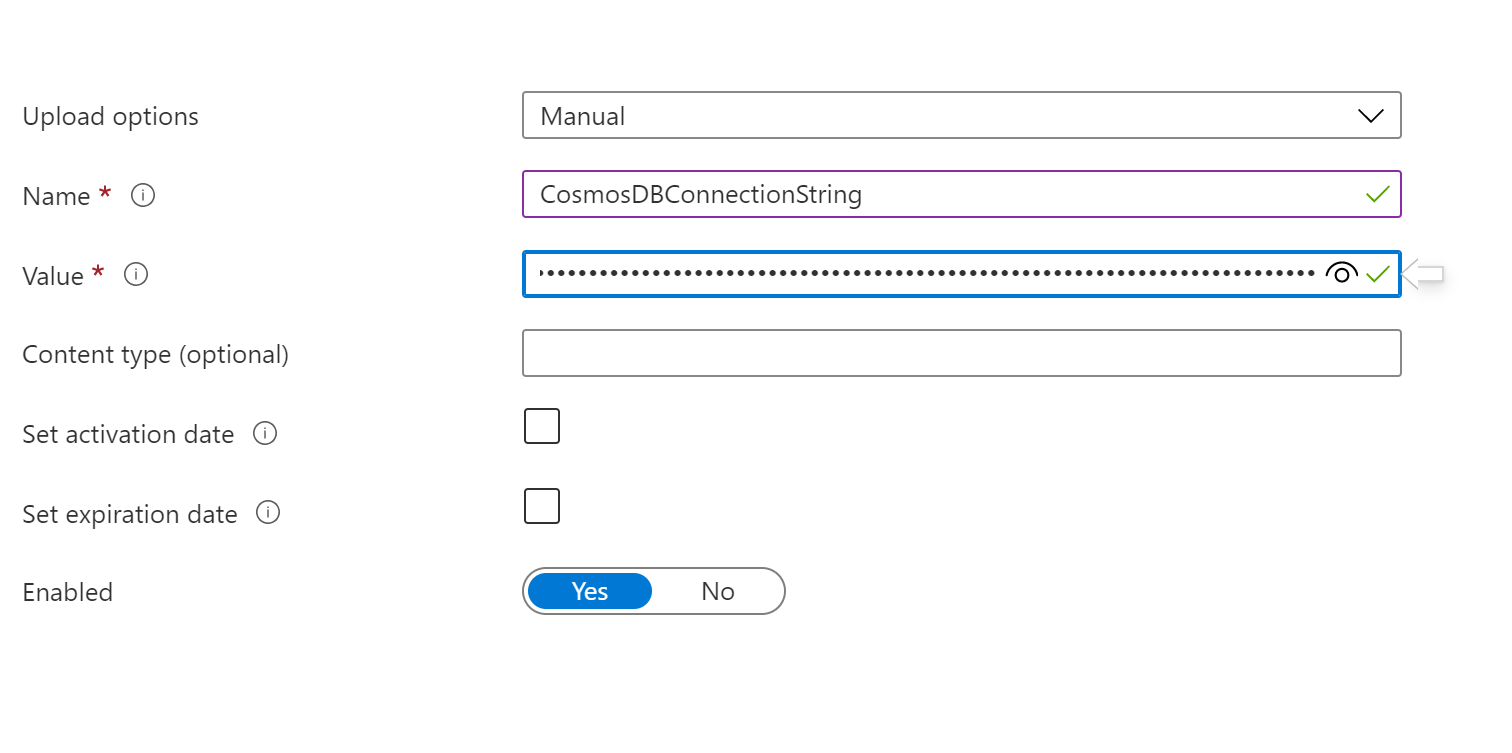
Now give your Secret a name and Paste the connection string into the Value, make sure Enabled is set to ‘Yes’ and your done. Now that was easy wasn’t it…
That’s it super simple our secret is now locked away and all the team can access this secret and it is also the single source of truth for the secret and can be secured using the normal Azure AD security which is beyond the scope of this post.
Let’s create our WebAPI
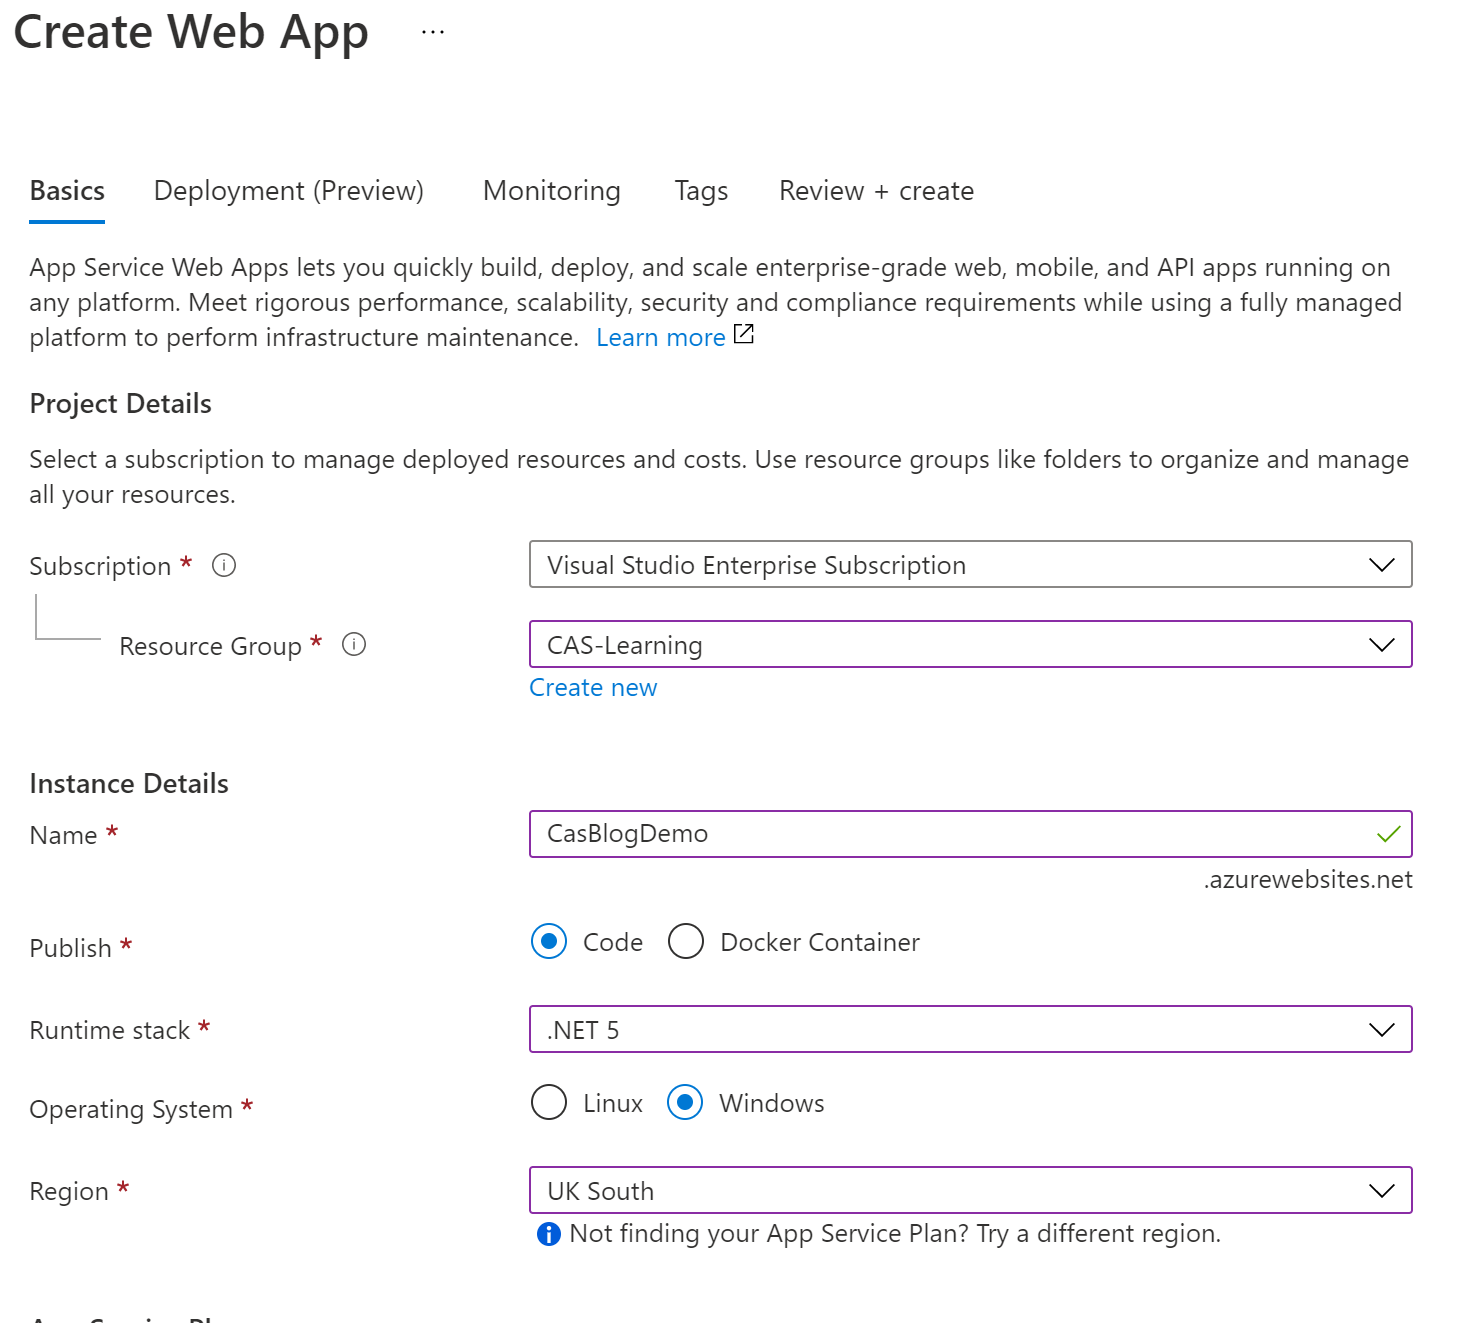
As before in the top search in the Azure Portal enter ‘WebAPI’ and select, again as before complete the first page as you can see here I have opted for .NET 5 and you want to try and keep the regions the same if you can.
Unlike before you may want to consider the Monitoring Tab as it defaults to having Analytics turned on and this has an associated cost.
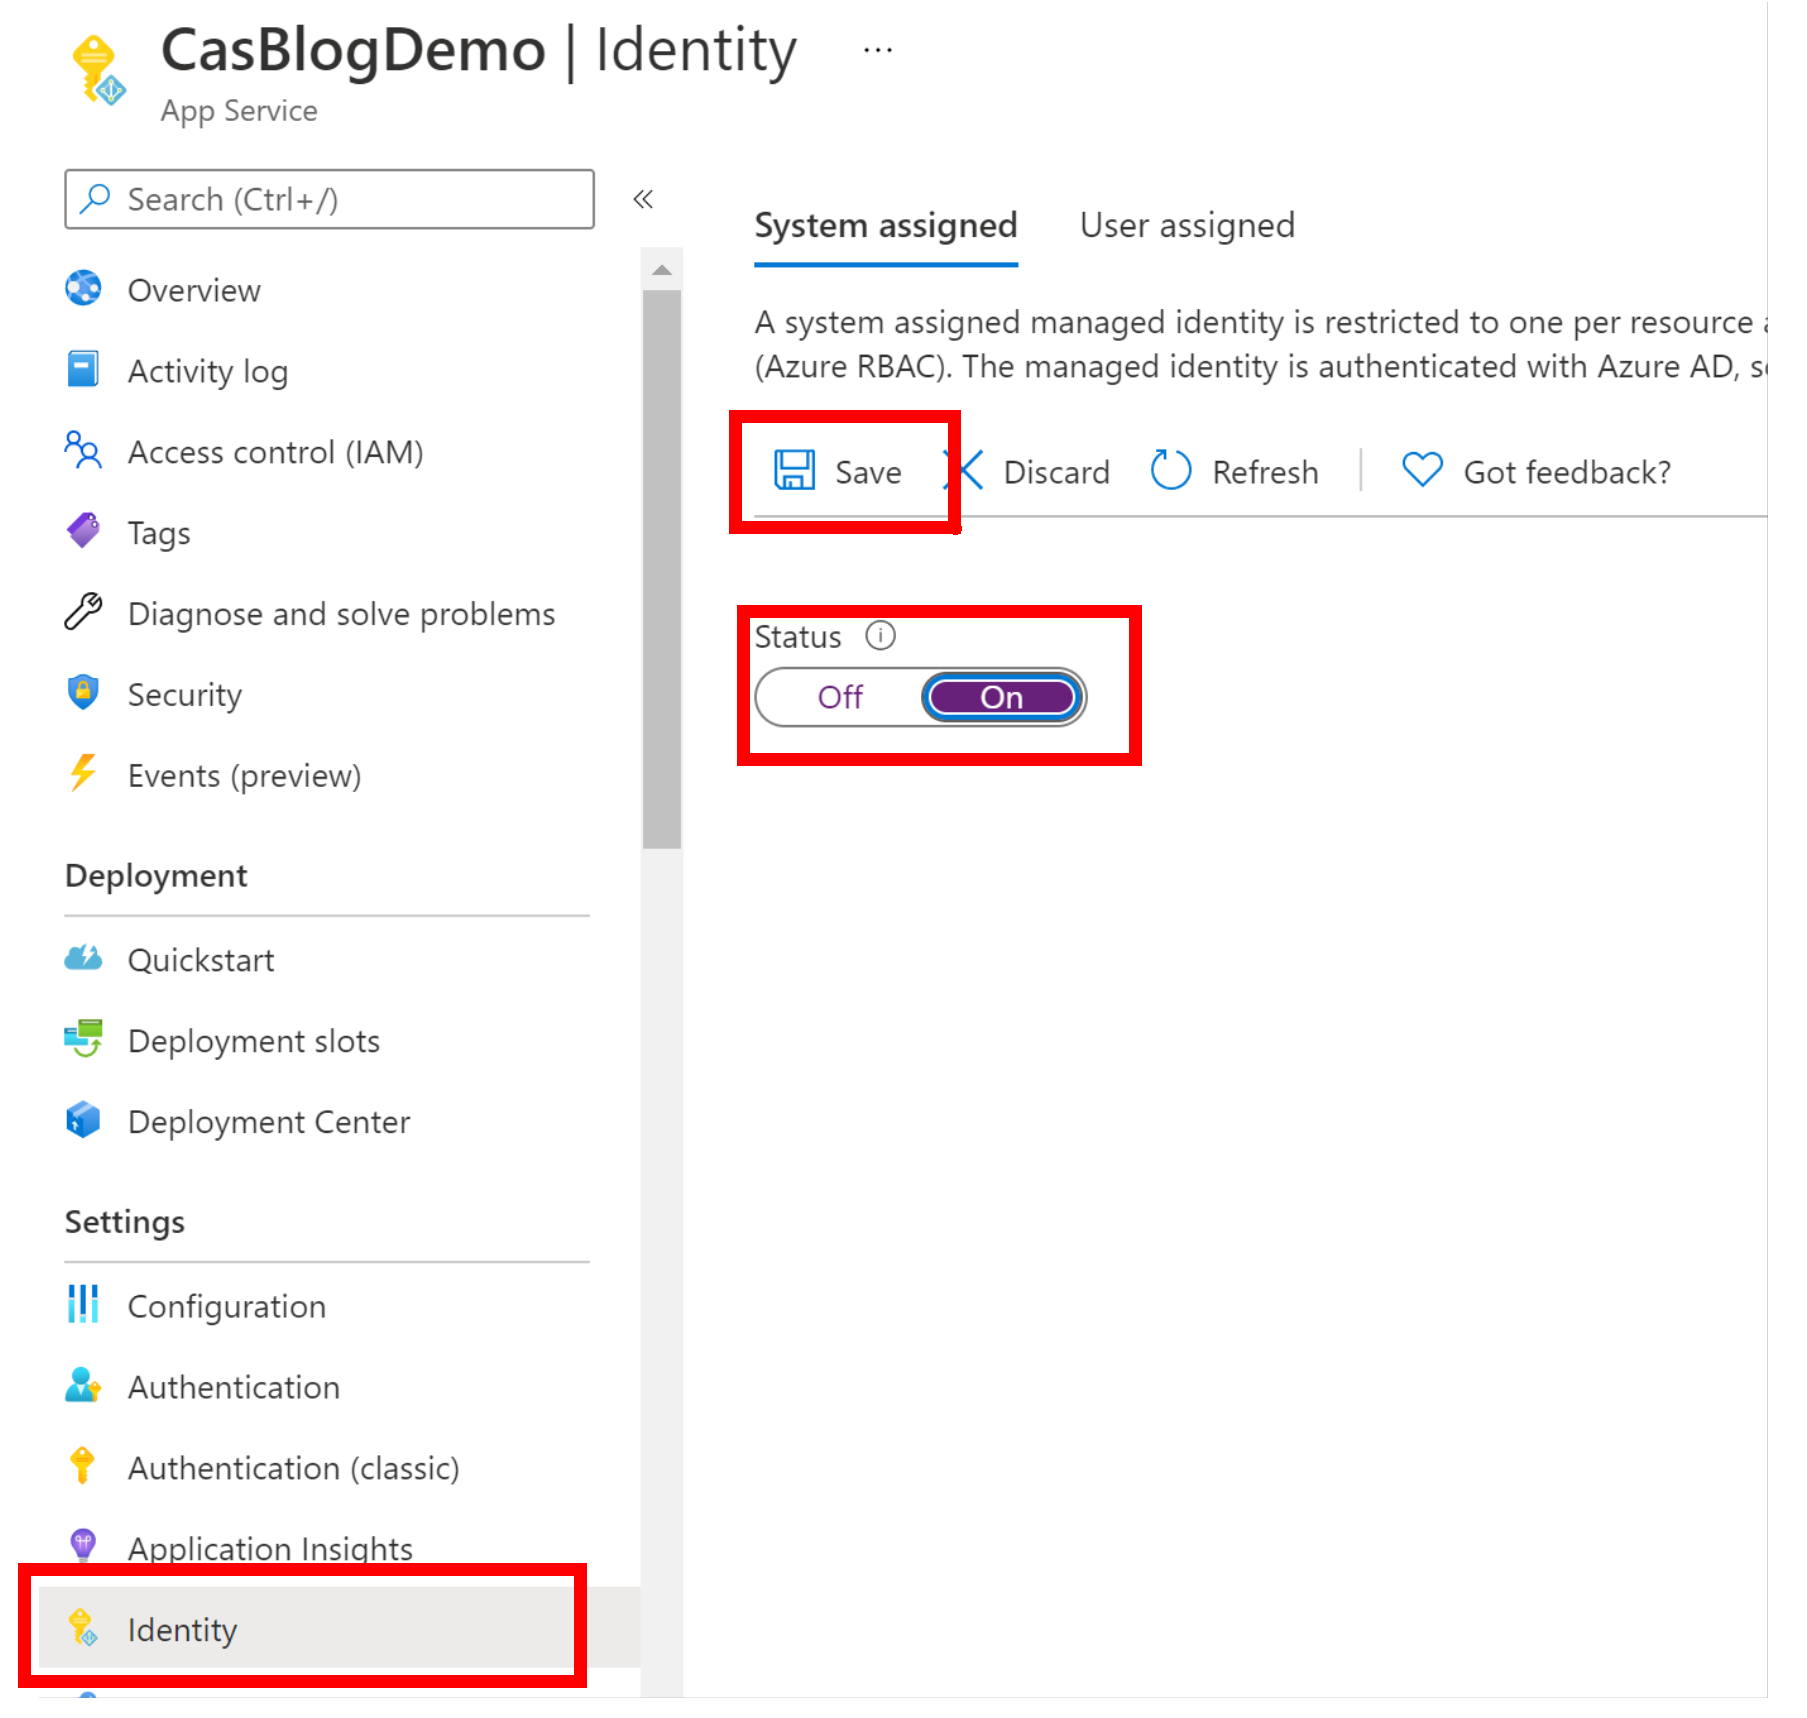
Now our WebAPI is created we need to give it an identity so that we can configure it’s access to the KeyVault. This is done by opening the Identity blade and turning on the ‘System Assigned’ identity which means that the Azure AD for your subscription takes care of the management of the Identity for you, just remember to click the save otherwise it won’t work otherwise. That’s it we are done with WebAPI set-up how easy was that!
Tell KeyVault to allow the WebAPI access
Now we have the WebAPI set-up and it has an Azure Identity we can configure the KeyVault to allow access.
Open KeyVault again, and under settings click the Access Policies and then the +Add Access Policy as shown in the image.
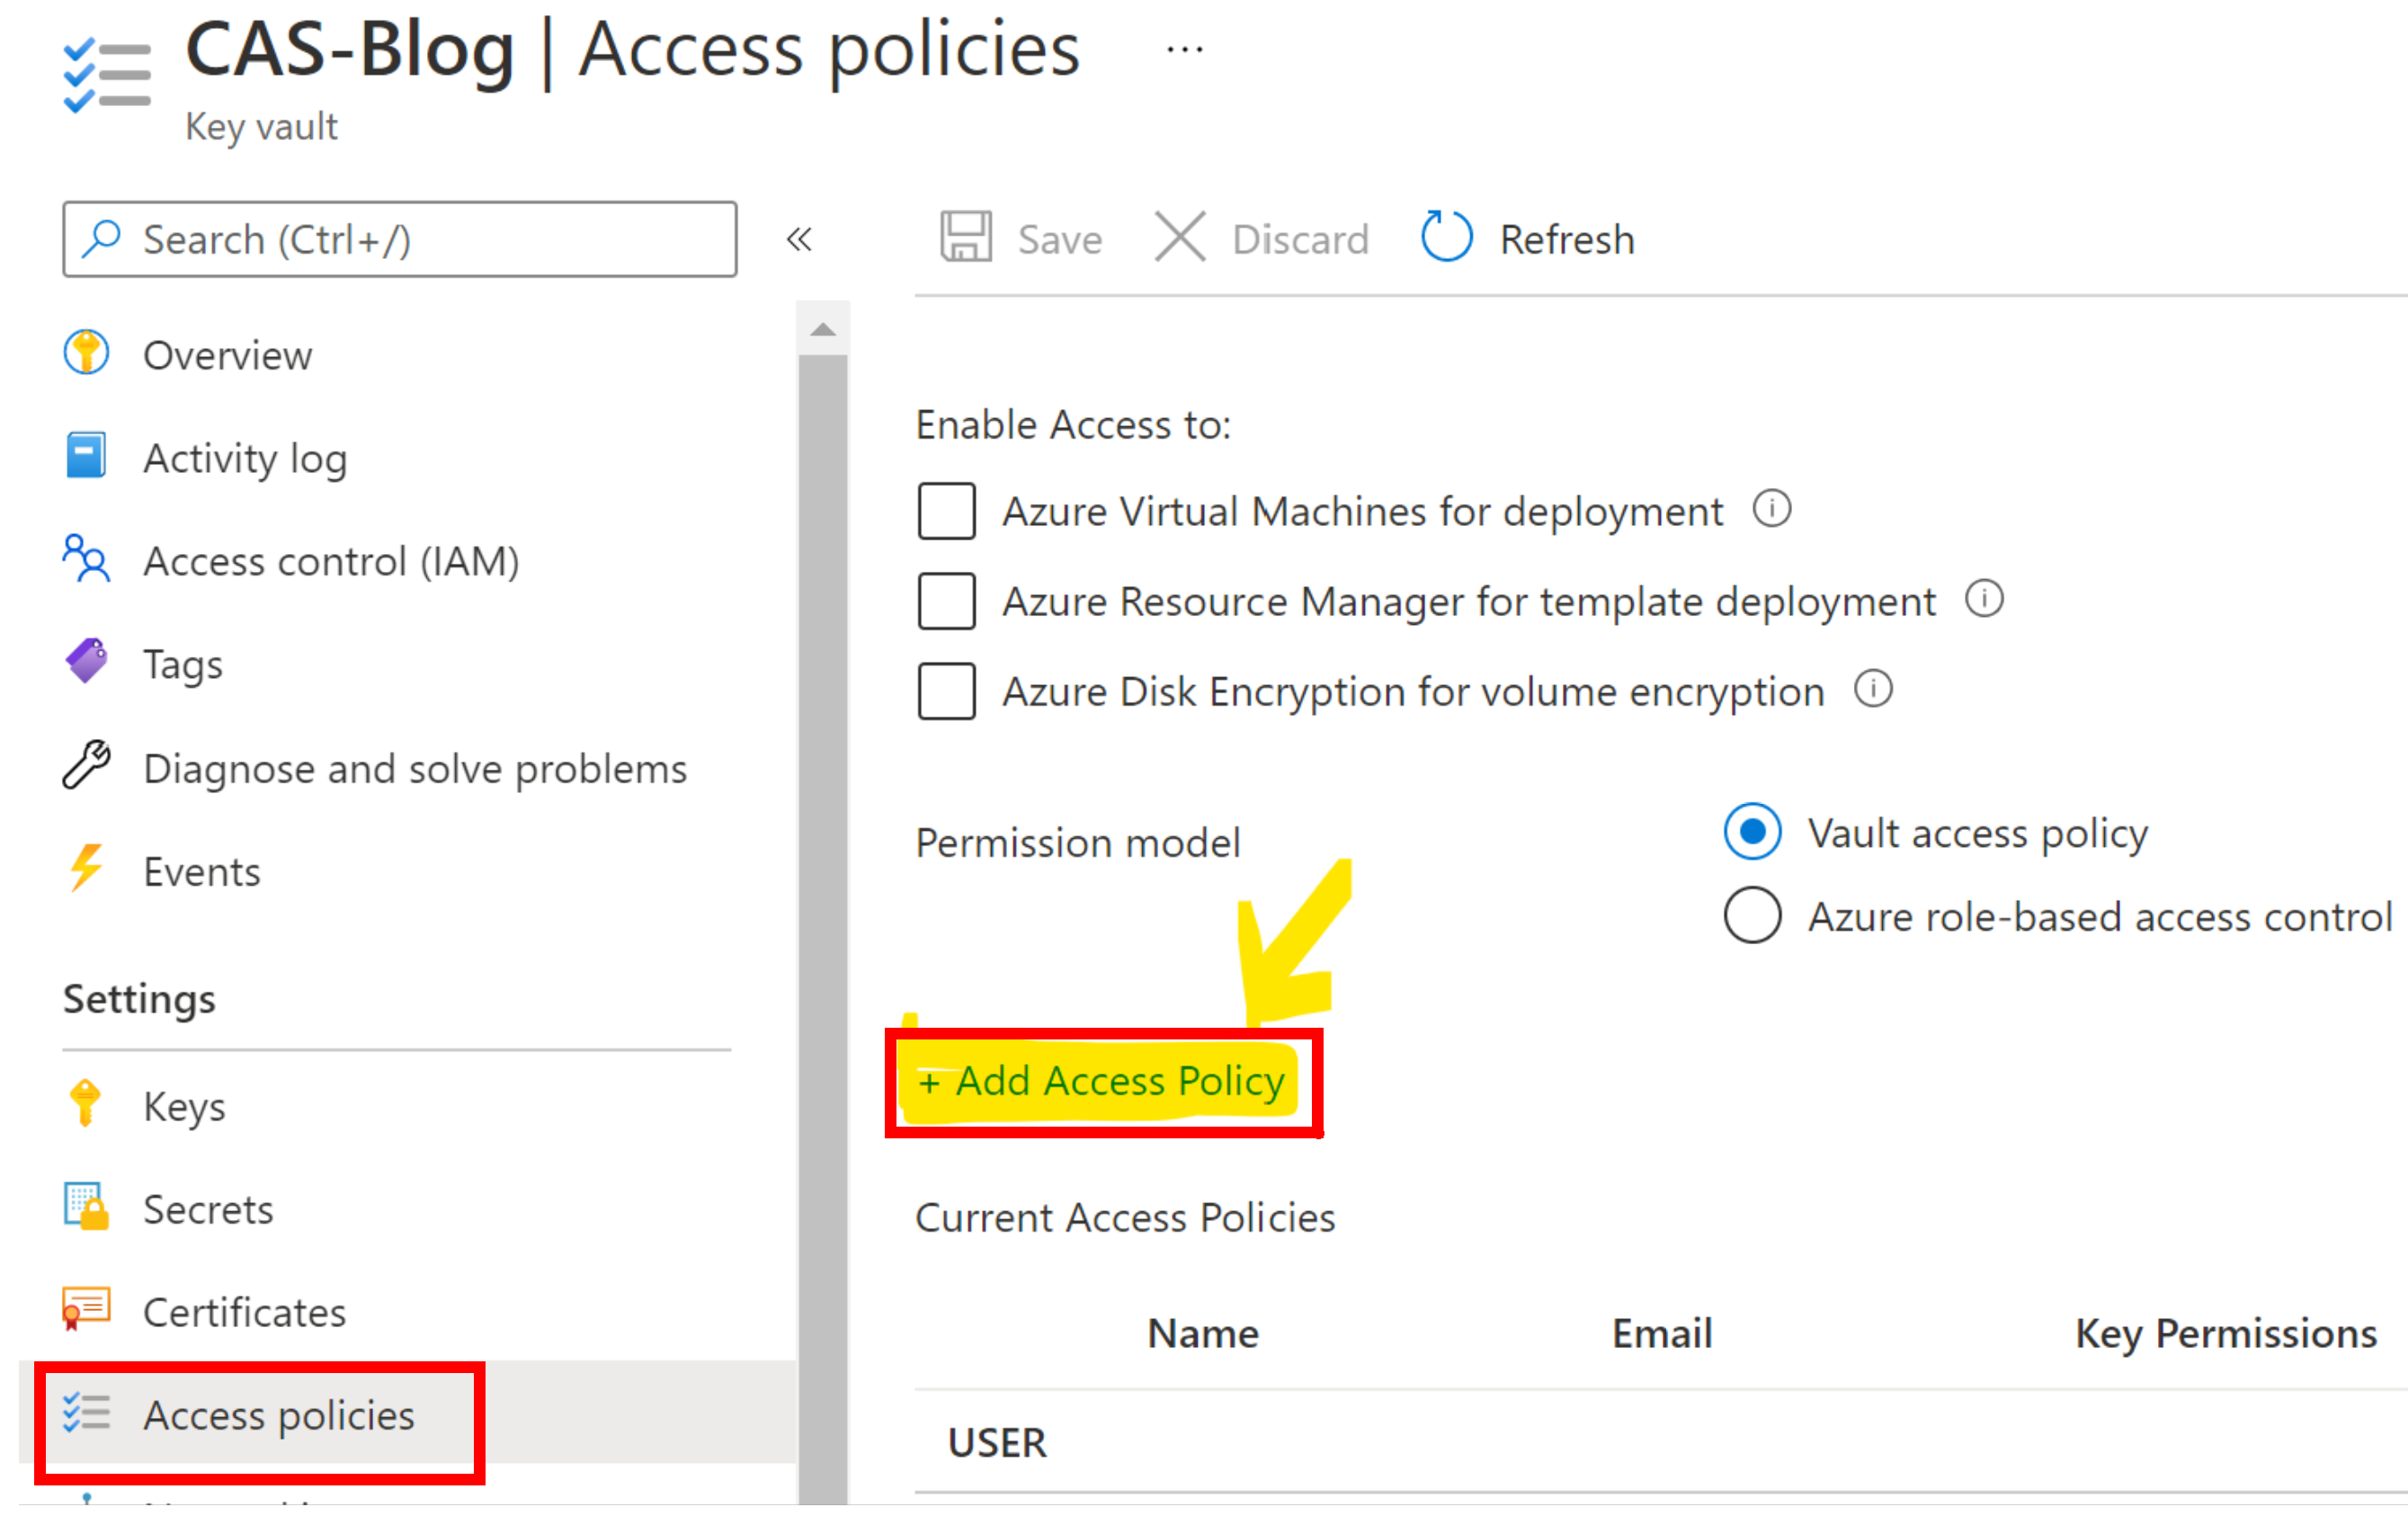
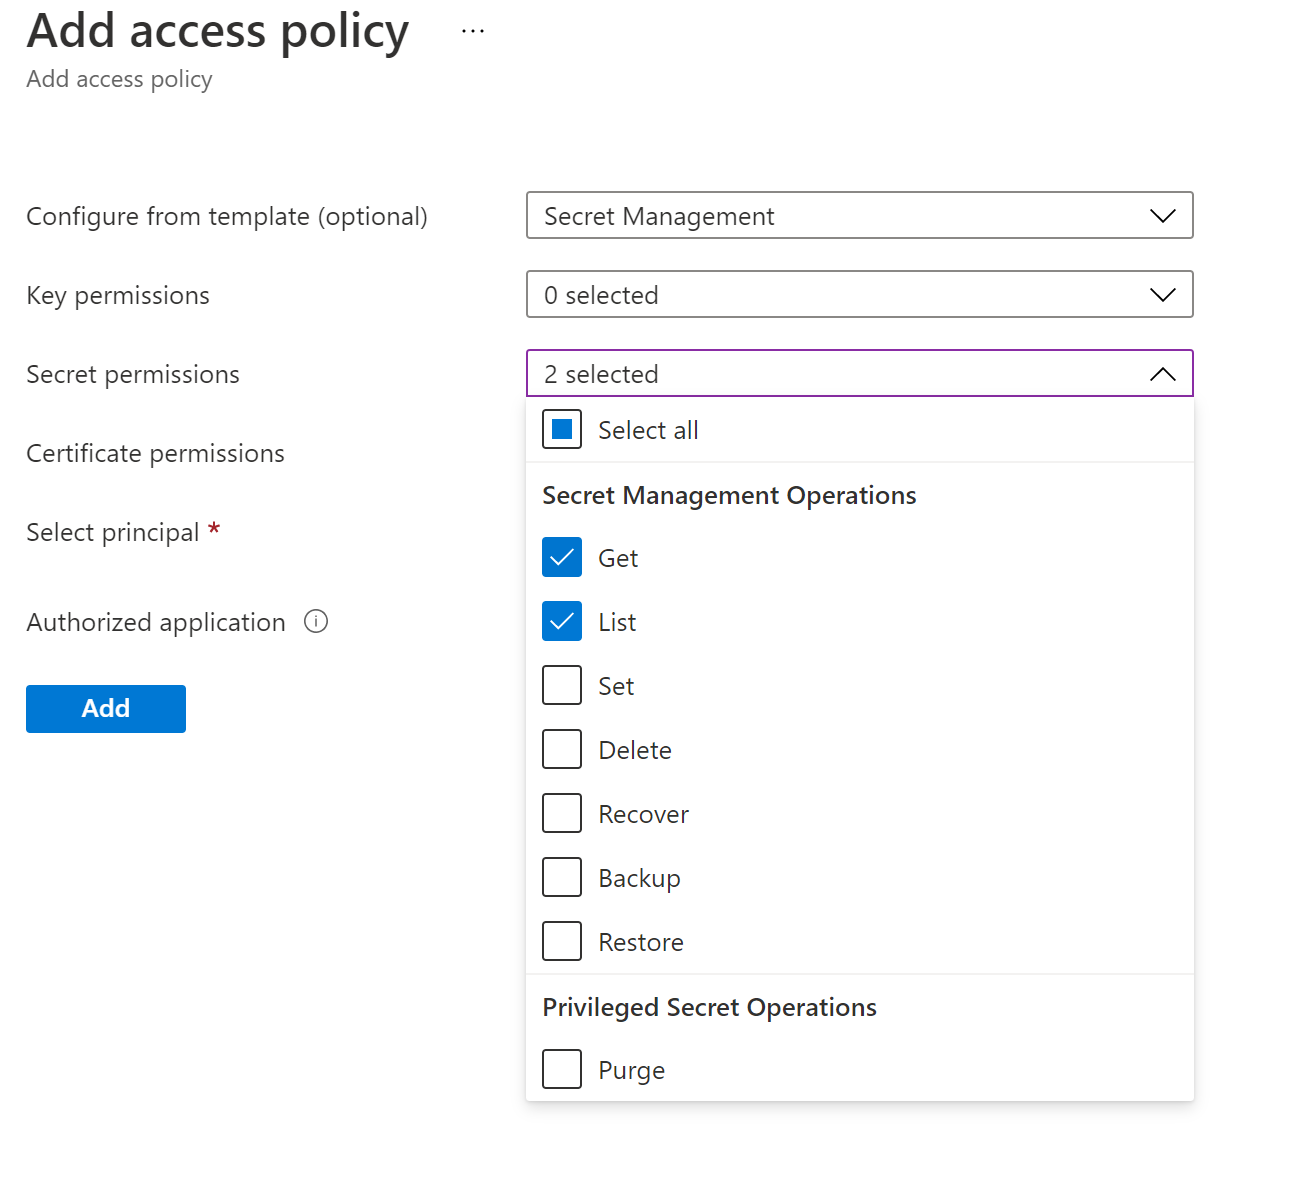
Now we need to assign the policies we wish to allow and as always with securing your access layers remember Less is More, so give the bare minimum access needed for the system to run and no more and always question if the access you are granting is really needed. For this project and indeed nearly all project I work on where I am securing the Connection Strings I select Secret Management and then under the Secret Permissions drop down I grant the GET and LIST (often just GET actually!).
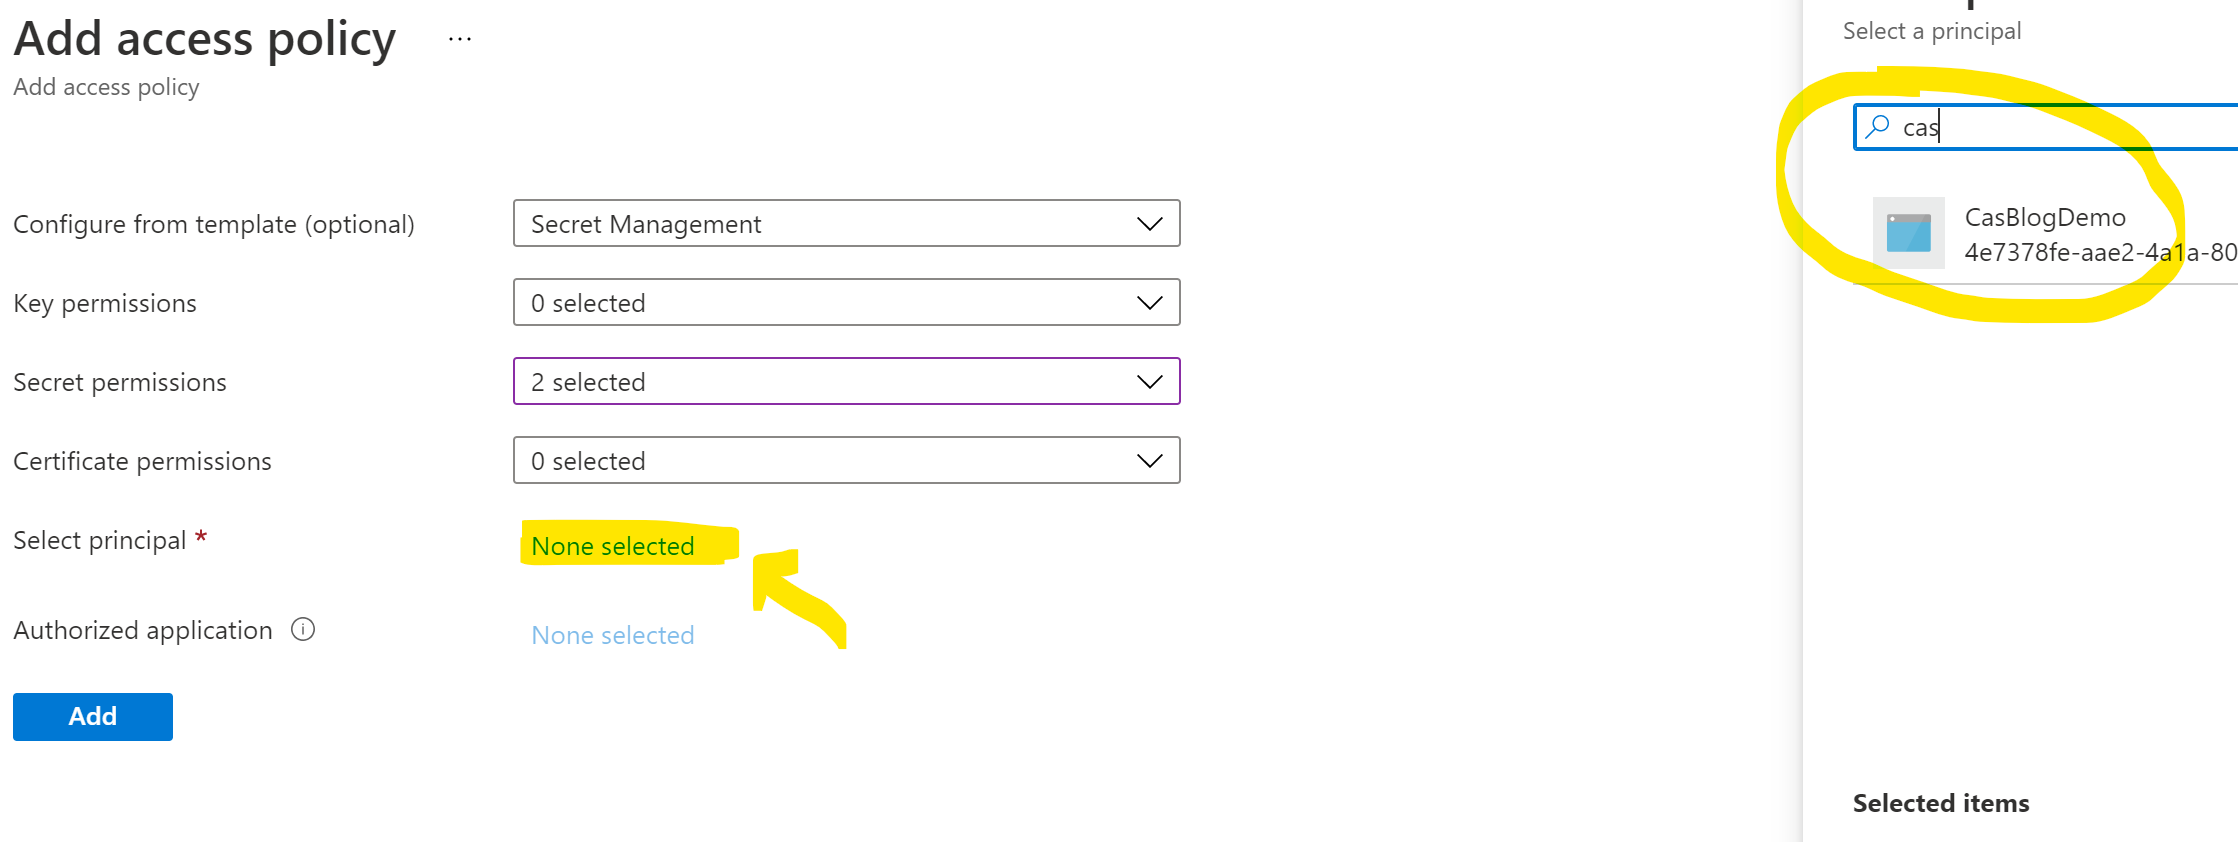
The next required part is the Select Principal clicking this opens the side panel to the right and has a long list of principals you can choose from but as we want to grant this access to our WebAPI if in the search box you started to type the name of the WebAPI it will appear ready to be selected.
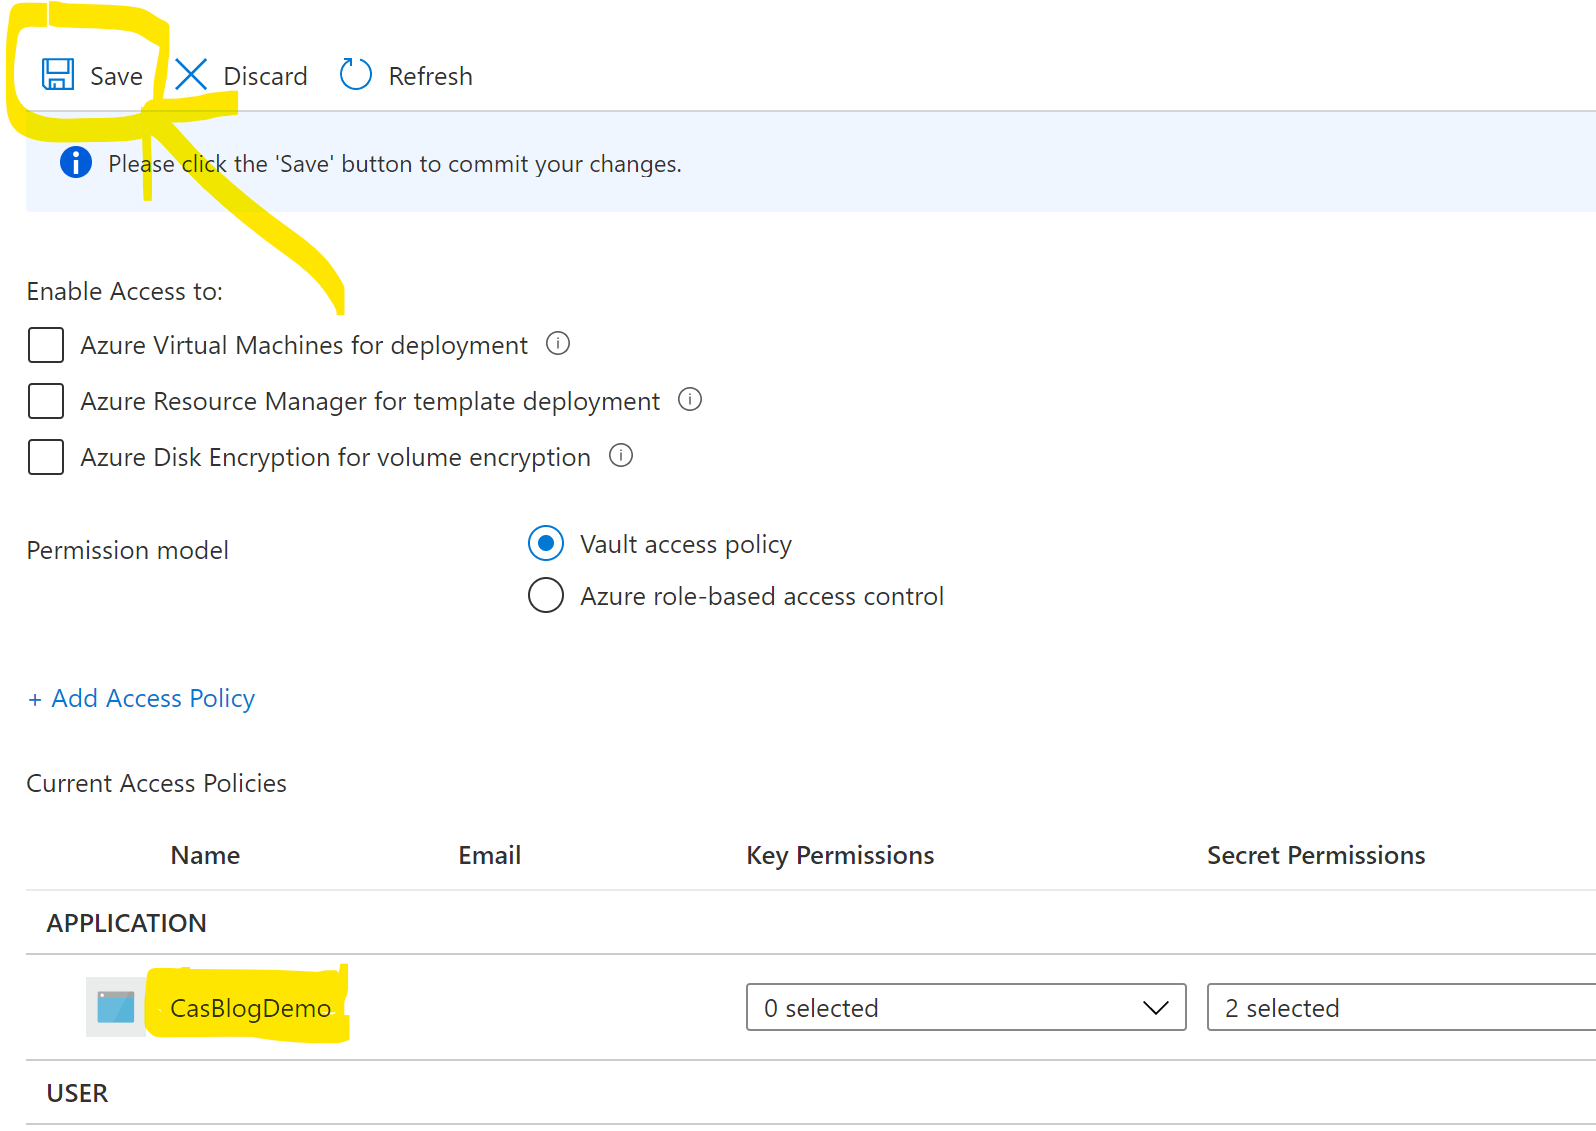
Your done on this page so click the ADD button to add the policy and this returns you to the Access Policies page and the really important part and I am guilty of always forgetting this part (It really should be improved UI wise here…) MAKE SURE you click the save button at the top otherwise you will be back here later repeating these steps… You have been warned.
Let’s create a Mobile App.
So we are now done with setting up our backend, with a CosmosDB for the data store the secrets in the Azure KeyVault and a WebAPI doing the data access and Business logic, we now just need the user interface to make it all worth while.
This is where we will use a Xamarin Mobile App or what will soon be called MAUI (Multi Platform App UI) not the Hawaiian island… You can find out more on the project Github Repo
Lets open Visual Studio and create our Xamarin App, search for Xamarin.Forms in the projects search box and then give it a nice sounding name.
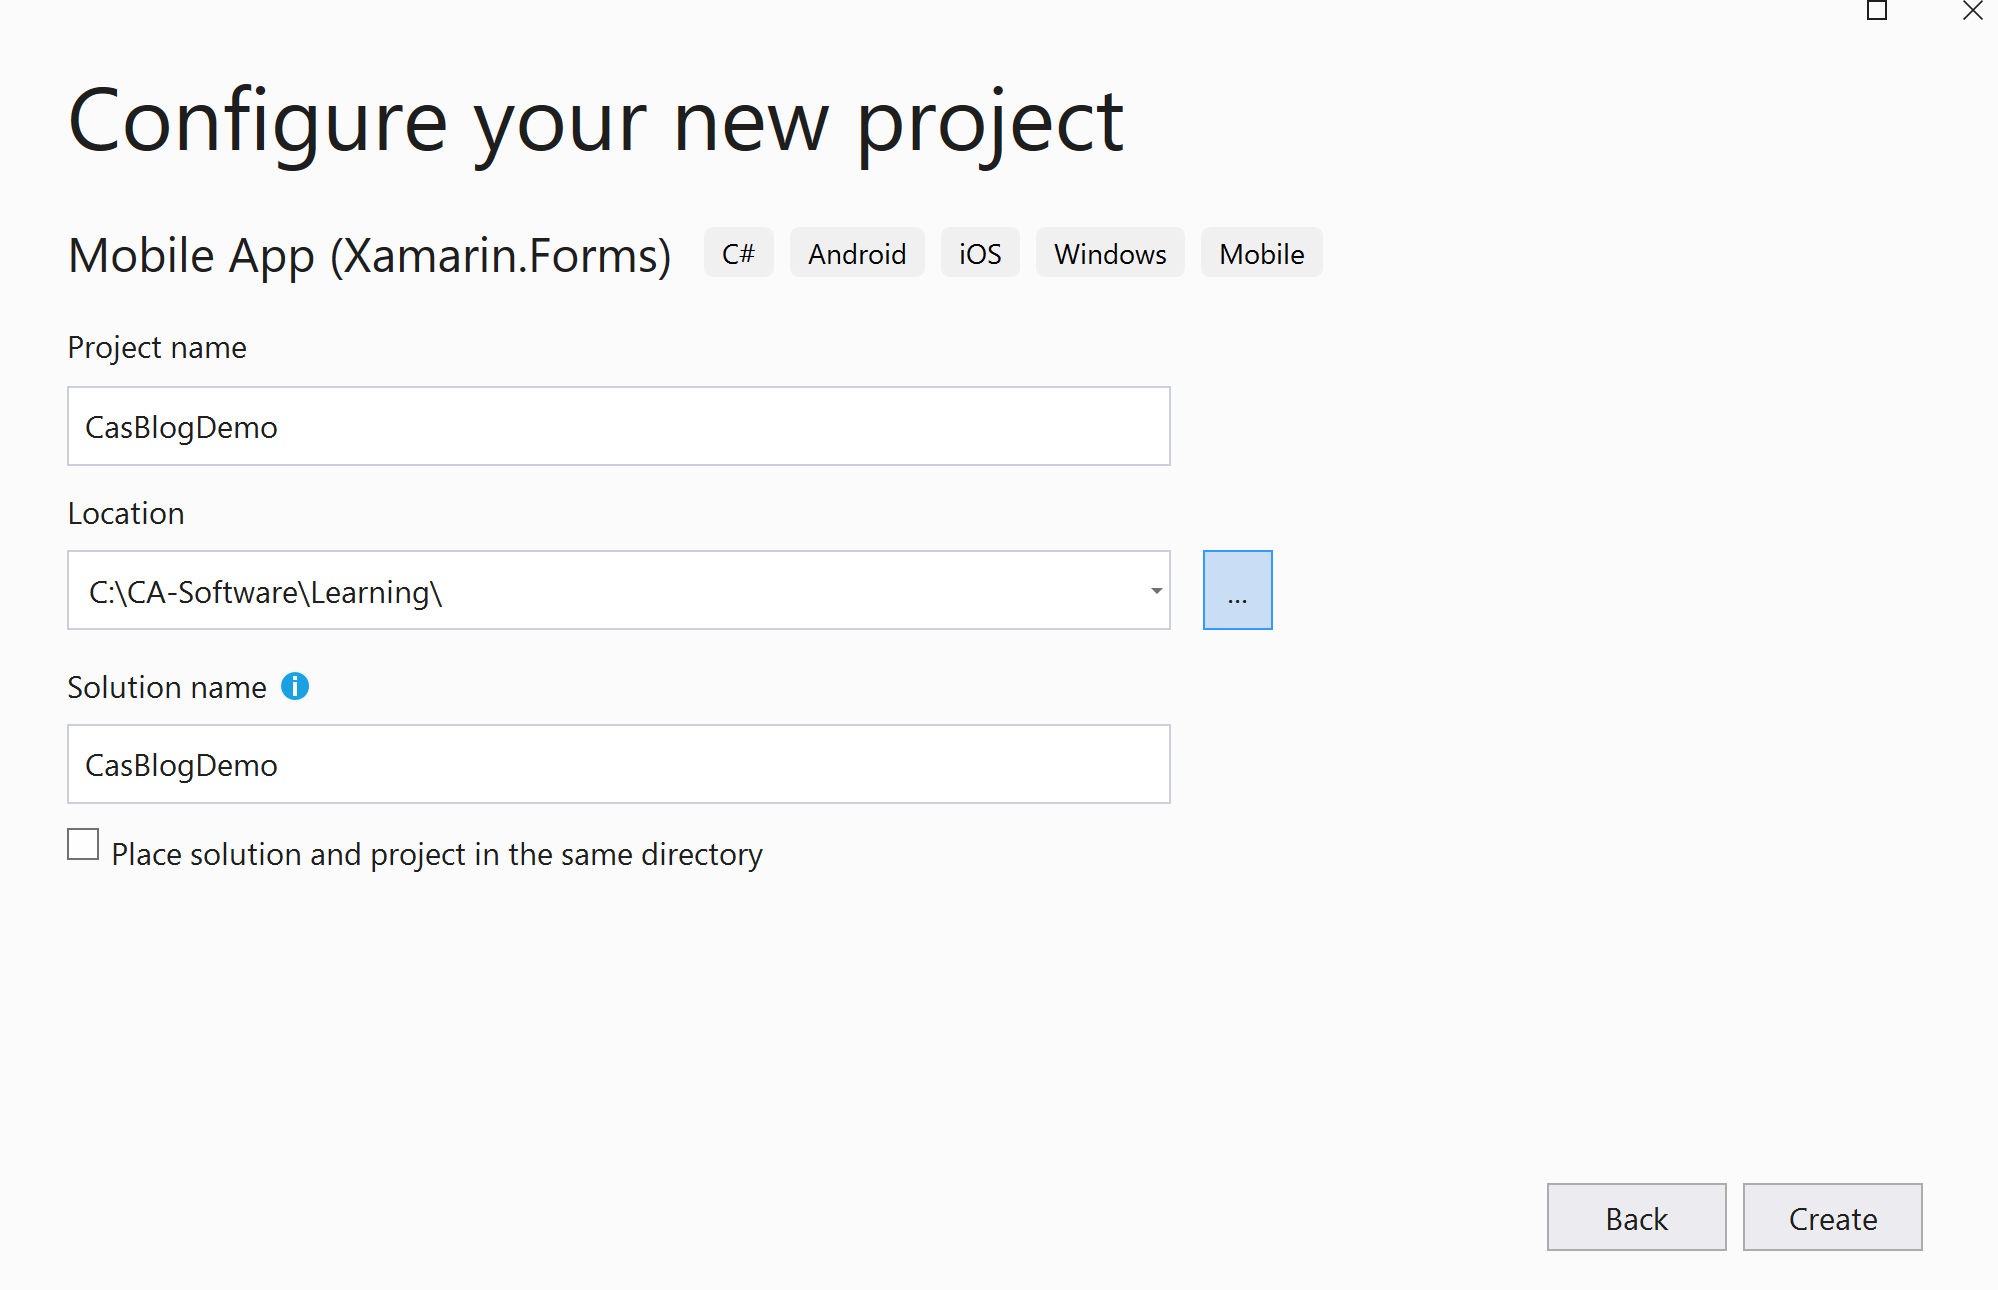
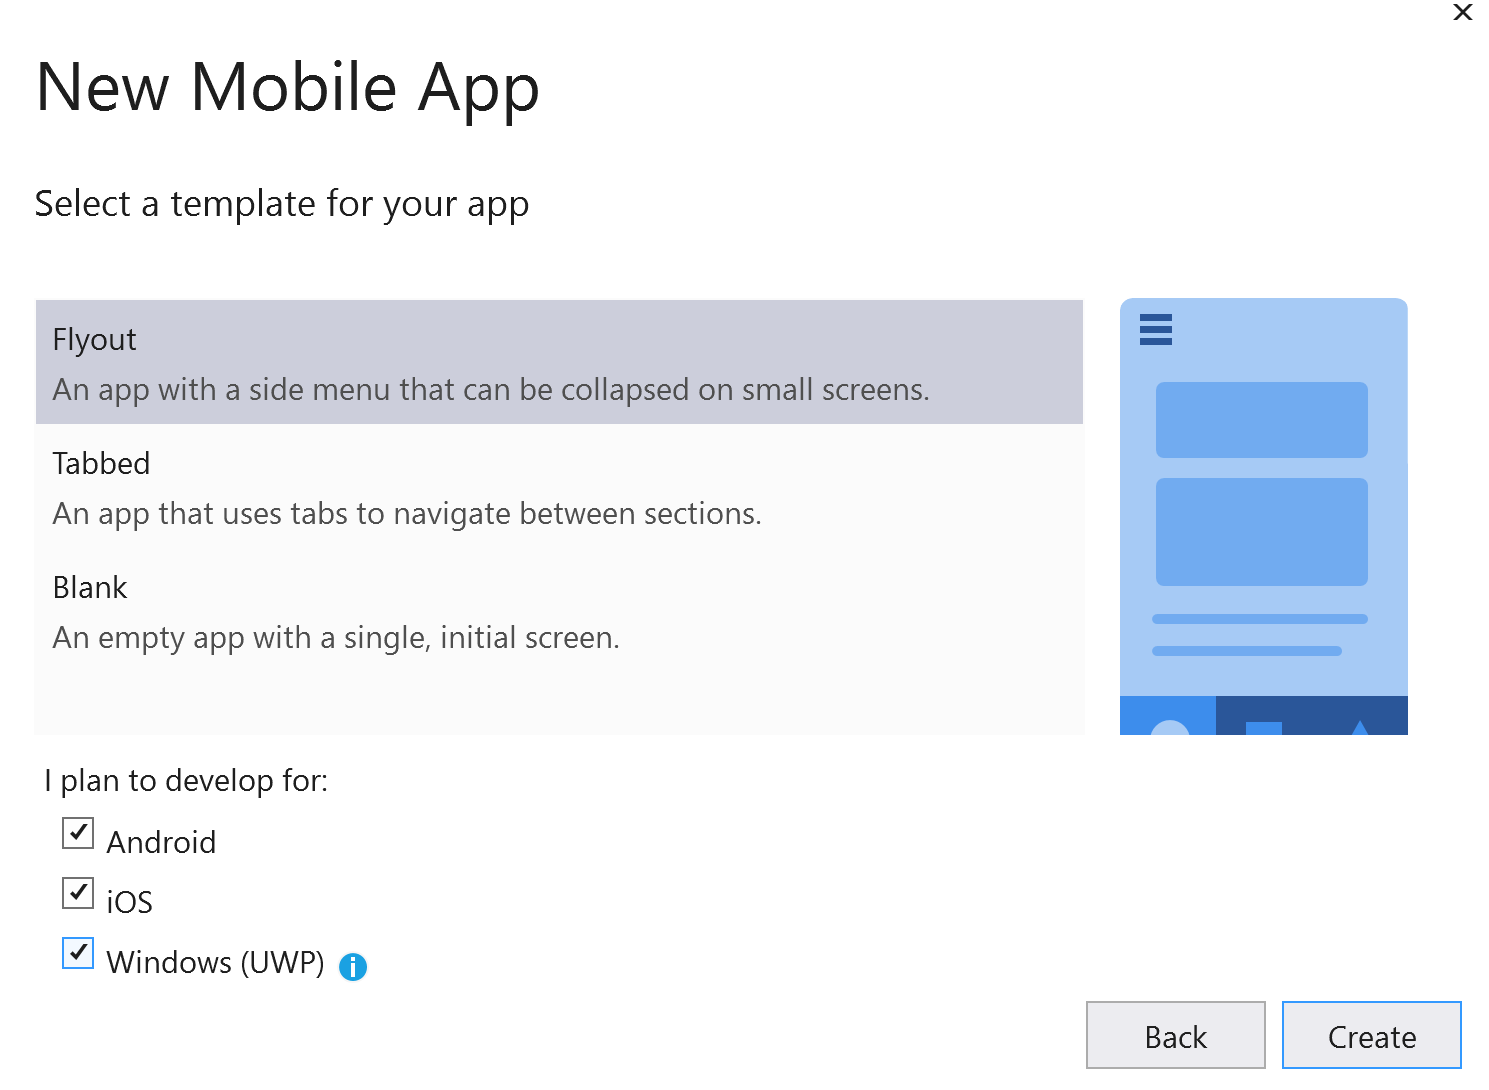
Select the style of the App you wish to create, do you want a flyout menu or just Tabs etc and also don’t forget to tick the Windows (UWP) box if your on windows and want the desktop app version as well. If this confuses you then there is a great docs Here
Add the WebAPI project.
We now have a basic Mobile App and clicking F5 to build and run should hopeful show you the templated Xamarin App which is a great start, now add a new WebAPI project to the solution and this will be the WebAPI that will get uploaded to the Azure Resource we created later we just need to add the code for the API backend to handle the requests from the Xamarin App. In this case right click the solution in the Explorer and select Add->New Project and search for a “ASP.NET Core Web API” You can add Auth in the creation flow but I tend to add it after and I will write a follow on blog for doing this
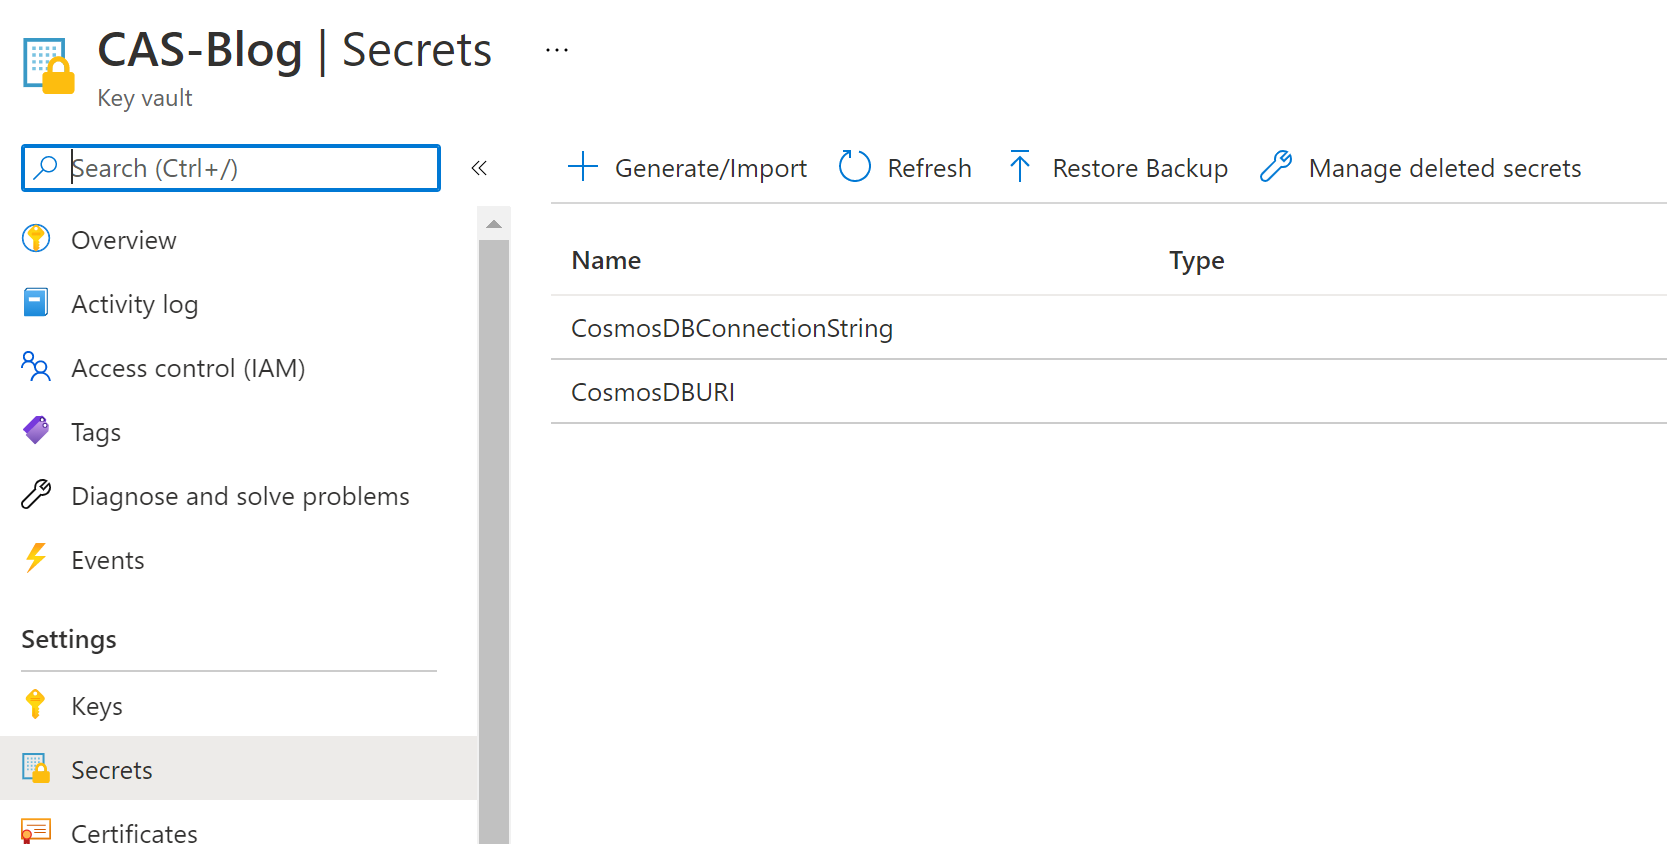
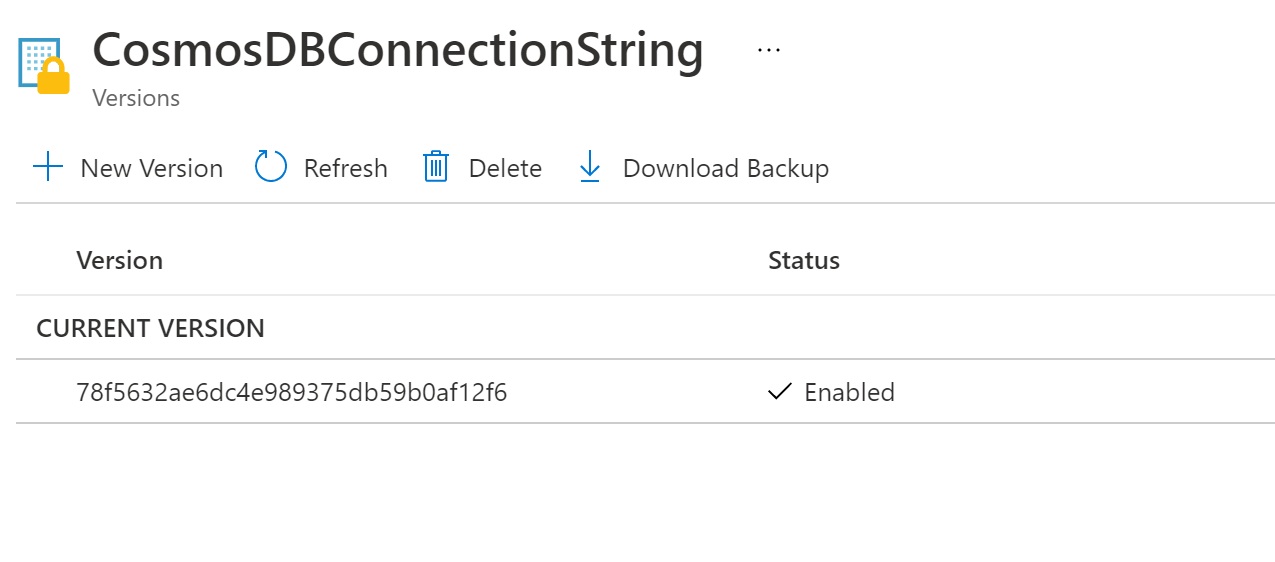
Now we need to tell the WebAPI how to get the secret it needs to access the Database so back in the KeyVault got Settings -> Secrets and click the secret that hides the Primary Connection string. This will then show a page with the versions of the secret and there should only be one for now but click that and you can copy the Secret Identifier and it’s this link the API will use to get the secret from the store but as only the WebAPI has the access policy set then only our WebAPI can use this Secret Identifier anything else will get denied access… Now hopefully you see how very clever and simple this process is.

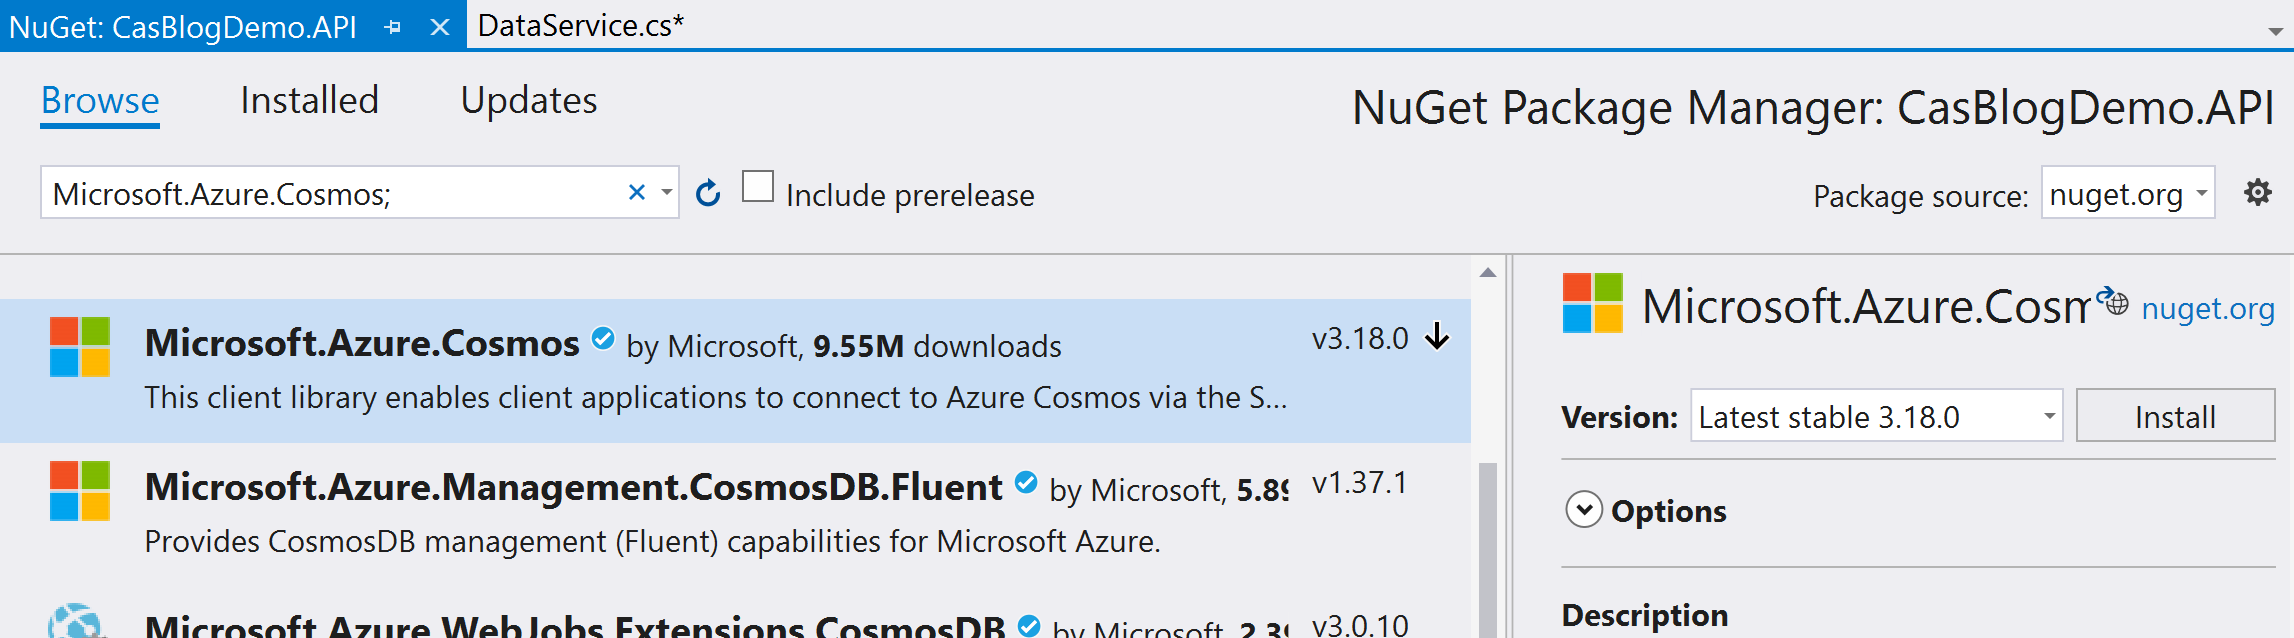
Add the NUGET
We need to add the NUGET for this all to work so in the WebAPI project add the following packages:
Microsoft.Azure.Services.AppAuthentication
Microsoft.Azure.KeyVault
Microsoft.Azure.Cosmos

Create a Data Service
Mow we are ready to create a service that will connect to the CosmosDB using the secret connection string from the KeyVault, I like to have this as a class in a Services folder but you do you. At the Top of this I add the following:
        private static async Task InitDBConnection()
    {
        var secretUri = "https://cas-blog.vault.azure.net/secrets/CosmosDBConnectionString/78f5632ae6dc4e989375db59b0af12f6";
        var keyVaultTokenProvider = new AzureServiceTokenProvider().KeyVaultTokenCallback;
        var keyVaultClient = new KeyVaultClient(new KeyVaultClient.AuthenticationCallback(keyVaultTokenProvider));

        var mySecret = await keyVaultClient.GetSecretAsync(secretUri);
        cosmosClient = new CosmosClient(mySecret.Value);
    }
Don’t panic…
I have not given away any secrets in showing my SecretURI here as mentioned only MY WebAPI resource can use this link so it’s safe to commit to source control, don’t believe me go ahead hit the link… Here I’ve made it easier
See you will get a message like so:
{"error":{"code":"Unauthorized","message":"Request is missing a Bearer or PoP token."}}
And that is because you don’t have access.
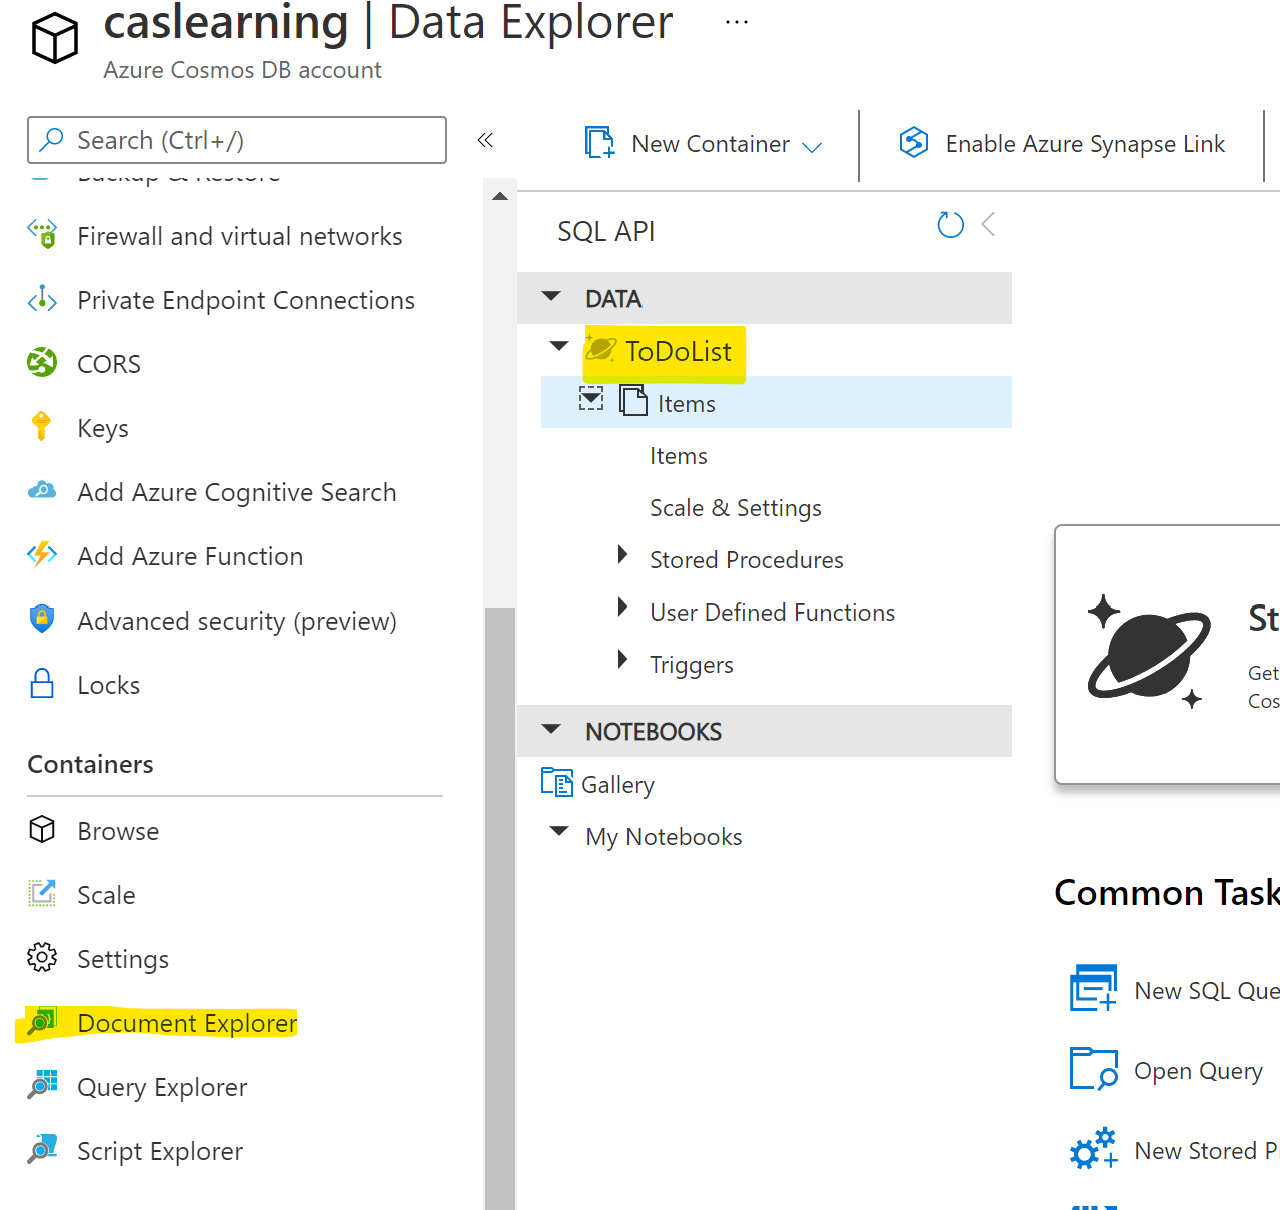
CosmosDB Set-up
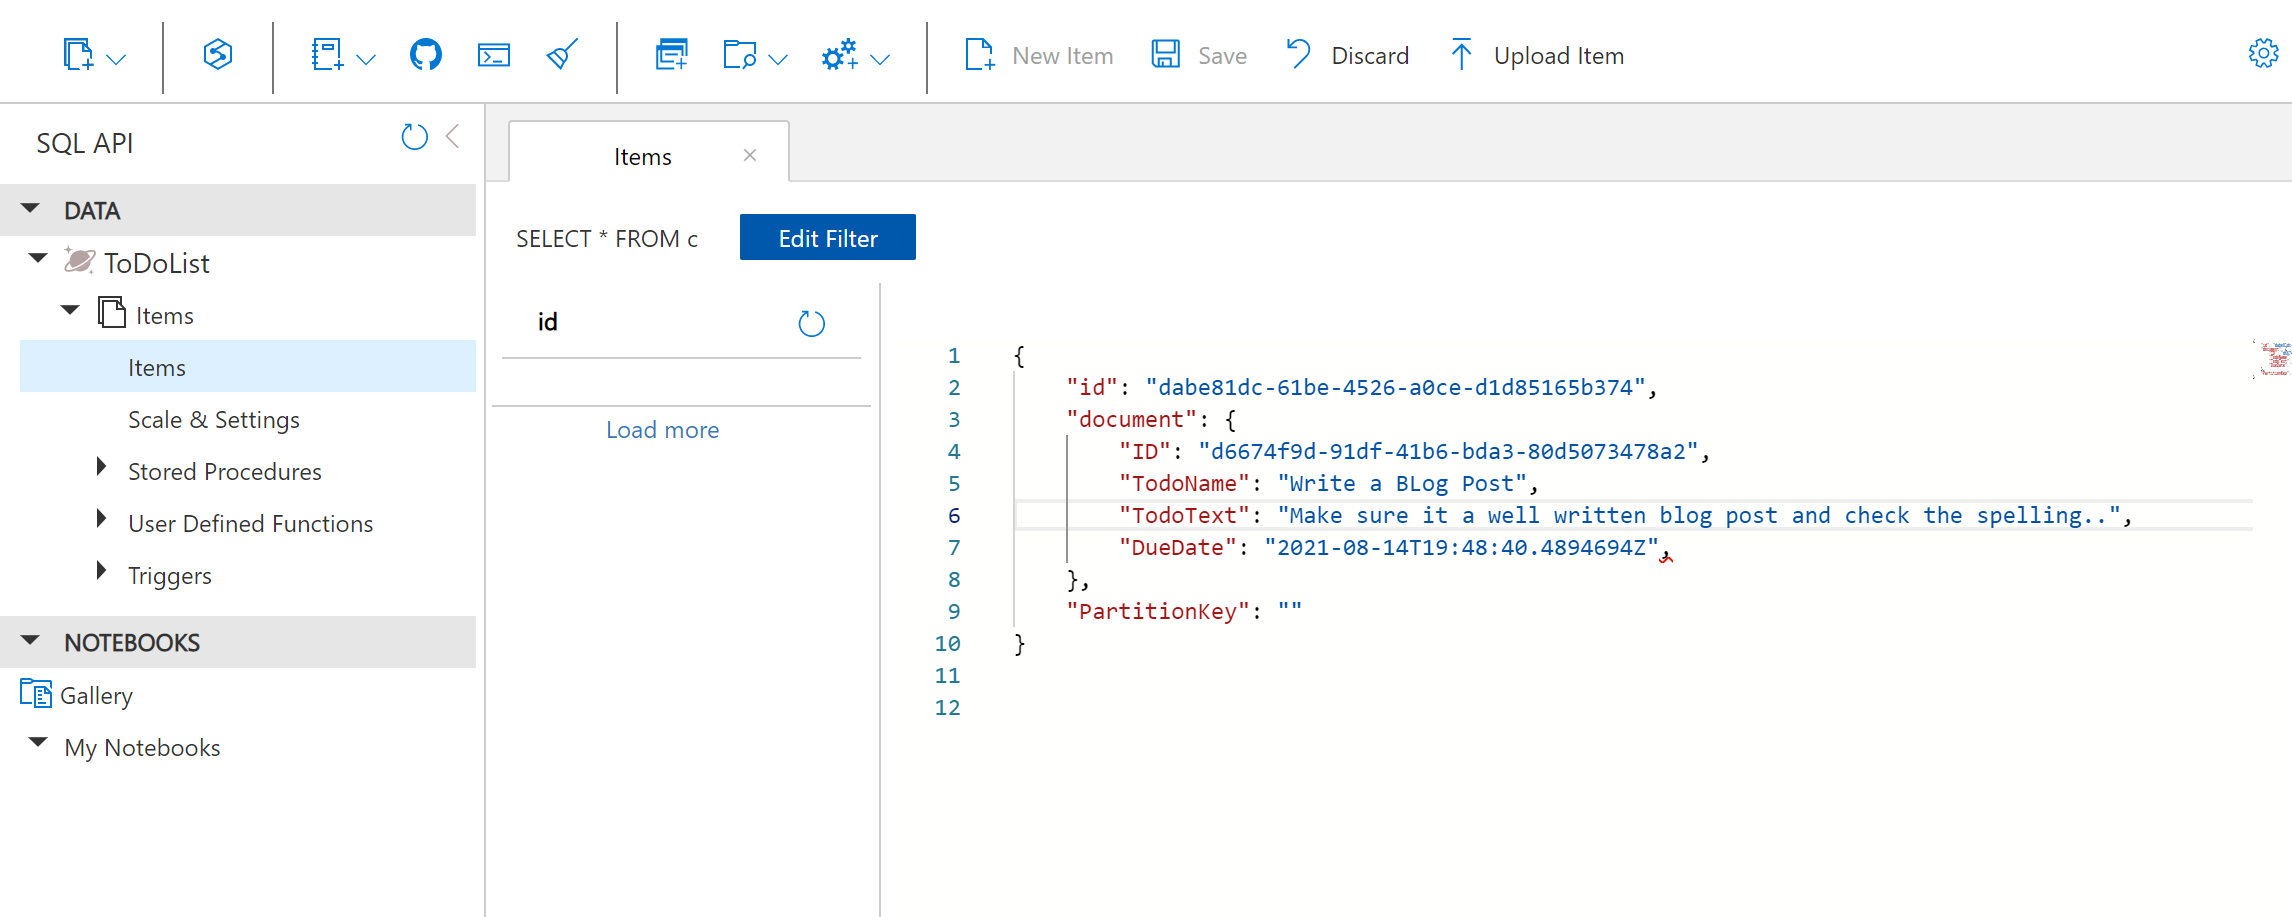
Back in CosmosDB we will see if we open the Document Explorer on the left down in the Containers Section and the there will be the default container of TODO (Got to love a To-do!) so we already have a container but add what you want/need for your project I am sticking with this for this blog post.
with this in mind we need to create a Model to hold this data and I use a trick I learnt from Matt Soucoup in his Partly Cloudy Series in that he creates a generic Empty Document and then within this stores any data needed but each entry could if you really want have different data even a different Model, like a To-do Entry or your favourite Nan’s apple pie recipe…
    public class EmptyDocument<T>
{
    [JsonProperty("id")]
    public string Id { get; set; } = "";
    [JsonProperty("document")]
    public T Document { get; set; }
    public string PartitionKey { get; set; } = "";
}
As it’s generic we can pass in out TODO model when it’s called that it will form the Document part of the EmptyDocument<> and when stored in the collection inside Cosmos you will have an ID and PartitionKey with your Model and data stored as JSON in the Document. It’s a great way to use Cosmos and since stealing/borrowing the idea I use it on all my projects.
Adding the Controller
Add a GET method to your Data Service as follows works for me and is a bit of Boiler plate and Generic so can be used to read any Model of data that has been store in the Document section of the Container (Hence doing the Document way I have)
        public static async Task<List<T>> Get<T>(string Query = "")
    {
        try
        {
            var allItems = new List<T>();

            if (cosmosClient is null)
            {
                await InitDBConnection();
            }

            QueryRequestOptions options = new QueryRequestOptions() { MaxBufferedItemCount = 100 };
            var database = cosmosClient.GetDatabase("ToDoList");
            var container = database.GetContainer("Items");
            var queryText = $"SELECT * FROM c";
            if (!string.IsNullOrEmpty(Query))
            {
                queryText += Query;
            }

            using (FeedIterator<EmptyDocument<T>> query = container.GetItemQueryIterator<EmptyDocument<T>>(
                queryText,
                requestOptions: options))
            {
                while (query.HasMoreResults)
                {
                    foreach (var item in await query.ReadNextAsync())
                    {
                        allItems.Add(item.Document);
                    }
                }
            }

            return allItems;

        }
        catch (Exception ex)
        {
            Debug.WriteLine($"ERROR - {ex.Message}");
            return null;
        }
    }

Now we have that we need the controller to call so Add the API controller with Read/Write actions so that it creates all the boiler plate for you, but you need to edit the GET call to use the DataService:
    // GET: api/<TodoController>
    [HttpGet]
    public async Task<string> Get()
    {
        return System.Text.Json.JsonSerializer.Serialize(await DataService.Get<ToDo>());
    }
Almost ready to test.
Before we test as we have only implemented the GET action in the data service we need to add some dummy data to the ComosDB collection that we can retrieve to prove this all works, don’t forget to click the Save button after making the edits.
Now if we F5 to debug and spin up the WebAPI (make sure it’s set as the Start-up Project) we can call the API and check it returns the data as required.

Yippie it worked…
Call the WebAPI from inside your App
Now within the Xamarin App we can call the URL for the WebAPI using a HTTP call as we normally would and commit all this code to a Source repository even a public one and be safe in the knowledge that we are not leaking any secrets and the access to our secrets is safe. Now this is just a quick and dirty demo of the code that will get you started as I am trying to keep it really simple but:
        public async Task<Item> GetItemsAsync(bool forceRefresh = false)
    {
        HttpClient httpClient = new HttpClient();

        var result = await httpClient.GetAsync(@"https://localhost:44301/api/todo");

        if (result is null)
        {
            return null;
        }

        string content = await result.Content.ReadAsStringAsync().ConfigureAwait(false);

        var todoItem = JsonSerializer.Deserialize<ToDo>(content);

        Item = new Item() { Id = todoItem.ID, Description = todoItem.TodoName, Text = todoItem.TodoText };

        return item;
    }
This will get you going but obviously there is no checking or error management etc this will just get the data for the TODO app we have created, and the URL is hard coded etc but you see the idea is super simple.
Conclusion
This is a long post and has lots of pictures, but I have found that when explaining parts of Azure to fellow developers including some I help mentor just saying things never works and we all know a picture speaks a thousand words so if you made it this far thanks for sticking with me and if you are future cliff the cake you ate was it nice?
Now I know what you’re thinking… Cliff we have this secret Key, and our Xamarin App is just calling a WebAPI which is returning the data which means our data is now open to anyone with a web connection, and you are 100% correct anyone with a browser can query your data store which is less than ideal. However, when I am starting a project I start just like this so that I can test quickly and get the App running and working, otherwise when you are testing a page in the App you need to login each time and that becomes a drag.
SO, I test in this state and then add the Authentication when I am comfortable the app is doing as needed for the intial display to the clients and this will be the subject of my next blog on Adding Azure B2C Authentication to our Xamarin App.
I hope this helped and as always.