TOC
What and Why?
You have created an awesome .NET MAUI app and your ready to take over the world but you have been building on a laptop and now want to know how to send that out to Testers or to the Store and maybe you want to automate all the things. Enter CI/CD (Continuous Integration / Continuous Delivery ) we have all heard of it and even use it in projects but how does this work for a .NET MAUI app and how can we set-up Azure DevOps to help us. This is what we will be covering in this blog and sorry but it’s a big topic so it’s going to be a long one…
Why Not AppCenter
I have like many of you used AppCenter/HockeyApp for years to build my Xamarin apps and still have many that I maintain using it. The problem is AppCenter at the time of writing doesn’t support MAUI and speaking with the support team there is no plans yet to support MAUI at least not that I can find anyway, also anyone that has used AppCenter will know that it’s not getting any love and seems to be on life support, which means I have a feeling that AppCenter’s days are numbered as more and more Azure DevOps and Github Actions are getting the support and new features.
Finally since playing with Azure DevOps and setting up my pipelines I can see that running this myself with my clients means we have total control over the pipeline so if something changes we don’t have a few weeks Build Outage while AppCenter is patched as has happened many times with Xamarin projects in the past.
What about GitHub Actions.
This is the bit I am confused about with the Microsoft offering, as I feel that both Azure DevOps and GitHub actions do essentially the same thing yes there are differences and it depends where you are coming from and what you need to achieve so rather than me cover the differences and what/why/how etc here is a great blog post I found that may help you decide. Azure DevOps or GitHub Which Option Is Right For Your Organization?
But I am going to show Azure DevOps in this post as I prefer the Azure Boards for client feedback over GitHub Issues and also the Pipelines in Azure DevOps to me seem a better way to manage the deployment especially for a Mobile App out to the App Stores and even to App Center for internal testing if you really want.
Where do we start?
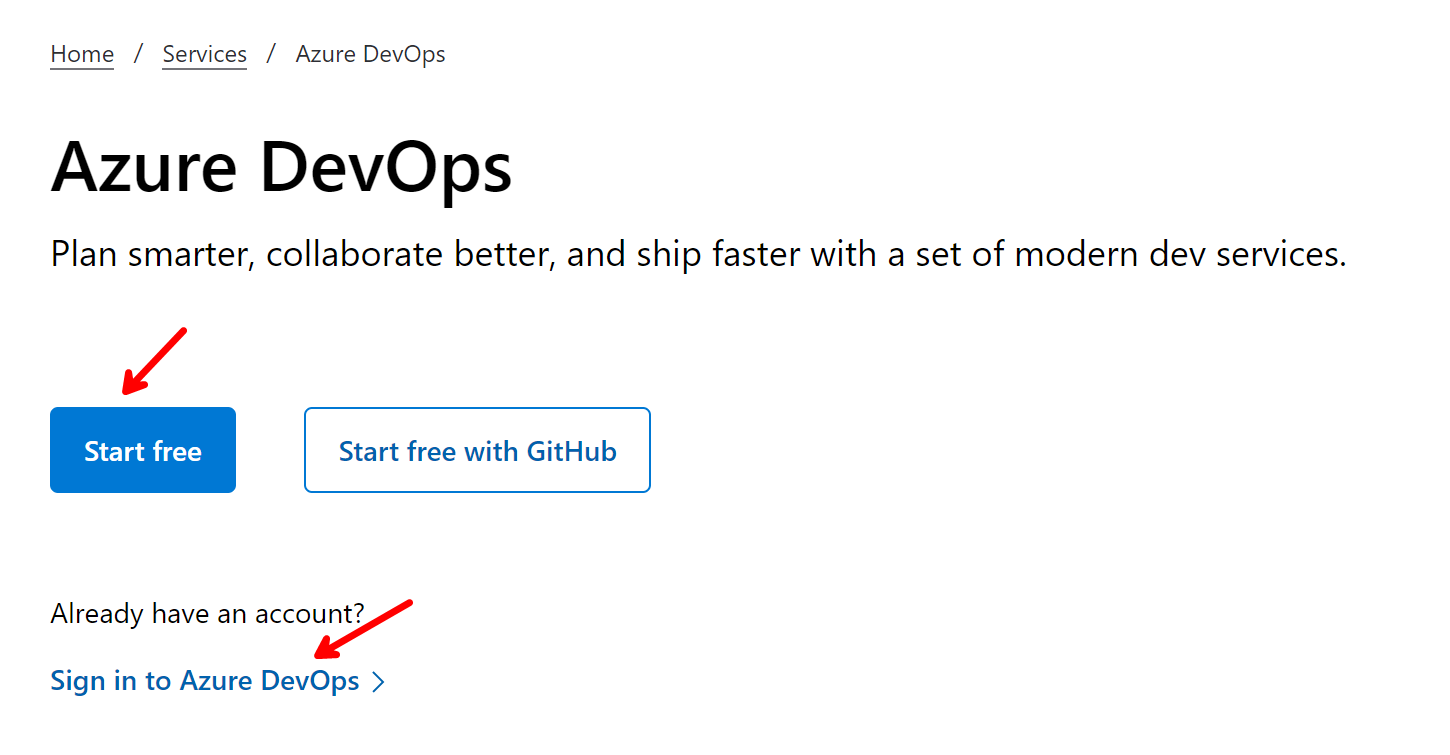
The first thing we need to do is create our Azure DevOps pipeline and to do this we need to head out to https://azure.microsoft.com and click the blue Start Free button if you don’t already have an account or just below the “Sign In” if you already have an account.
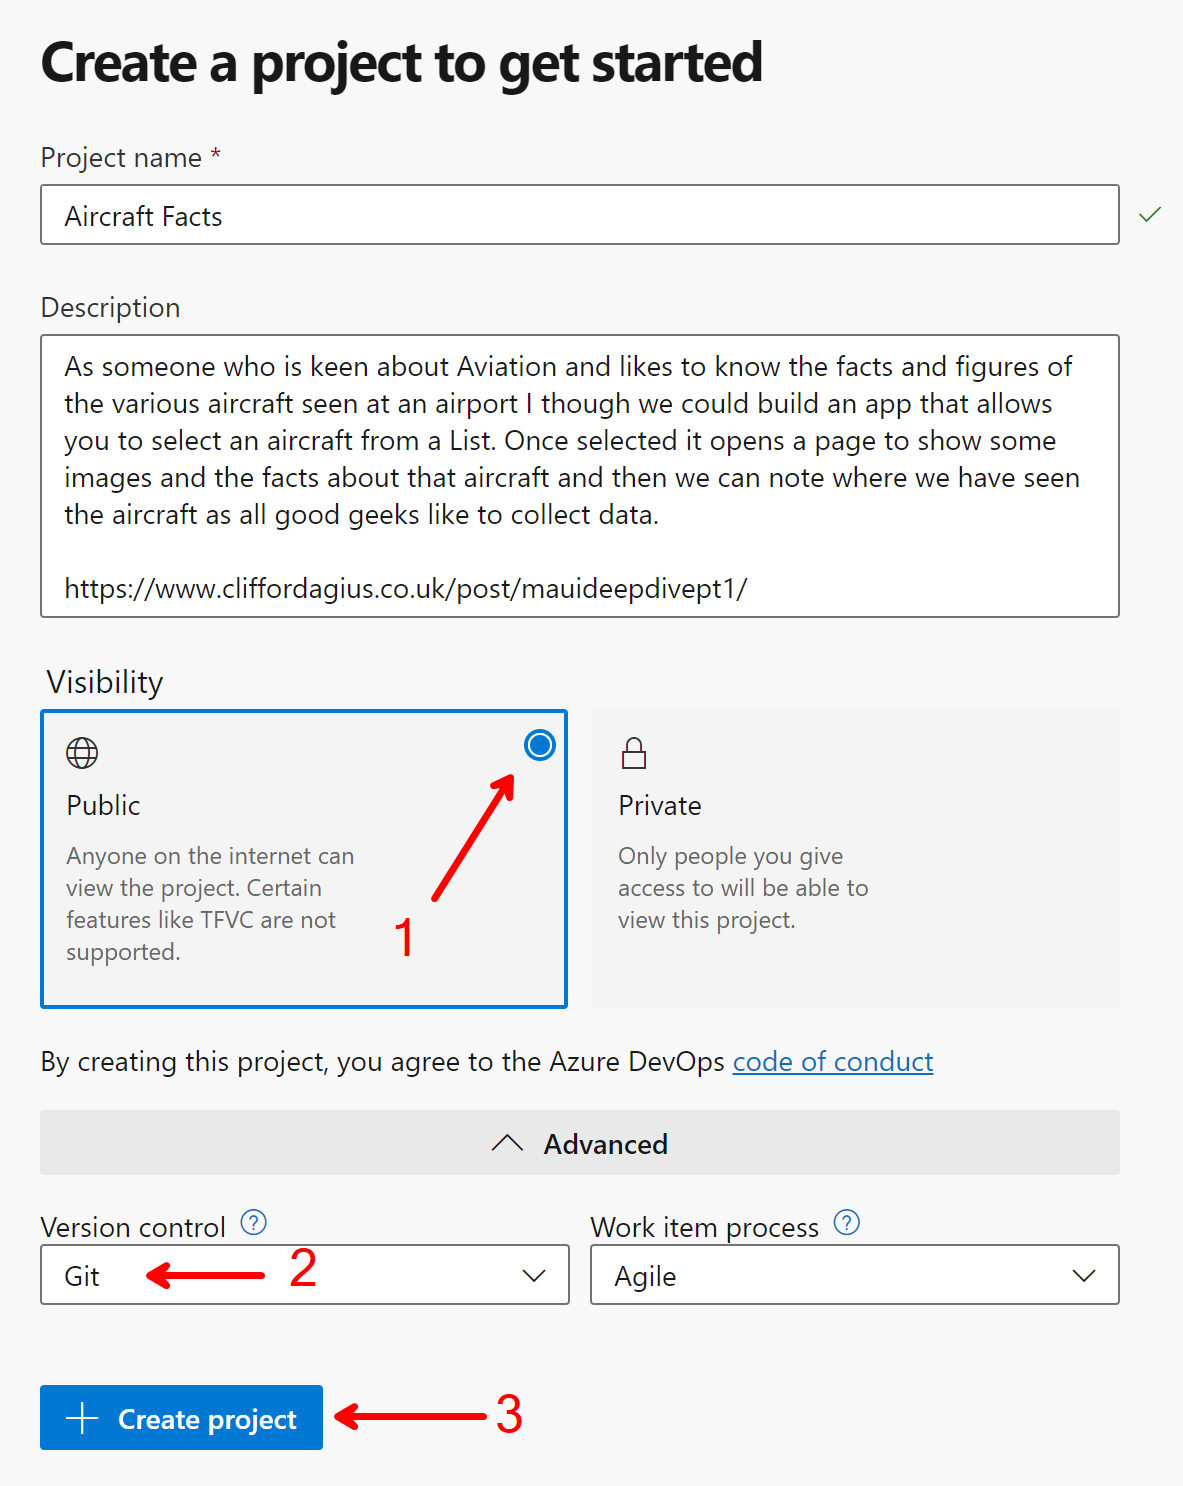
Once you have the Organization set-up you will either see your Projects List if you have used Azure DevOps before or you will see the “Create a project to get started” wizard, this is where we will start. For this tutorial I am going to build a CI/CD pipeline for a demo App I use when training/speaking about .NET MAUI and this is a simple App that allows a user to select an Aircraft from a list to see more details and facts about that Aircraft be it Boeing or Airbus etc.
So Give your project a name and some Description so you know what it is doing when you come back in a few months (This is for future you…), check if you want to be Public or Private and your version control and click the create project button.
Creating a Pipeline
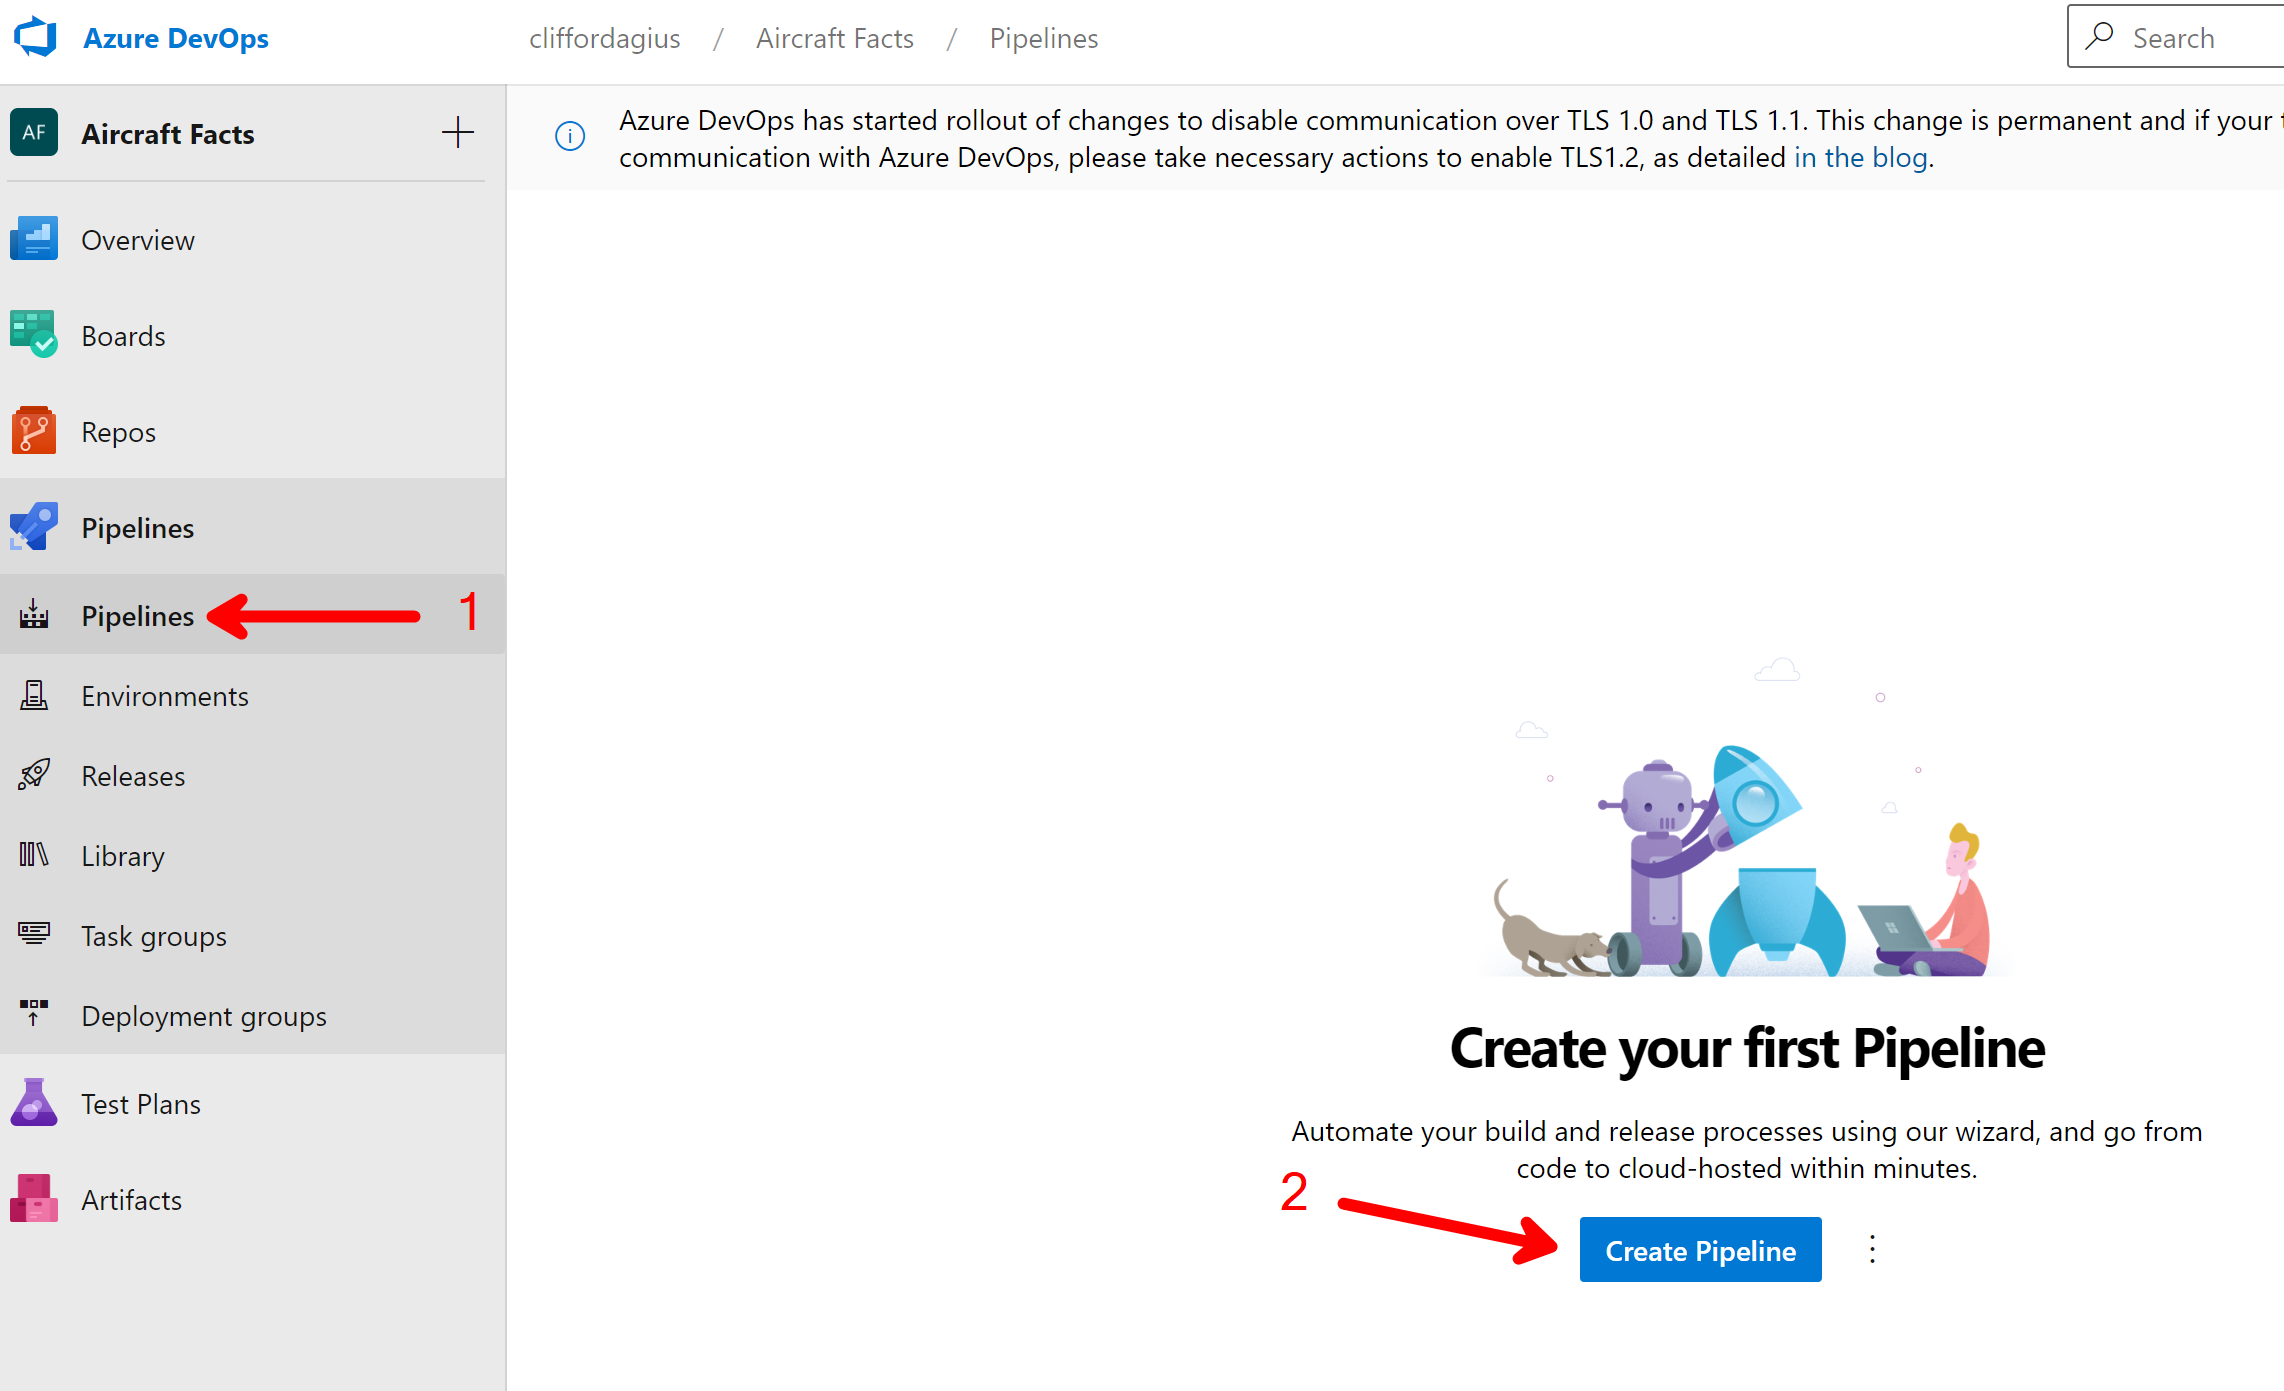
Now we have our project created it will be empty and the first thing we want to do is to create a Pipeline that will build our App this is the CI part, so on the left Menu under Pipelines click the “Create Pipeline” button to proceed.
NOW THE BIG QUESTION…
Do you want to use YAML or not?
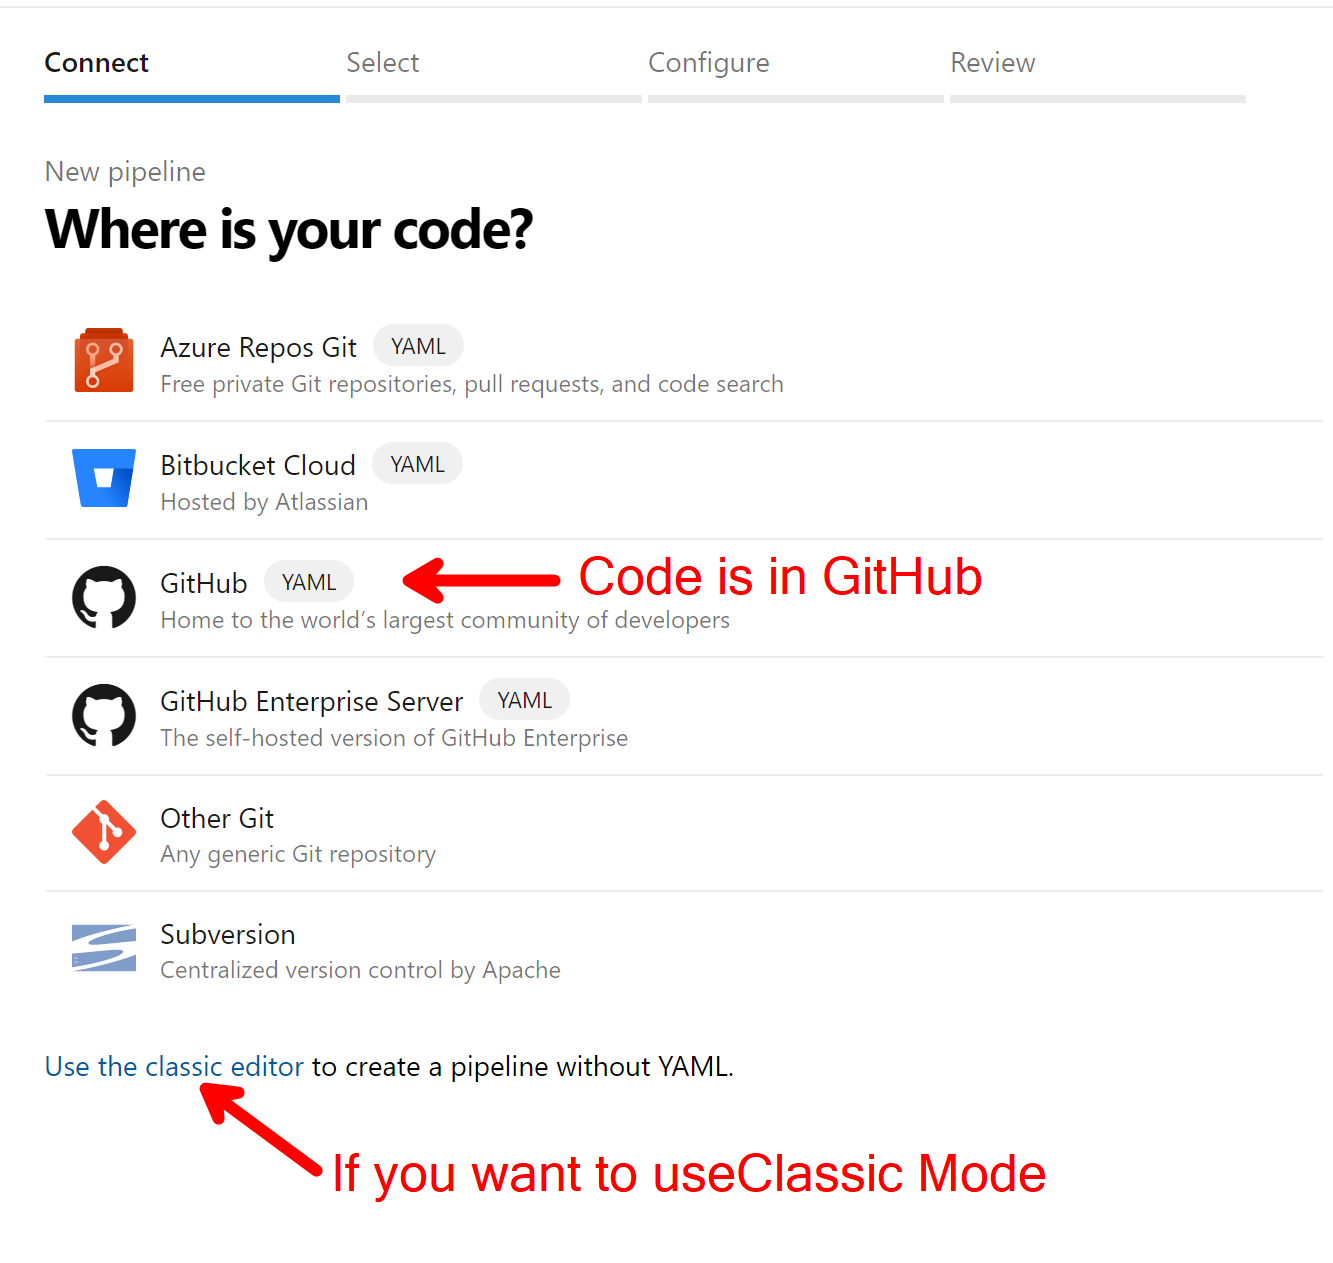
The UI will offer YAML as a default and if your not one for Yelling At My Laptop you can use the classic editor which is more of a UI drag and drop system, for this post I am going to show the YAML as this is what seems to be the future as the Classic editor is hidden away we may as well roll with the times and use the new hotness…
Also by using YAML it will commit the .yml file to your GitHub repo so that anyone else within your Org can see how the App is built and you have the set-up in your repo with version control, and then when you move onto the next project you can just copy and paste the file over and your pipeline is already 90% built how cool is that.
Word of warning once picked I have not found a way to change this selection other than starting again so pick wisely…
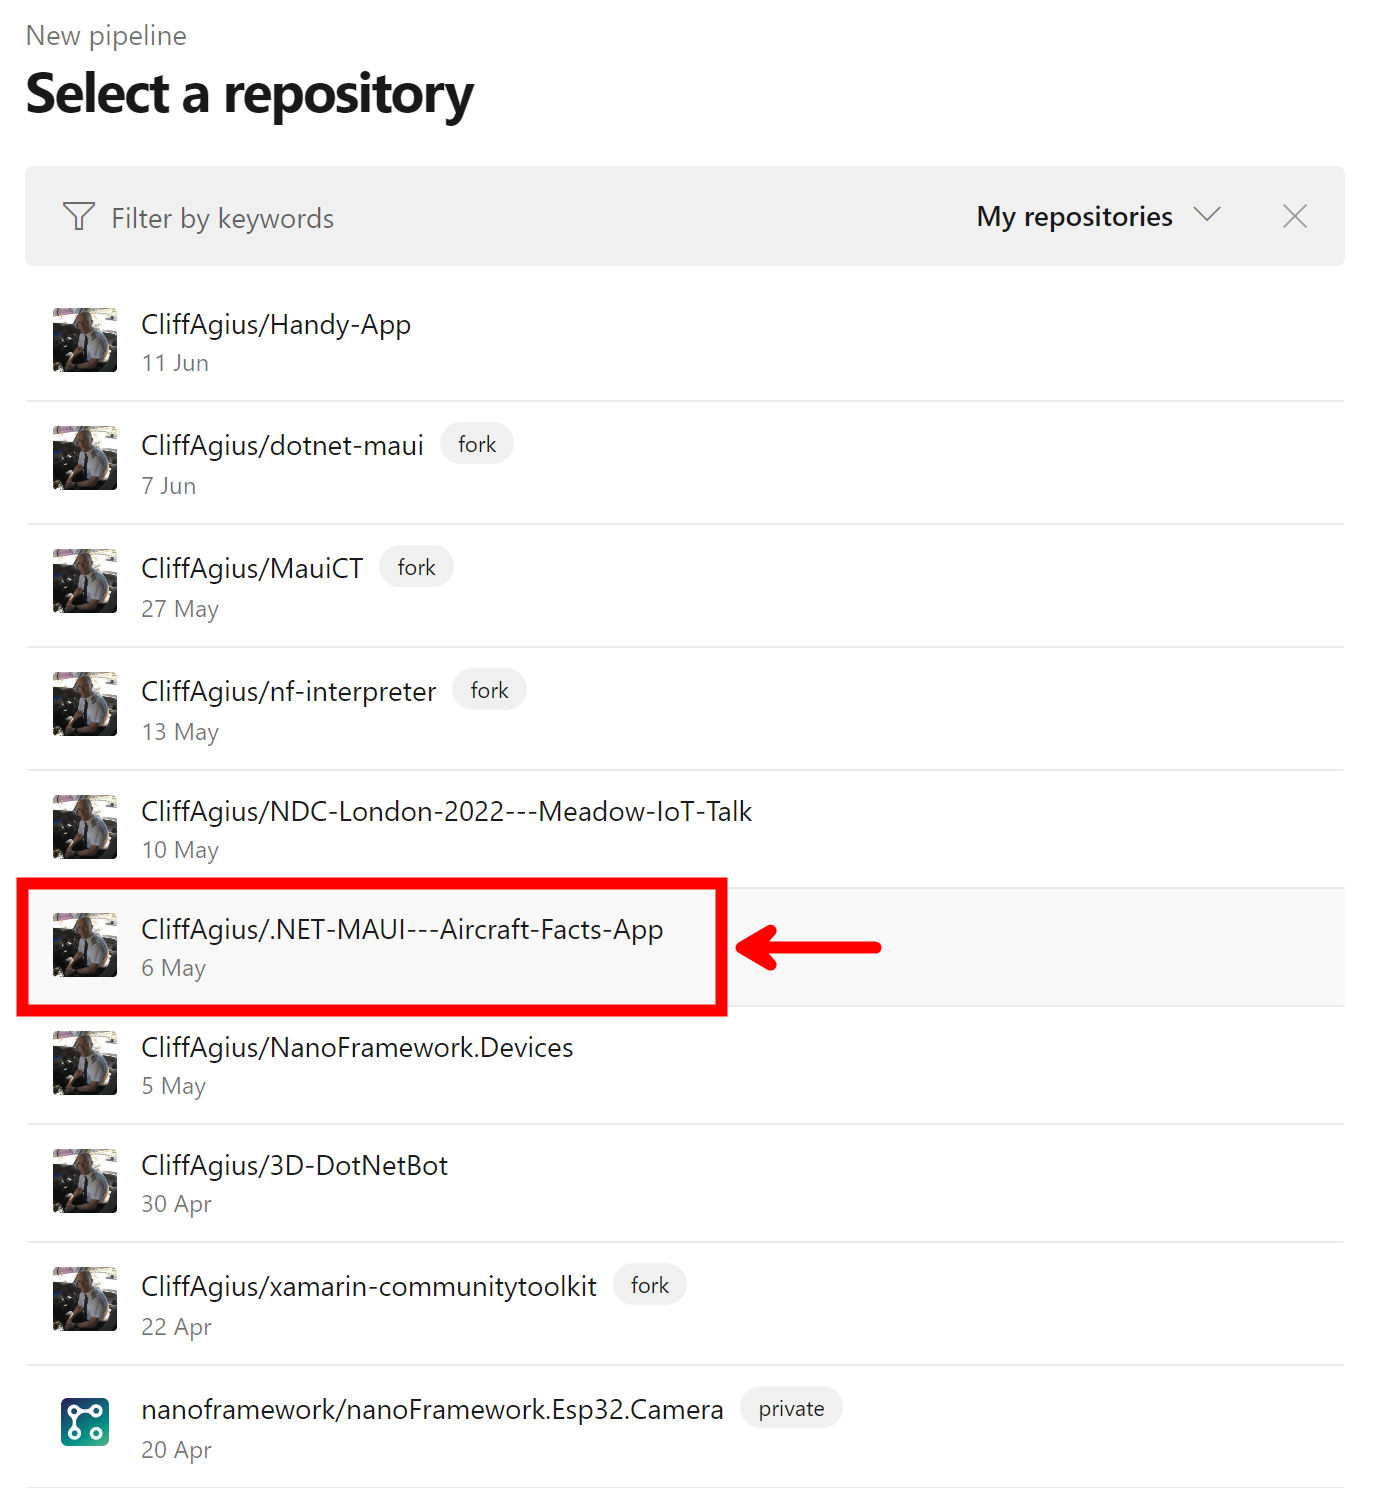
As the code for the App is in my GitHub repo I will be selecting the middle GitHub to point to where it lives.
Now you can select your repository that holds the code for your App and in my Case it’s the Aircraft Facts App.
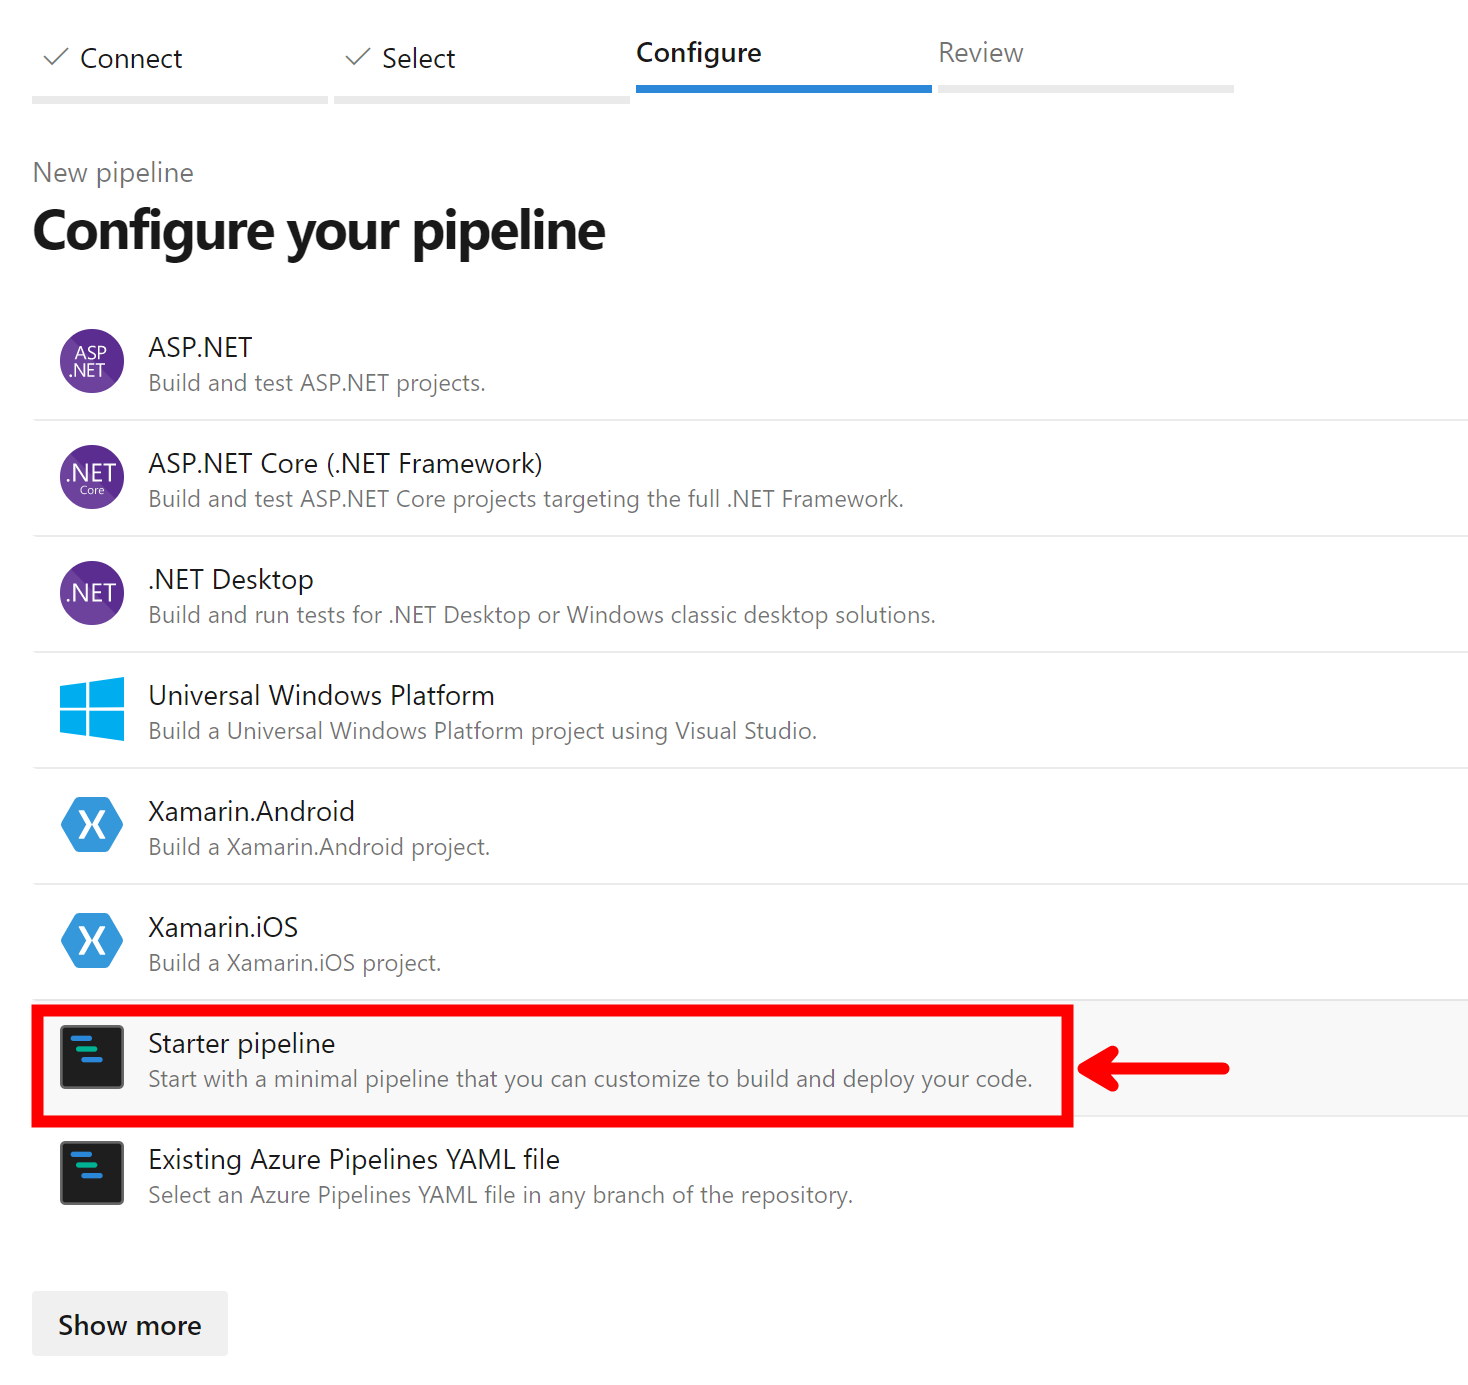
Now you need to configure your pipeline and sadly as .NET MAUI is so new (At the time of writing this blog post!) there is no Pipeline template we can use so we will write our own, which gives the added advantage of us learning together how this is done.
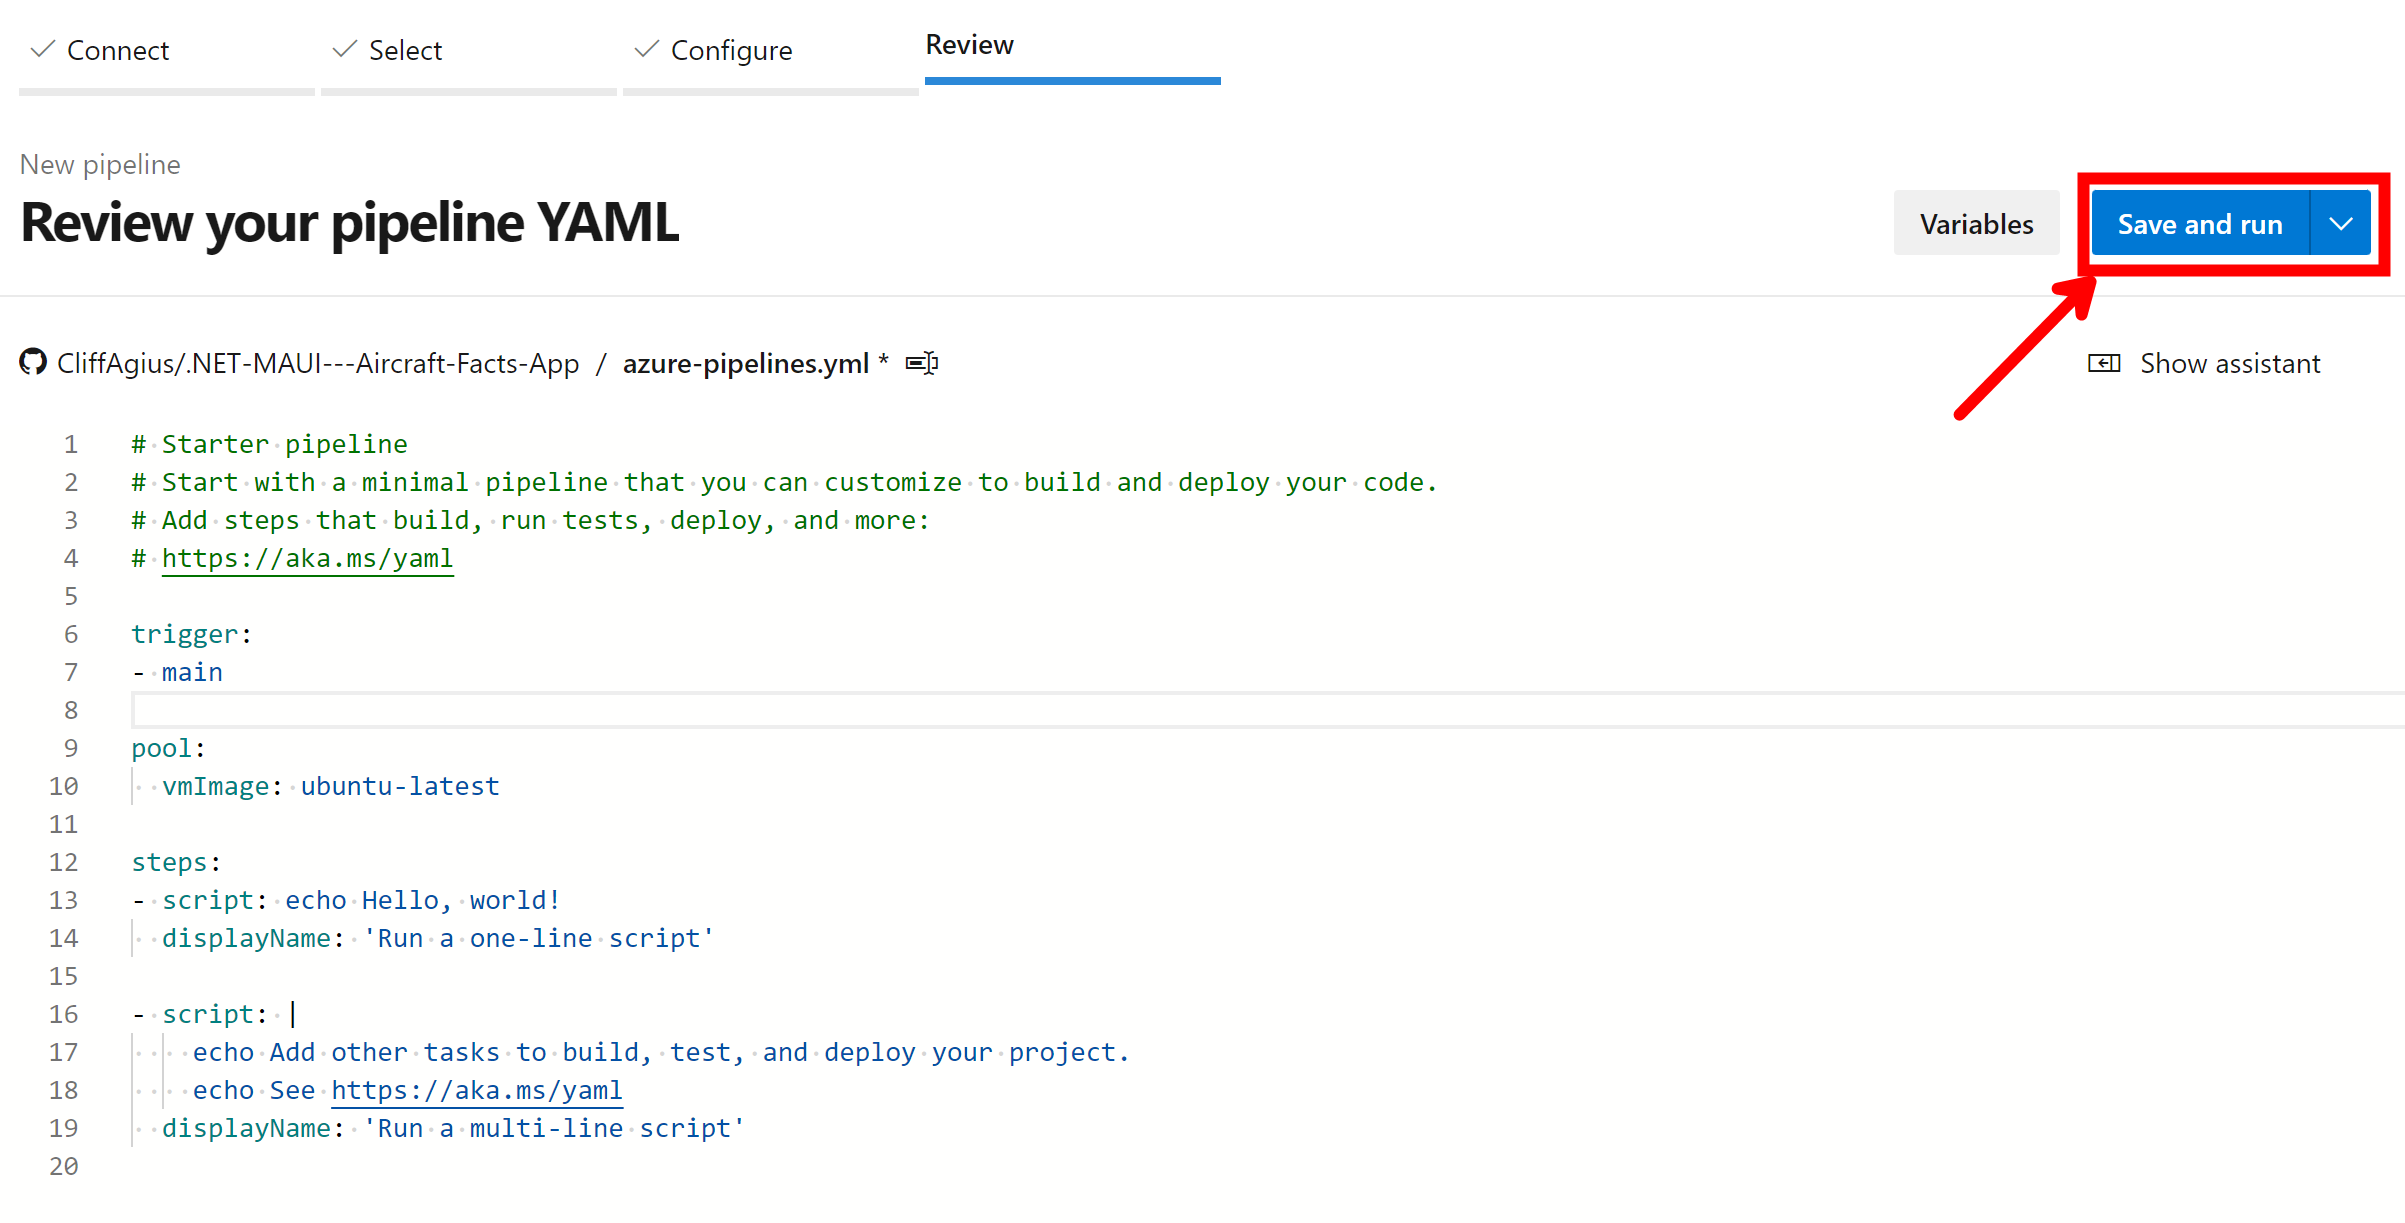
The last part here is the Review and anyone that knows me and has attended any of my talks REVIEW, REVIEW and REVIEW again so here we can see it’s a very empty do nothing YAML file so we can check we are happy for now and click the “Save and Run” button just to do that acid test that it’s at least doing something…
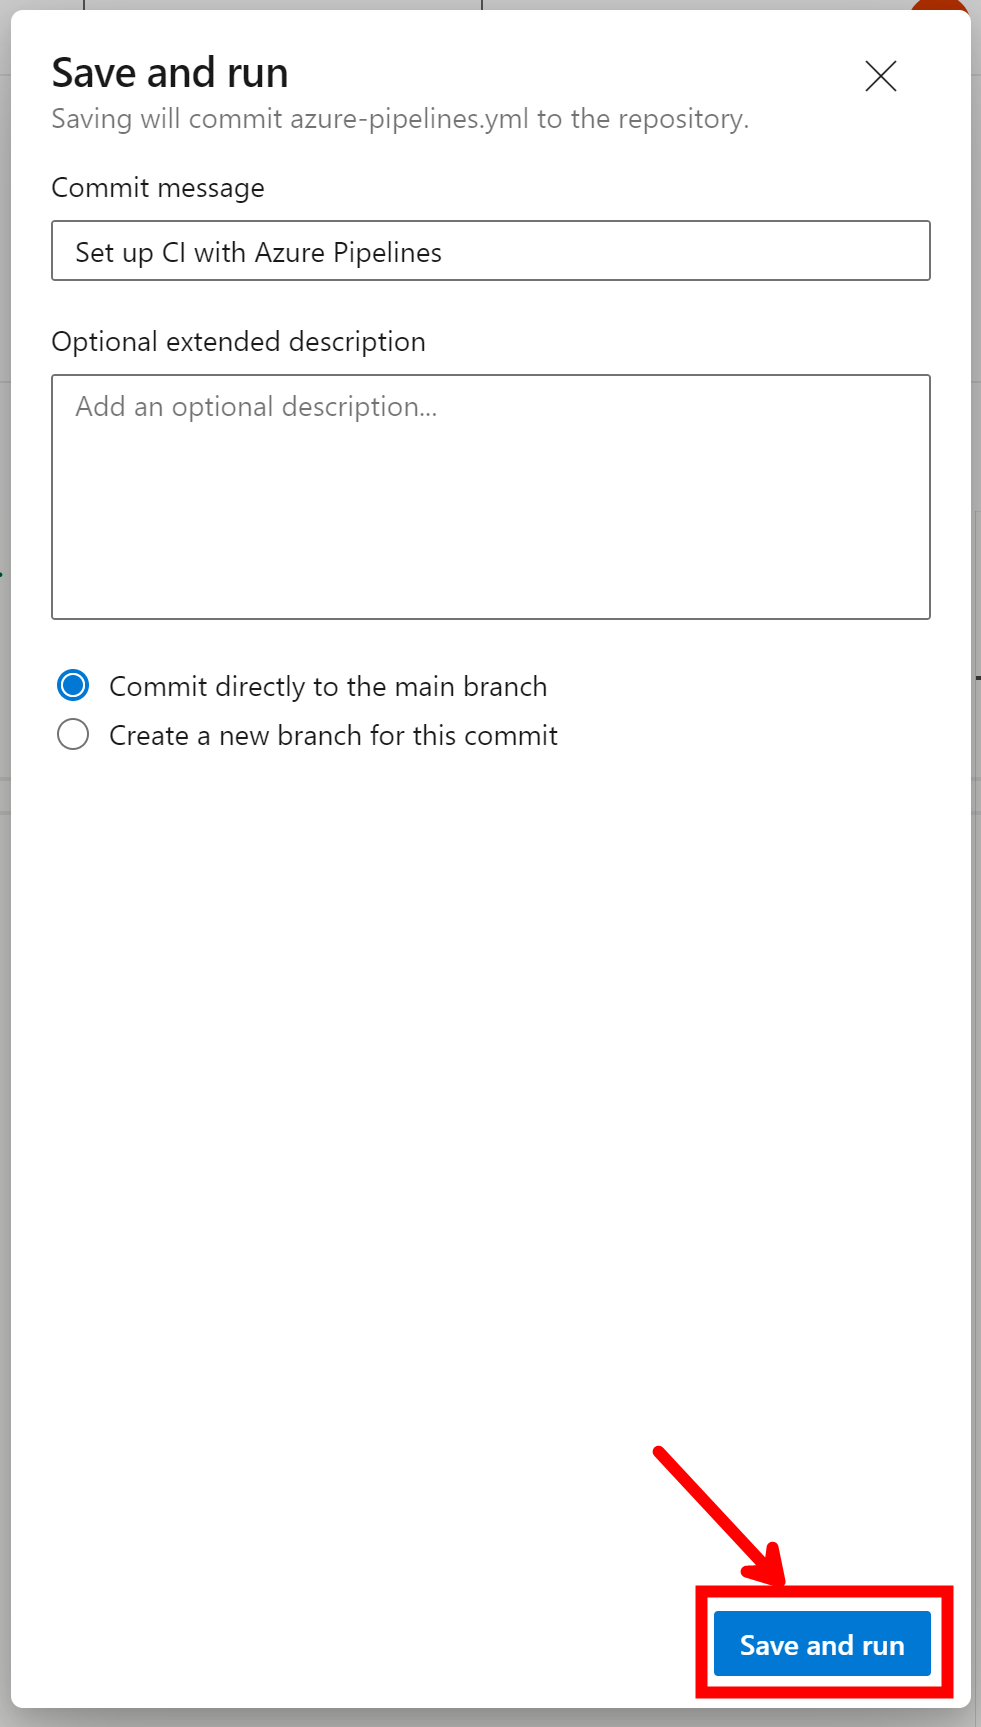
Click the Save will show a Dialog that allows you to give it a meaningful commit message and also decide where to commit, as you can see I live on the edge and commit direct to Main which you should not do obviously but you know how GitHub works so you can solve that part as homework.
Install .NET and MAUI
To start building our MAUI App we first need to pick an Agent Pool that our build service is going to run on, the good news that there really is only 2 mobile devices out there these days Android and iOS and you can build both on a Mac so we will pick that. I will show how to build a Windows version of the App as well but lets start with the Mobile versions first.
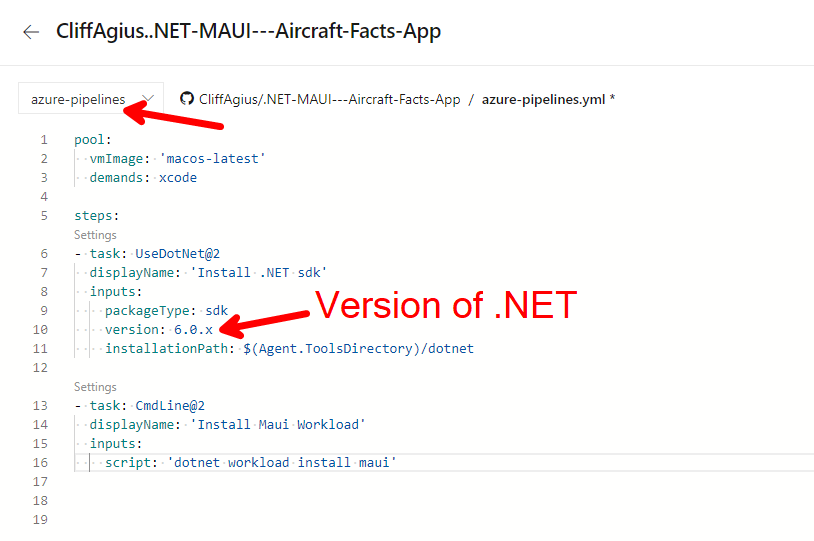
With our initial pipeline we had the default ubuntu vmImage we need to change that for a Mac and I like to use the latest as it means all the versions of xCode are up to date.
pool:
  vmImage: 'macos-latest'
  demands: xcode
Now we have that we want to install .NET and we want also to install the MAUI workload ready to start building our awesome App.
steps:
- task: UseDotNet@2
  displayName: 'Install .NET sdk'
  inputs:
    packageType: sdk
    version: 6.0.x
    installationPath: $(Agent.ToolsDirectory)/dotnet

- task: CmdLine@2
  displayName: 'Install Maui Workload'
  inputs:
    script: 'dotnet workload install maui'
You can see here I have put all this together and saved into a new branch so that as I develop this pipeline there is no issues/conflicts with Github code if a college is doing something which is very nice. The version of dotnet being installed is 6.0.x and this will install the latest version of the SDK and as MAUI is GA it will be in the latest version, of course we could pin to a version by replacing the last x with the actual version we want, this being very handy if there are breaking changes we want to guard against.
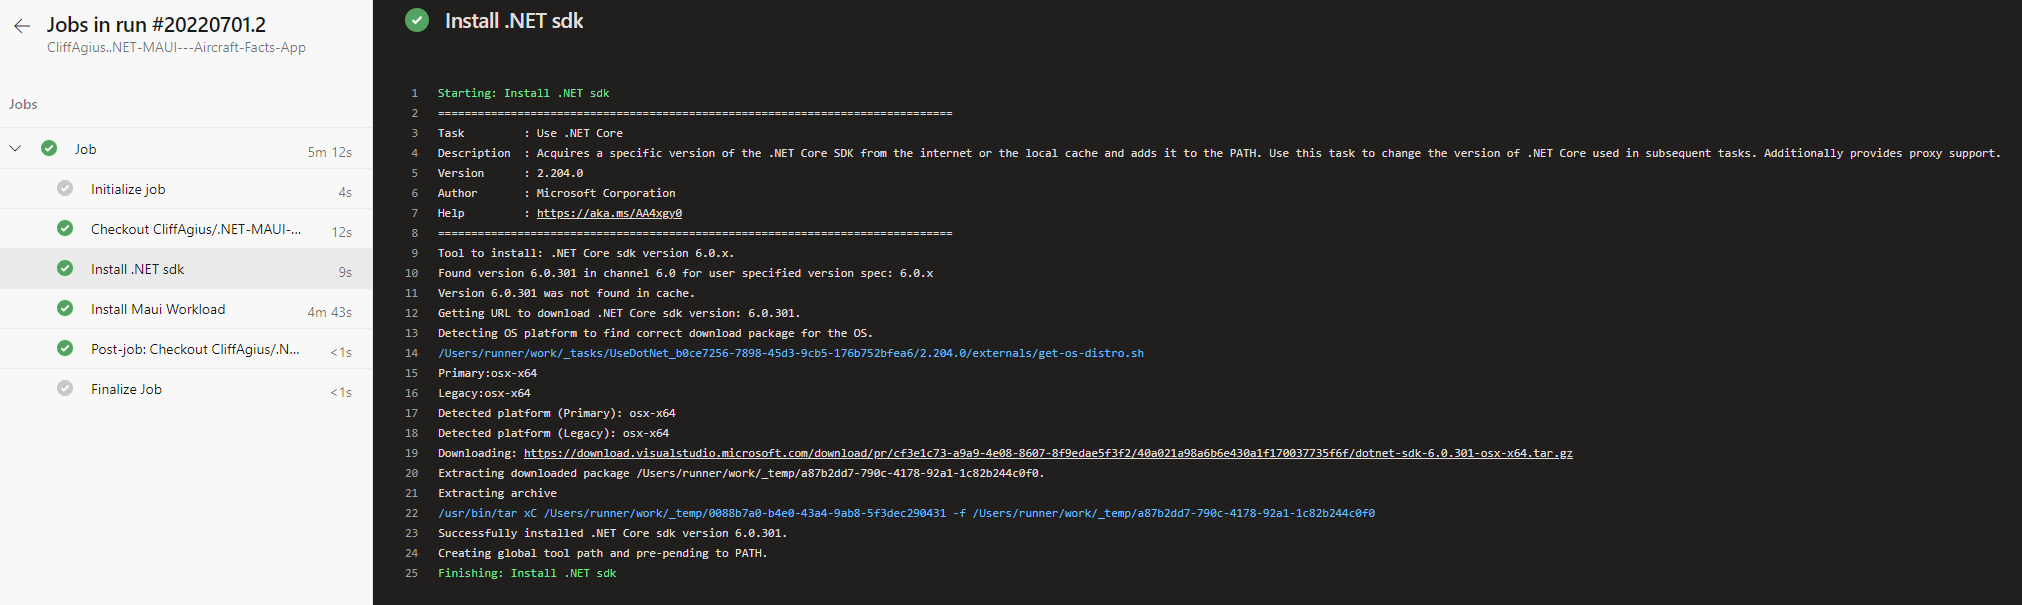
If we save this to a new branch and run we will get a Mac agent to install .NET and the MAUI workload ready for us to build upon with an Android and iOS version of the App and you will I hope have nice green ticks of success…
Lets build for iOS
Ok for no reason really I am picking iOS to start with and will follow on with the next blog post for Android and Windows etc.
For iOS we need to get some parts set-up before we can get the actual build running, if you have done any Xamarin or iOS work then you know the pain that is the Apple certification and provisioning profiles. All of this is beyond the scope of this blog but there are plenty out there and if you really get stuck reach out and I will try and help (Maybe a future blog post!)
So head off and get your Certs and Profiles and come back when your ready, with your P12 and MobileProvision files, just a hint you will need Dev certs at this stage for testing we can swap them out for Store certs later when we do the Releases (A future blog post!)
This is one area that I like about DevOps over GitHub actions and that is we can store our certs/profiles securely without having to commit them to the GitHub Repo which I think is awesome. Our files will be uploaded to Azure and my understanding is that behind the scenes they are stored automagically in Azure KeyVault for you and we then can call them as needed in our YAML for use in our build pipeline.

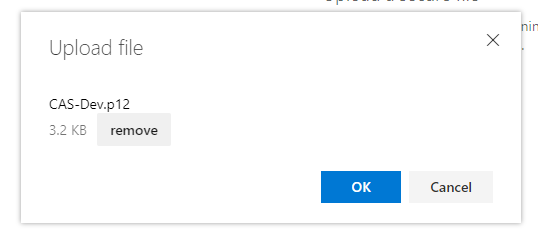
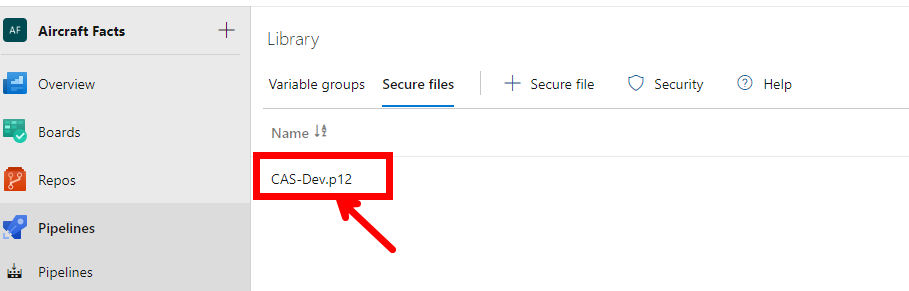
First on the left menu in Azure DevOps select Library and then Secure Files and finally click + Secure File this will open a dialog to upload your P12 or Mobile Provisioning certs you have to do one at a time so here I am doing the P12.
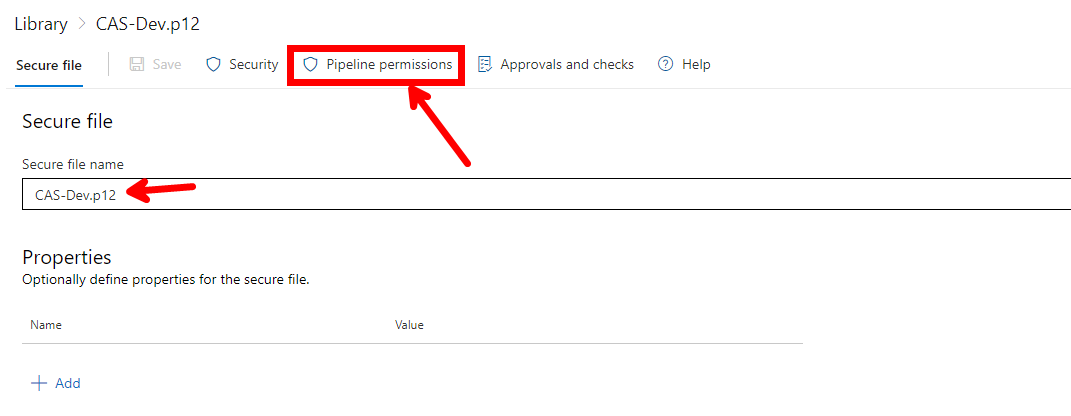
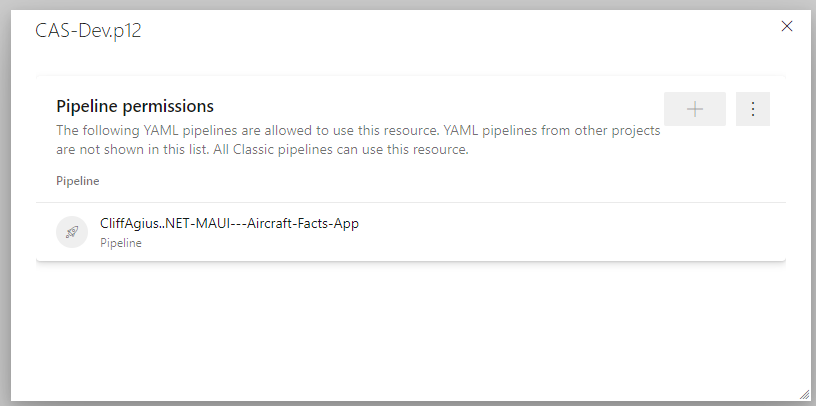
You need to click the name which automatically takes the filename as the default and go into the secure file, here you can rename it if you need but more importantly at the top we need to click the Pipeline Permissions so that we can give our Pipeline the permission to access this secure file. Once you click this a dialog will show where you can add your Pipeline to those permitted.

Do the same for the Mobile Provisioning cert so that both are in your secure files and both have been given access to the pipeline you are building, if you want to read more about adding Secure files you can do so on the Doc pages
Using the certs in YAML
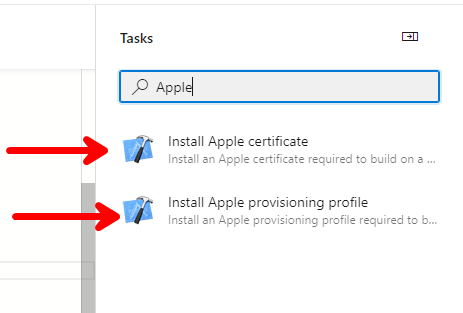
Now we have the Certs for the iOS build in the secure files store we can use them in our YAML so that they can be installed and used during the build on the Mac Agent we have asked to be used. So back to the Pipeline and the YAML we were looking at earlier, make sure your cursor is at the bottom of the current YAML and now on the right side you will see a list of tasks we can use in the assistant and if you type Apple into the search box you will see the two tasks we need.
Picking the Install Apple Certificate we get the entries required for this task the first box is the name of the Secure file as you named it in the above step so for me it’s CAS-Dev.p12 and the 2nd box is asking for the Certificate password.
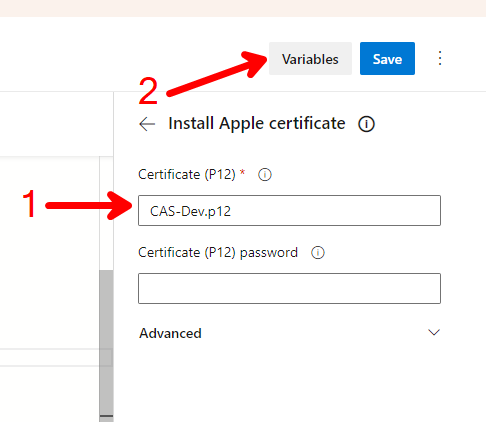
We can just hit the Variable button above and add the password as a secure Variable and this will again be stored for you in Azure KeyVault
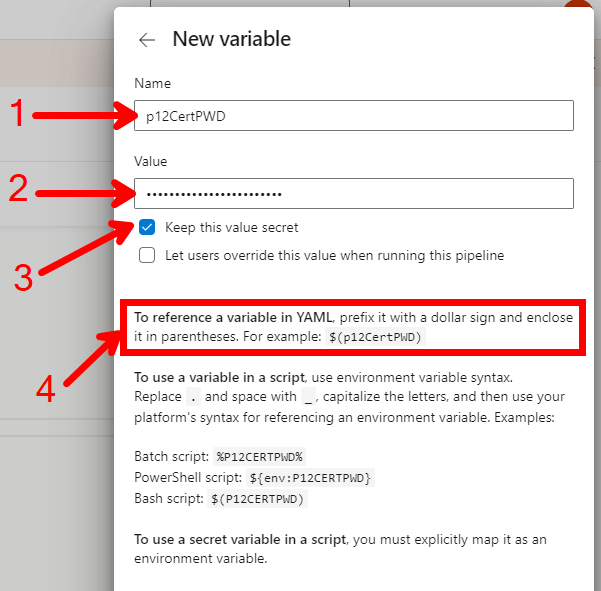
In here we can add a new Variable and then give it a name (Step 1), add the actual password (Step 2) and as we want it to be a secret tick the Keep this value secret (Step 3) and finally as you can see in the box of Step 4 it even tells you what you need to reference the Password in the YAML and the Task Assistant so copy that which here for me is $(p12CertPWD).
Click OK and Save and back on the Task Assistant pane enter the copied value for the password into the password box and hit Add at the bottom this will generate the YAML code needed for adding the cert and it will appear in the editor on the left. Repeat the steps for adding the MobileProvisioning certificate and your YAML should look something like mine. You will notice that I have manually added the 2nd line in the Task for the Display Name as this helps when watching the Build Pipeline running as it gives each task a meaningful name but it’s not needed.
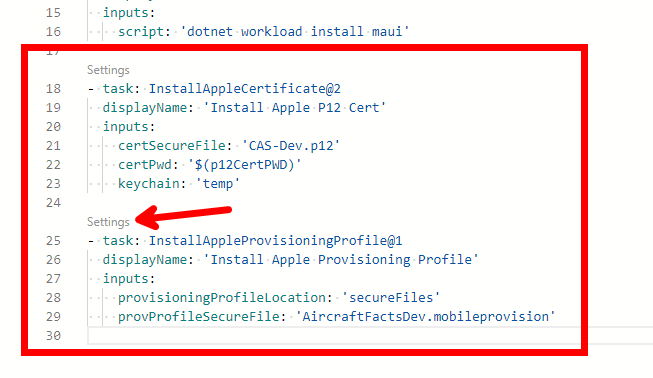
Just a little side note if at any time you want to re-open the Task Assistant to change some of the settings you can click the little Settings link above the section in the YAML.
Lets Build and Publish the iOS App.
Now we have the certs and the Mac build host set-up we can finally build the App, so back to the Task Assistants list on the right and the top one should be DotNET Core (yes I know it’s not really core by name anymore but hey roll with it!) select this and in the settings we need a few things.
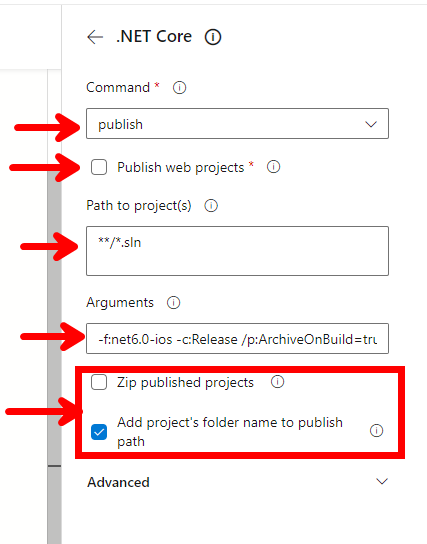
1st Change the Command to Publish as this is what we need for the iOS version, then be sure to untick the Publish Web Projects before entering the path as:
**/*.sln
For the Arguments we need to Tell the .NET CLI that we want it to Publish the Release of the net6.0-ios so use the following:
-f:net6.0-ios -c:Release /p:ArchiveOnBuild=true /p:EnableAssemblyILStripping=false
Finally you need to untick the Zip Published Projects and leave the Add folder name ticked, once you have done this click add at the bottom and the task will be added to the YAML, of course you could just cut and paste this in if you really wanted but where is the fun in that. 😜
- task: DotNetCoreCLI@2
  displayName: 'Build the iOS Binaries'
  inputs:
    command: 'publish'
    publishWebProjects: false
    projects: '**/*.sln'
    arguments: '-f:net6.0-ios -c:Release /p:ArchiveOnBuild=true /p:EnableAssemblyILStripping=false'
    zipAfterPublish: false
Copy files and Drop them out for use.
Now we have a build step that builds our app it will be sitting in the Build Directory on the host machine which is fine the app is built but as soon as the pipeline finishes and the host agent is torn down your build will be lost forever. So we need to copy the file with the Published files and drop them into our Staging Directory where we can use them in the Releases later.
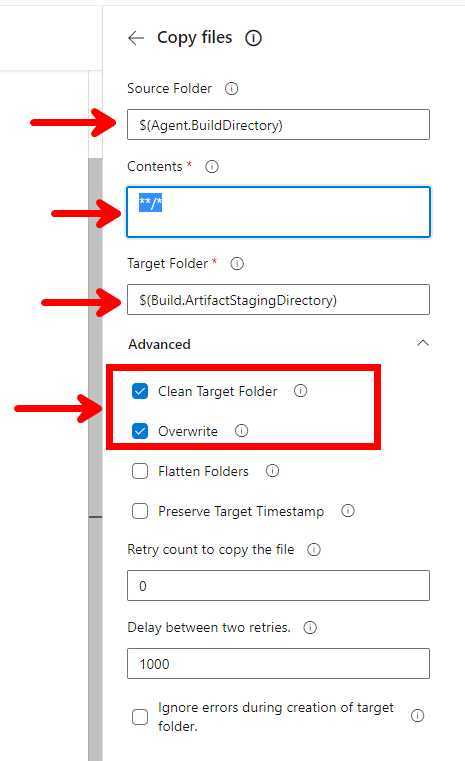
Using the Task Assistant on the right again this time we need the Copy Files task and in here we need in the entry fields (Here is it’s easy to copy and paste for you!):
$(Agent.BuildDirectory)
**/*
$(Build.ArtifactStagingDirectory)
I also tick the checkboxes for the Clean Target Folder and Overwrite yes I know the Overwrite shouldn’t be needed if the folder is empty but hey it’s there so why not.
This will produce the YAML of:
- task: CopyFiles@2
  displayName: 'Copy file from Build to Staging'
  inputs:
    SourceFolder: '$(Agent.BuildDirectory)'
    Contents: '**/*'
    TargetFolder: '$(Build.ArtifactStagingDirectory)'
    CleanTargetFolder: true
    OverWrite: true
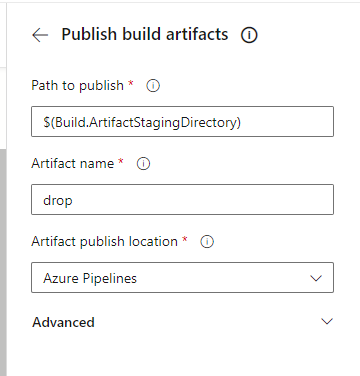
Now we have the files copied from our Build Directory into our staging Directory we need to Publish them into our Container ready for the Release pipeline to send them out into the big bad world. For this we need our last step and from the Task Assistant we can use/search for the Publish build artifacts and in here we don’t actually need to change anything as the defaults should work for us.
This means that we now have a complete YAML file for building the iOS version of our app and just to make life a little easier for you if you just want to Copy&Paste what I have rather than follow all the steps (I know you skipped down to this part really!!) here is the whole YAML file so far.
pool:
  vmImage: 'macos-latest'
  demands: xcode

steps:
- task: UseDotNet@2
  displayName: 'Install .NET sdk'
  inputs:
    packageType: sdk
    version: 6.0.x
    installationPath: $(Agent.ToolsDirectory)/dotnet

- task: CmdLine@2
  displayName: 'Install Maui Workload'
  inputs:
    script: 'dotnet workload install maui'

- task: InstallAppleCertificate@2
  displayName: 'Install Apple P12 Cert'
  inputs:
    certSecureFile: 'CAS-Dev.p12'
    certPwd: '$(p12CertPWD)'
    keychain: 'temp'

- task: InstallAppleProvisioningProfile@1
  displayName: 'Install Apple Provisioning Profile'
  inputs:
    provisioningProfileLocation: 'secureFiles'
    provProfileSecureFile: 'AircraftFactsDev.mobileprovision'

- task: DotNetCoreCLI@2
  displayName: 'Build the iOS Binaries'
  inputs:
    command: 'publish'
    publishWebProjects: false
    projects: '**/*.sln'
    arguments: '-f:net6.0-ios -c:Release /p:ArchiveOnBuild=true /p:EnableAssemblyILStripping=false'
    zipAfterPublish: false

- task: CopyFiles@2
  displayName: 'Copy file from Build to Staging'
  inputs:
    SourceFolder: '$(Agent.BuildDirectory)'
    Contents: '**/*'
    TargetFolder: '$(Build.ArtifactStagingDirectory)'
    CleanTargetFolder: true
    OverWrite: true

- task: PublishBuildArtifacts@1
  displayName: 'Publish the Staging Files.'
  inputs:
    PathtoPublish: '$(Build.ArtifactStagingDirectory)'
    ArtifactName: 'drop'
    publishLocation: 'Container'
Running the Pipeline.
Now we have the YAML completed if you Save and Run in the top right again.
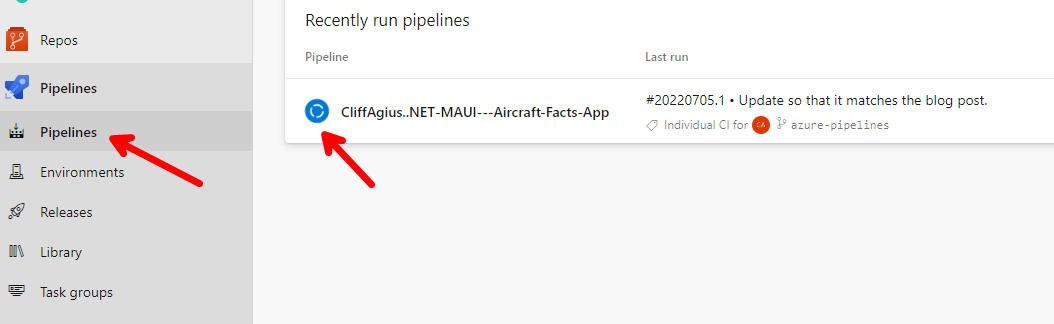
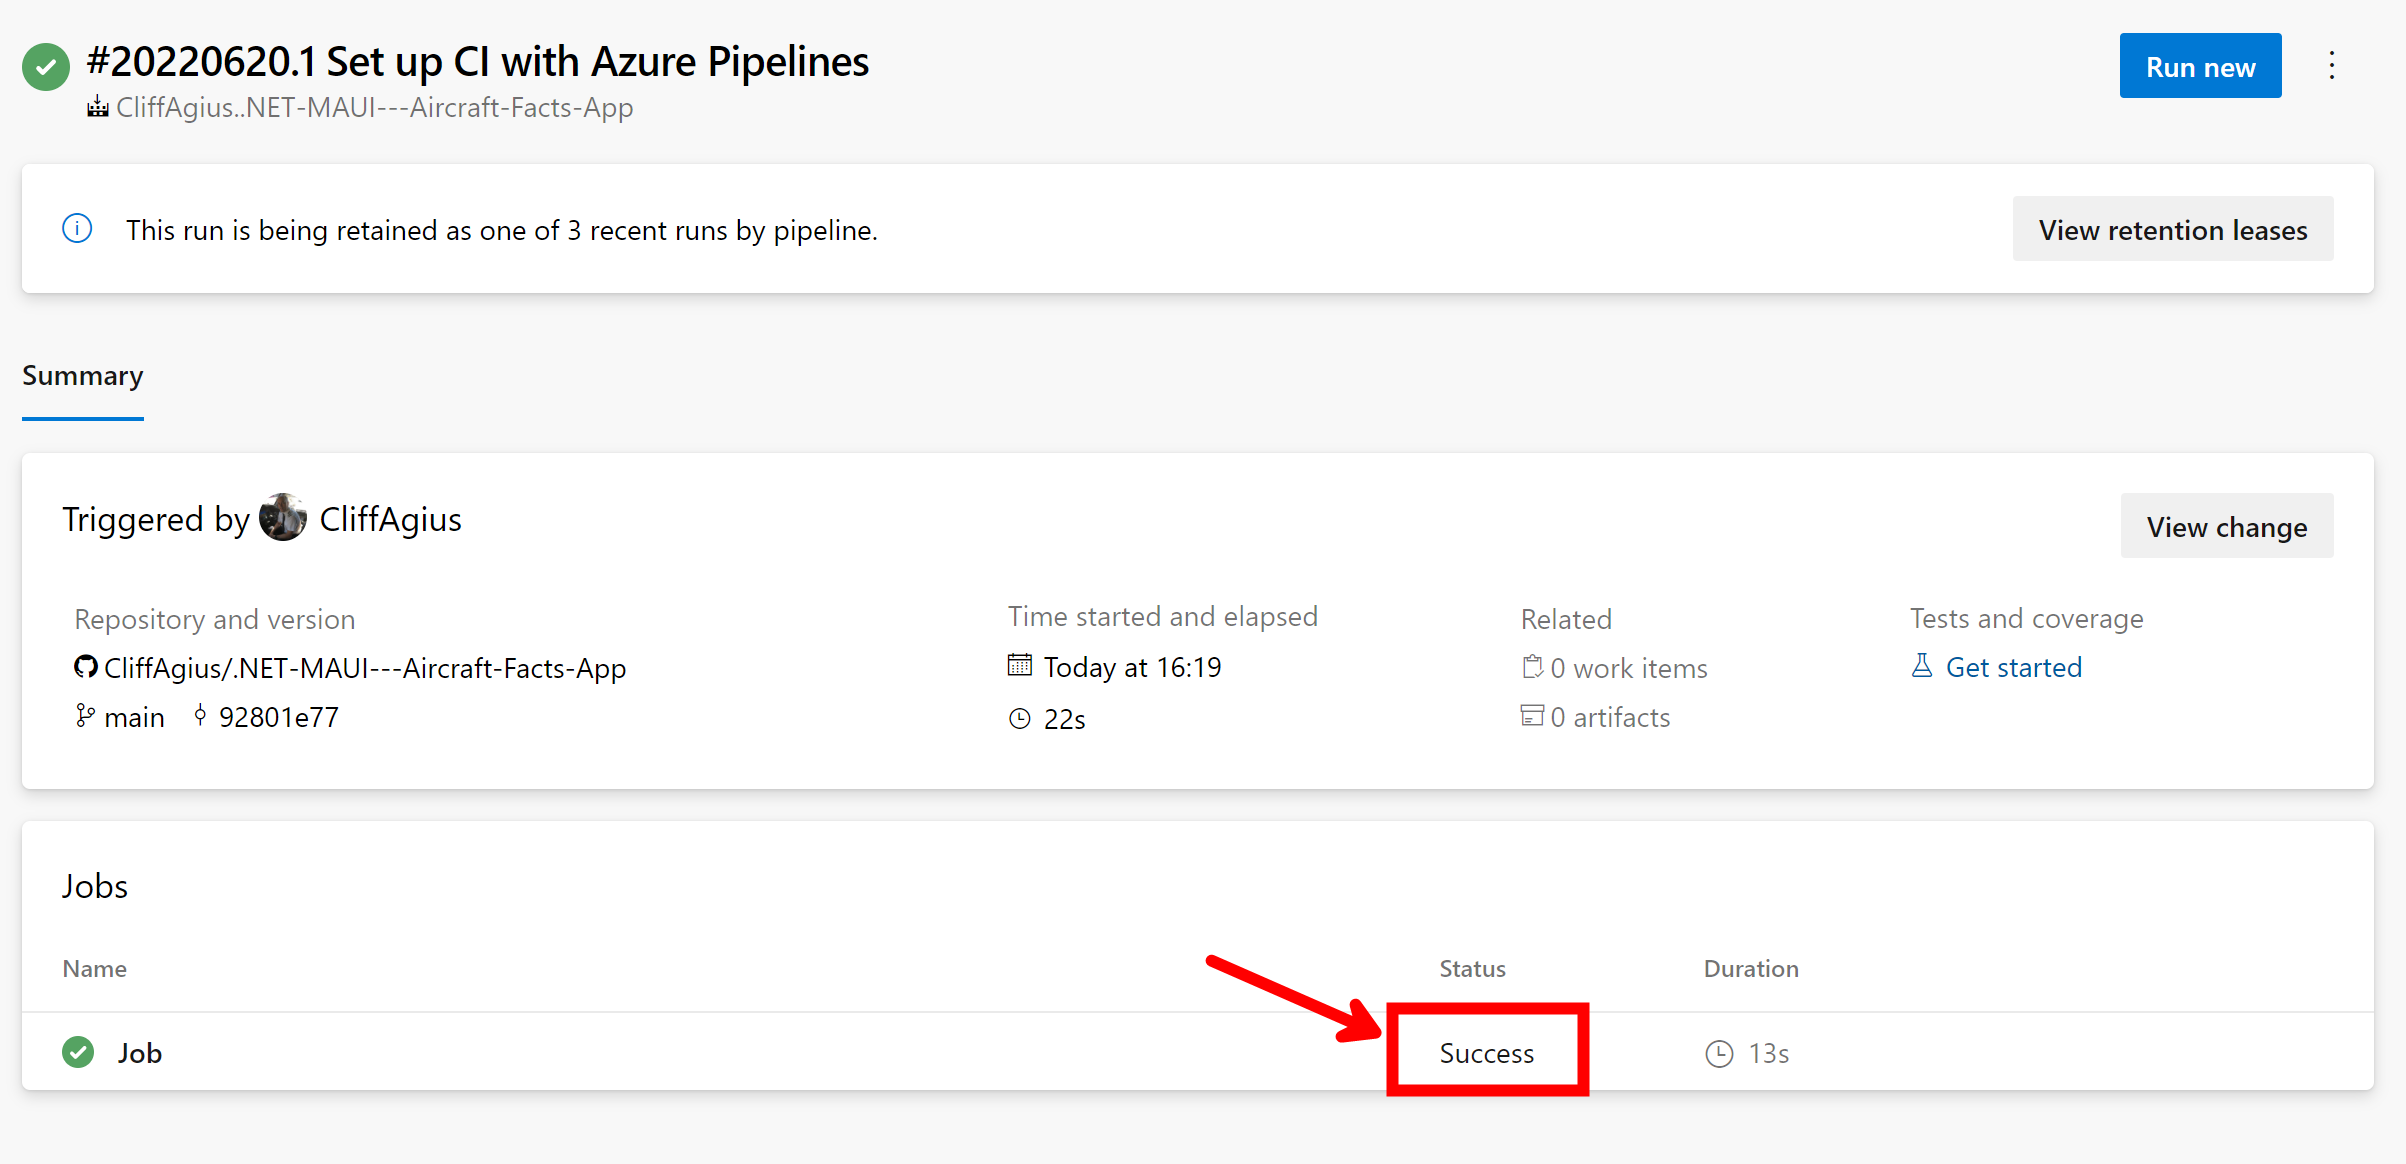
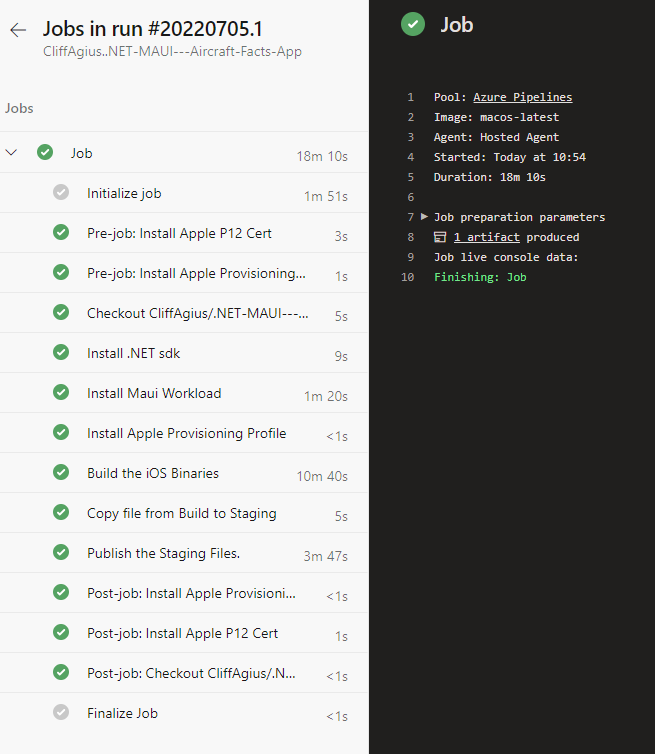
If you then click Pipelines on the left menu and click the blue circle you can then see the list of the runs you have completed with your pipeline and the top one is the latest so click that blue circle and you then see all the steps/tasks from your YAML being run and if you did like me and gave each step a displayName they will show on the left with the progress green ticks as it completes each stage.
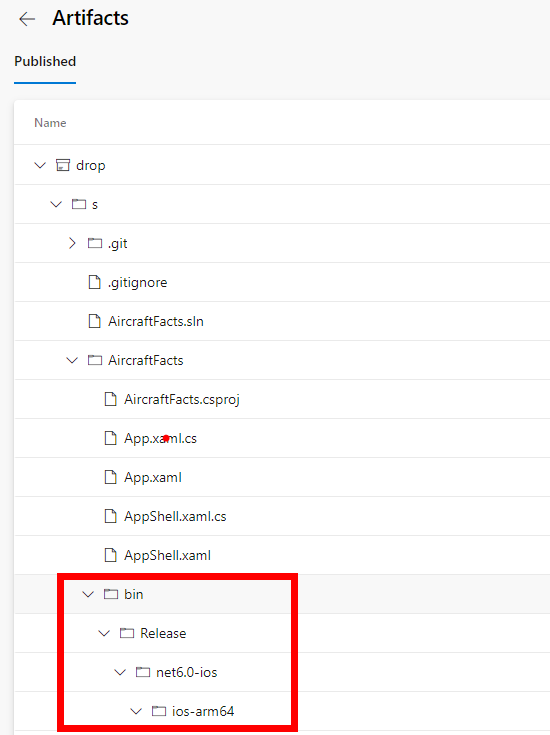
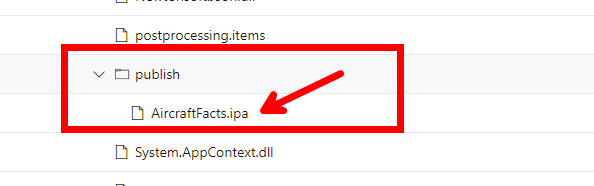
Now that it’s complete where is that iOS IPA file that is our built app? If you hit the back button and see the Summary page you will notice that there is now a Published link hidden in the centre.

Clicking into this we see the Drop folder we created in the last step of the YAML and opening this up and into the bin/release folder if you scroll down to the publish folder you will see the ipa file as promised.
But I got an error!
If when your build is running it fails on the Build the iOS Binaries step as I have named it and you see something like this:

Don’t panic! this is just pointing out that your awesome project is missing some parts from the csproj file, I know this as I fought with this error for a bit and then realised what it actually means so to help you along here is what you need to do.
Inside your project in Visual Studio open the .csproj file by double clicking the project name so for me it’s AircraftFacts and when the csproj page shows for the project scroll to the bottom and add the following lines, save and commit back to your GitHub repo and it should automagically get picked up by Azure DevOps and built and hopefully this time you should get a successful build.
	 <!--Build Targets-->

	<PropertyGroup Condition="$(TargetFramework.Contains('-windows'))">
		<OutputType>WinExe</OutputType>
		<RuntimeIdentifier>win10-x64</RuntimeIdentifier>
	</PropertyGroup>

	<PropertyGroup Condition="$(TargetFramework.Contains('-android')) and '$(Configuration)' == 'Release'" />

	<PropertyGroup Condition="$(TargetFramework.Contains('-ios')) and '$(Configuration)' == 'Release'">
		<RuntimeIdentifier>ios-arm64</RuntimeIdentifier>
		 <!--Only needed when you need entitlements-->
		<CodesignEntitlement>Entitlements.plist</CodesignEntitlement>
	</PropertyGroup>
Using the ipa file.
You could click the file and download it onto an iPhone but that is rather messy and not ideal so in the next blog post we will create a Release Pipeline that will take this and the Android APK files and push them out to the relevant stores while also updating the Certs to distribution certs as needed by the stores.
Conclusion
As you can see this may be a long post but it’s all actually fairly simple and mostly screengrabs, we have built a simple pipeline that will take secure certificate files and use them to build the iOS app on a Mac in the Azure Cloud and I have done all of this from a Windows Machine with no Mac nearby…
In the next post we will add in Android then one on Windows and finally show how to build the Releases to push the various builds to the Stores.
I hope this has helped you and please reach out on twitter if you have any questions/comments.
Happy Coding.